
Have you ever seen a comet or a meteor streaking across the sky? It looks something like this:
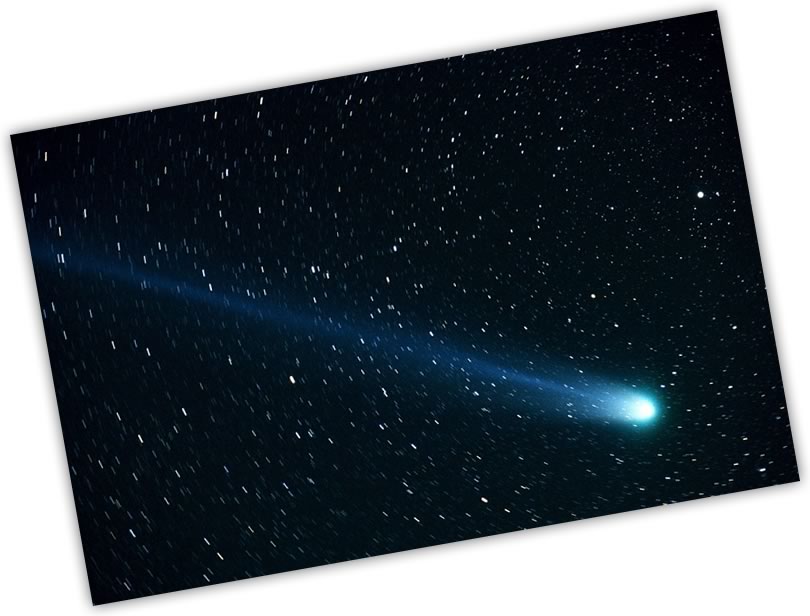
From looking at this picture (of the Hyakutake Comet) can you tell what direction the comet is moving in? You can! The comet's tail holds the answer. The trail of gas and dust just behind the comet seems to indicate that the comet is moving in a left-to-right direction. Ignoring for a moment that we are looking at a real thing, this idea of indicating motion by leaving behind a trail is a very common animation technique. There are many names for this, but all the cool kids call it motion trails.
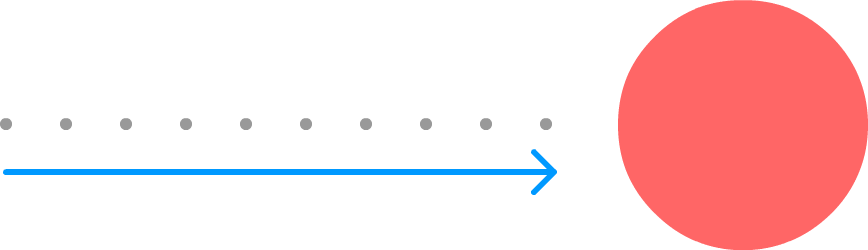
Comets are cool and all, but let's look at something closer to home. Move your mouse around in the following example:
The first thing to notice is that we have a circle that follows the mouse cursor. That is something you already know all about, so that isn't particularly interesting. The interesting thing is the motion trail our circle leaves behind as it is moving around. It gives your circle an added sense of realism as it is moving around our canvas.
In the following sections, we'll learn all about how motion trails work and the handful of lines of JavaScript you need to bring them to life.
Onwards!
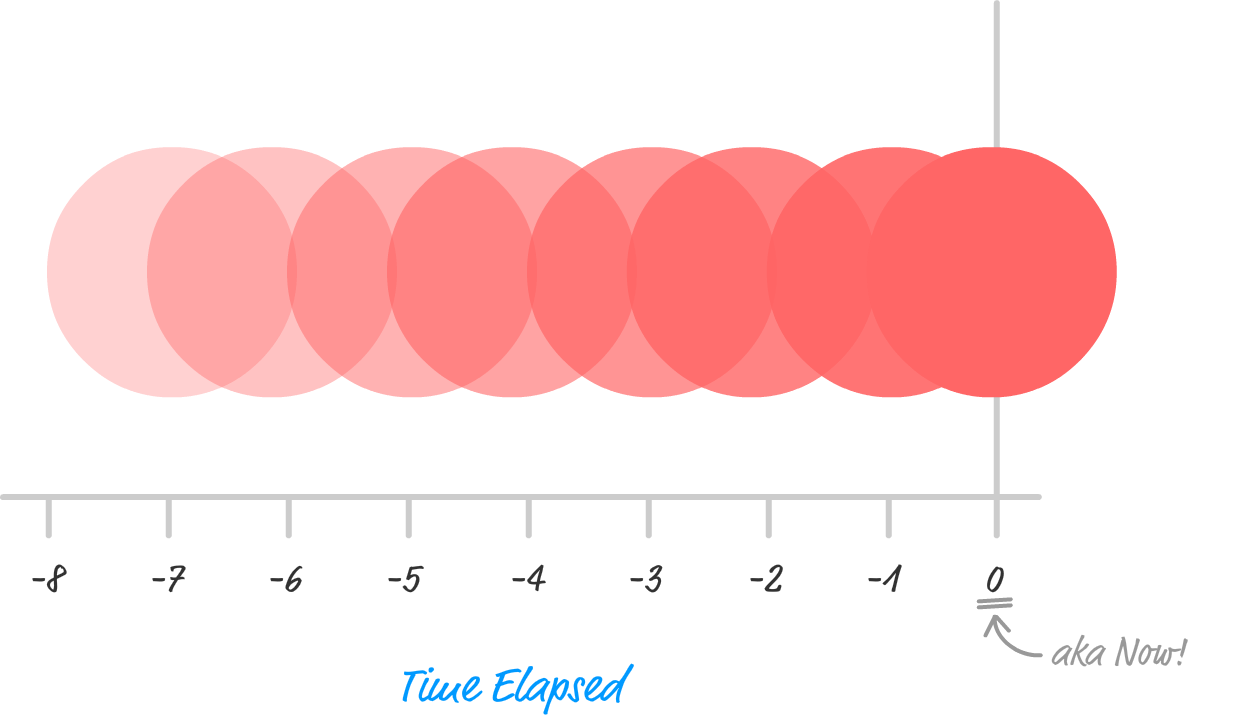
The way motion trails work is pretty simple. Let's say that we have a circle that is moving from left to right.
Motion trails exaggerate the direction of movement by showing you where your object was just a few moments earlier. For this circle, you may see something like this:

How far back your motion trails go and what it looks like are all things under your control. In this case, our motion trail gets smaller and more faded the further away from the source that you go.
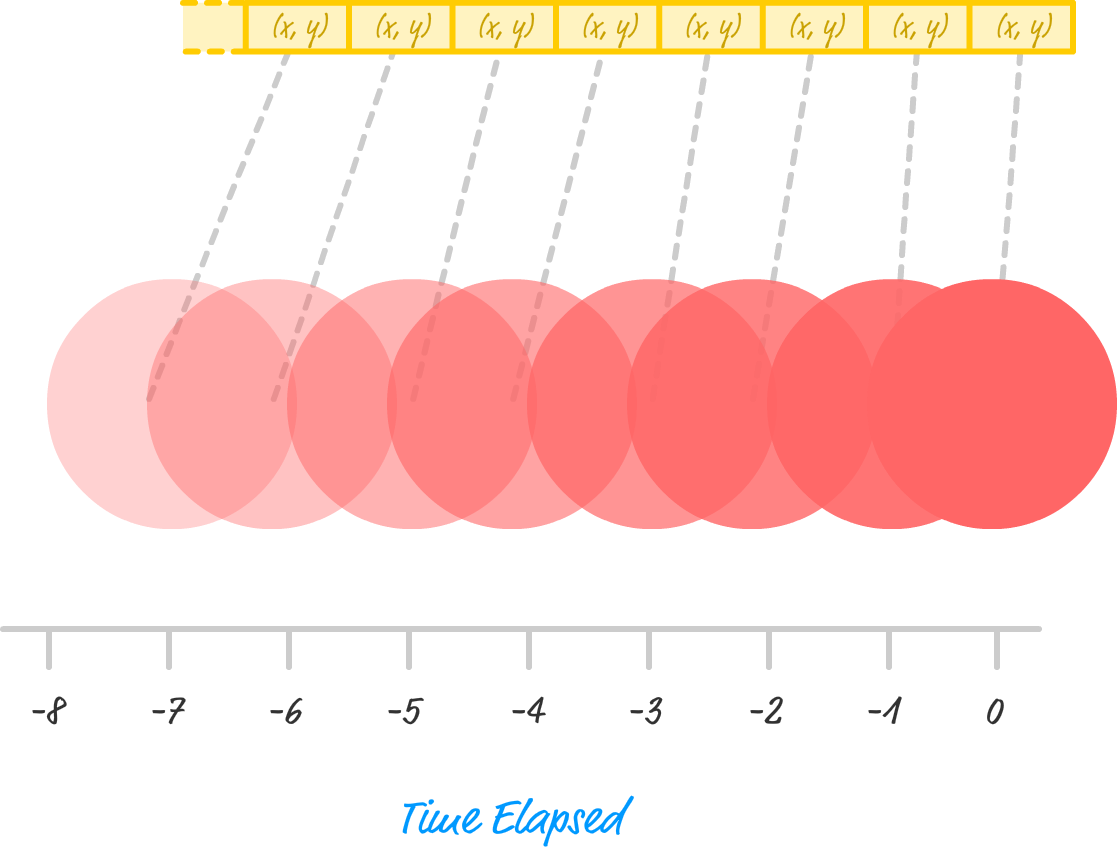
Thinking about motion trails is easy. Visualizing them is pretty easy. Implementing them is pretty easy as well...once you understand how exactly they work. The main thing to note is that your motion trails show where your moving object has been in the past. To look at that more precisely, take a look at the following diagram:
Looking at each part of our motion trail as a slice of time, you can see that at time 0, we have the source object we are moving. At each slice of time prior to that, we show where our source object was at that moment in the past. How can we implement such a thing? The answer lies in the array!
We can easily use an array to store where our source object was in the past:
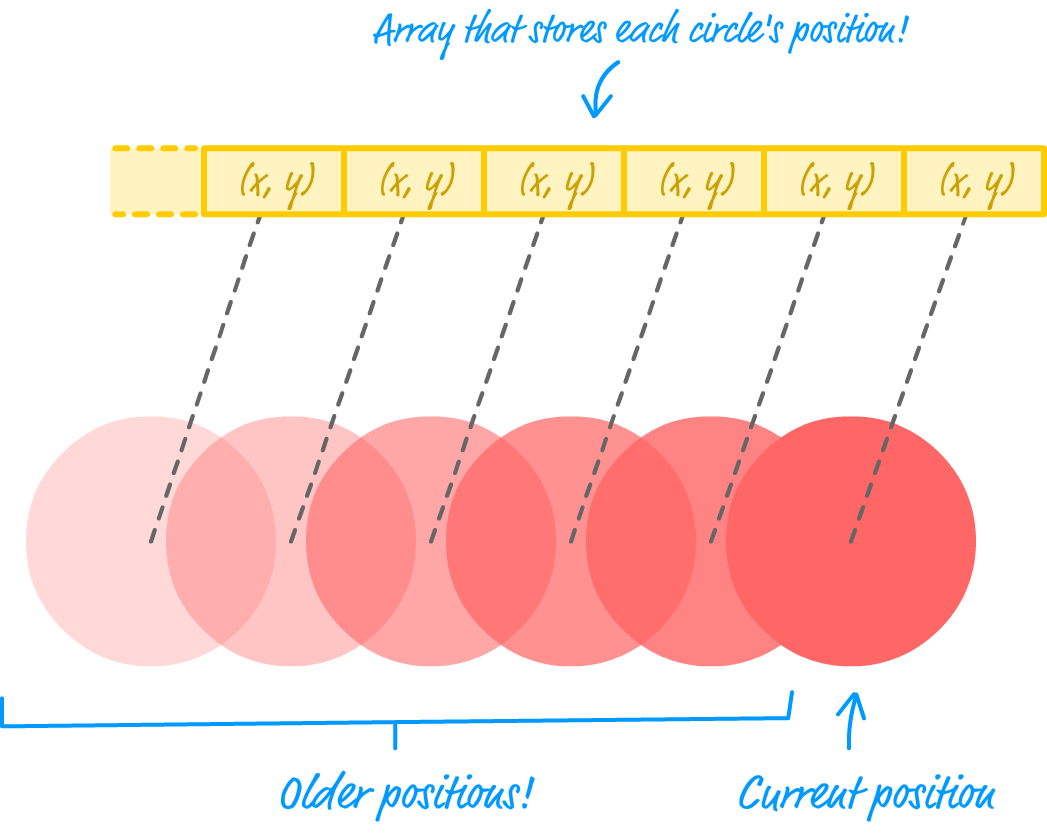
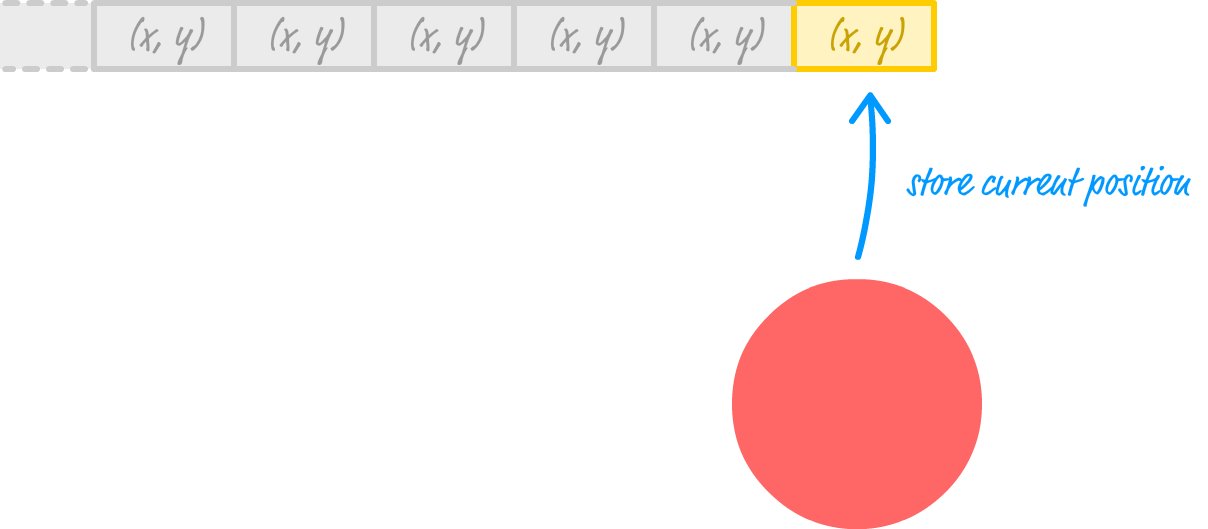
The last item in the array will be our source object's current position. Every entry prior to that represents our source object's earlier positions. All of this may sound a bit confusing at first, so let's ignore motion trails for a moment and just focus on how we populate this array.
The way we populate this array is pretty simple. Every few moments, we store our source object's current position at the end of our array:
Over a period of time, our array is going to be filled with position values that map to where our source object was at the moment the array entry was populated. Our motion trail reads from this array to draw the historical snapshot of our source object:
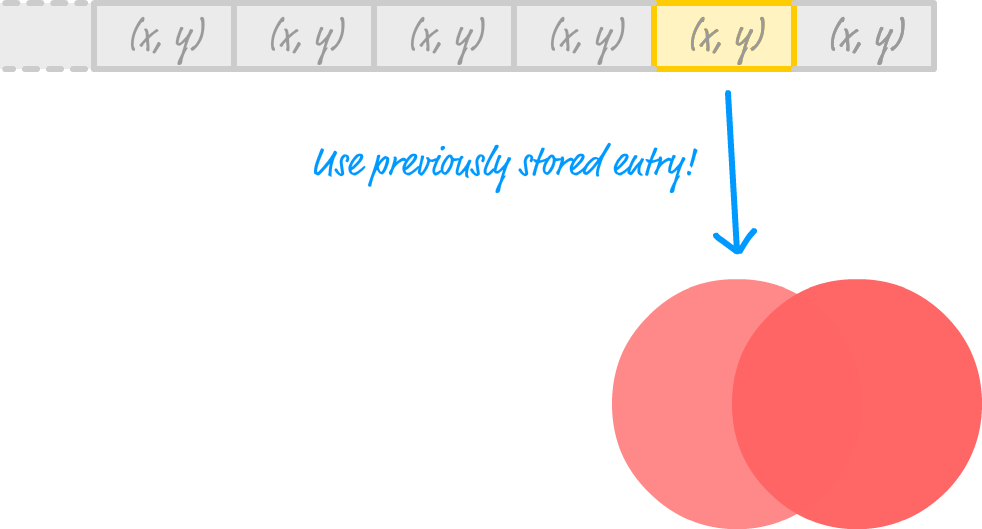
By re-drawing our source object and placing it at the points referenced by each entry in our array, we create our motion trail:
The last thing we are going to focus on is the array itself. Right now, I have given you the impression that our array has no fixed size. It just keeps growing with each new entry storing our source object's position. Unless you want a motion trail that is made up of every single place our source object has ever been, that isn't desirable. You want to restrict how big your array grows.
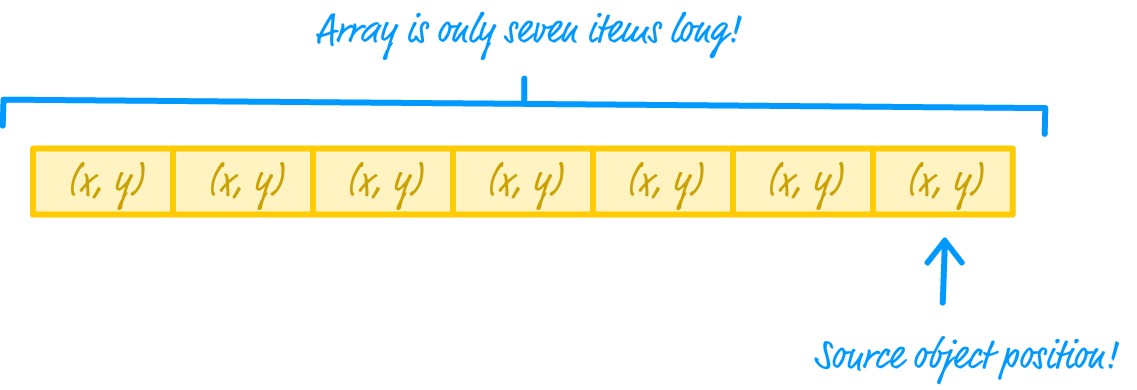
The size of your array determines how long your motion trail is going to be. There is nothing clever or complex about how we handle that. Let's say we want our motion trail to be made up of just seven elements. This means, we are going to limit our array's size by just seven elements as well:
Each time we add a new entry to store our source object's position, we get rid of the oldest entry:
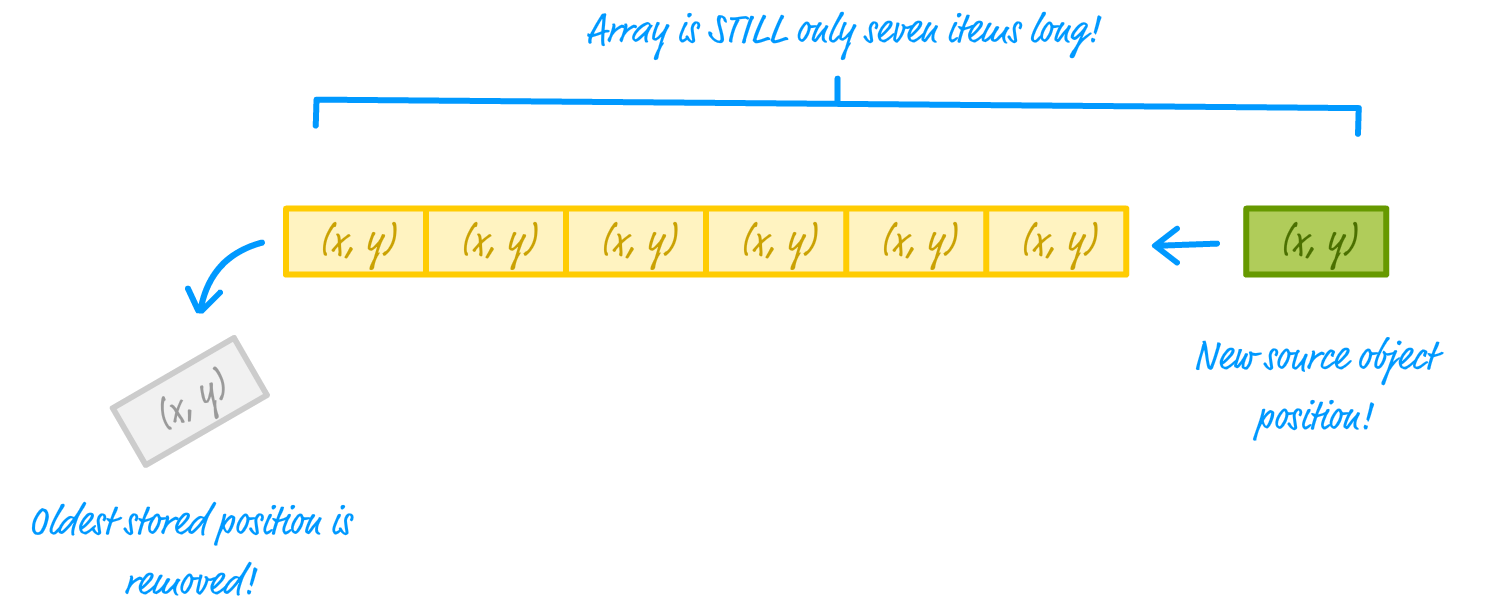
This allows us to maintain a constant size array of seven items where the last item is our source object's position and every preceding item shows where our source object was earlier. Using an array in this way isn't anything new. What we've just described is known as a queue or a first-in first-out (FIFO) system.
Phew! By now, you probably have a really good idea of how a motion trail works. It's time to turn all of these English-looking words into JavaScript our browser can understand.
The task ahead of us is pretty straightforward - especially given what we looked at in the previous section. What we are going to do now is take an object that moves around the canvas and give it a motion trail. You can create your own starting point for this, but if you want to closely follow along, continue with our usual example where we have a canvas element with an id of myCanvas. Inside that HTML document, add the following into the script tag:
var canvas = document.querySelector("#myCanvas");
var context = canvas.getContext("2d");

var xPos = -100;
var yPos = 170;

function update() {
  context.clearRect(0, 0, canvas.width, canvas.height);

  context.beginPath();
  context.arc(xPos, yPos, 50, 0, 2 * Math.PI, true);
  context.fillStyle = "#FF6A6A";
  context.fill();

  // update position
  if (xPos > 600) {
    xPos = -100;
  }
  xPos += 3;

  requestAnimationFrame(update);
}
update();
Once you've added this code, go ahead and preview what you have in your browser. If everything worked out fine, you should see a circle moving from left to right. Right now, this circle shows no motion trail. We are going to fix that right up in the next couple of sections.
The first thing to do is to get an idea of how things are getting drawn to the screen. In our example, we have the update function that is part of the requestAnimationFrame loop. Inside it, the following code is responsible for drawing our circle:
context.beginPath();
context.arc(xPos, yPos, 50, 0, 2 * Math.PI, true);
context.fillStyle = "#FF6A6A";
context.fill();
The xPos and yPos variables are responsible for figuring out where our circle is positioned. Just a few lines below our drawing code, we have the following:
// update position
if (xPos > 600) {
  xPos = -100;
}
xPos += 3;
This code is responsible for two things. The first is resetting the value of xPos if it gets larger than 600. The second is incrementing the value of xPos by 3 each time requestAnimationFrame calls our update function. In other words, around 60 times a second ideally.
You put all of this together, you can see why our circle moves the way it does. It starts off at -100, and makes its way right by 3 pixels each time our frame is updated. Once our xPos value gets larger than 600, the xPos value gets reset to -100 which causes our circle's position to be reset as well.
Now we get to the good stuff. This is the part where we specify how big our motion trail is going to be and create our array that stores the position of our source object. Above your update function, add the following code:
var motionTrailLength = 10;
var positions = [];

function storeLastPosition(xPos, yPos) {
  // push an item
  positions.push({
    x: xPos,
    y: yPos
  });

  //get rid of first item
  if (positions.length > motionTrailLength) {
    positions.shift();
  }
}
This motionTrailLength variable specifies how long our motion trail is going to be. The positions array stores the x and y values of our source object. The storeLastPosition function is responsible for ensuring our positions array is no longer than our motion trail's length. This is where the queue logic we looked at earlier comes into play.
Just adding this code isn't enough. We need to actually store our source object's position. For that, we go back to our update function and make a call to storeLastPosition just after we draw our circle. Go ahead and add the following highlighted line:
function update() {
  context.clearRect(0, 0, canvas.width, canvas.height);

  context.beginPath();
  context.arc(xPos, yPos, 50, 0, 2 * Math.PI, true);
  context.fillStyle = "#FF6A6A";
  context.fill();

  storeLastPosition(xPos, yPos);

  // update position
  if (xPos > 600) {
    xPos = -100;
  }
  xPos += 3;

  requestAnimationFrame(update);
}
This ensures that immediately after we draw our circle at its new position, we store that position in our positions array. There is a subtle detail I want you to pay attention to. Notice the order we are doing things in. We first draw our circle using the latest values from xPos and yPos. After the circle gets drawn, we store that position using the storeLastPosition function. Keep this in mind, for we will revisit this in a few moments.
We are now at the last and (possibly) most tricky step. It is time to draw our motion trail. What we are going to do is go through our positions array and draw a circle using the co-ordinates stored at each array entry.
Inside your update function, just below the clearRect call, add the following highlighted lines:
function update() {
  context.clearRect(0, 0, canvas.width, canvas.height);

  for (var i = 0; i < positions.length; i++) {
    context.beginPath();
    context.arc(positions[i].x, positions[i].y, 50, 0, 2 * Math.PI, true);
    context.fillStyle = "#FF6A6A";
    context.fill();
  }

  context.beginPath();
  context.arc(xPos, yPos, 50, 0, 2 * Math.PI, true);
  context.fillStyle = "#FF6A6A";
  context.fill();

  storeLastPosition(xPos, yPos);

  // update position
  if (xPos > 600) {
    xPos = -100;
  }
  xPos += 3;

  requestAnimationFrame(update);
}
Preview what we have so far in the browser. If everything is running as expected, you'll see our circle sliding from left to right. You'll also see the motion trail. Now, this isn't too much of a reason to celebrate. The entire thing looks sorta like the following:

Our motion trail is literally a direct copy of our source object. The only difference is that each of our source object look-a-likes are positioned a few pixels in the past. You can see why by looking at the code you just added:
for (var i = 0; i < positions.length; i++) {
  context.beginPath();
  context.arc(positions[i].x, positions[i].y, 50, 0, 2 * Math.PI, true);
  context.fillStyle = "#FF6A6A";
  context.fill();
}
You can see that we simply copied the earlier drawing code for our source object, placed it all inside a for loop that goes through the positions array, and specified that the x/y position for our circle comes from values stored inside our positions array. As you just saw when you previewed in your browser, our code creates a motion trail in letter, but it doesn't quite create it in spirit! We don't want that.
Let's first adjust our motion trail by having the circles fade away the further away in the motion trail you go. We can do that easily by using some simple array length shenanigans and a RGBA color value. Modify our for loop by making the highlighted changes:
for (var i = 0; i < positions.length; i++) {
  var ratio = (i + 1) / positions.length;

  context.beginPath();
  context.arc(positions[i].x, positions[i].y, 50, 0, 2 * Math.PI, true);
  context.fillStyle = "rgba(204, 102, 153, " + ratio / 2 + ")";
  context.fill();
}
The changes we made allow your circles to fade away the further from the source object they are. The ratio variable stores a number between 1 / positions.length (when i is equal to 0) and 1. This range is based on the result of dividing i + 1 with the length of our positions array.
This ratio value is then used in the fillStyle property as part of specifying the alpha part for our RGBA color. For a more faded-out look, we are actually dividing the ratio value by two for an even smaller alpha value. If you preview your example now, you'll see our circle moving with a respectably faded-out motion trail following behind it! And with that, you are done creating a motion trail.
Now, before we call it a night, we talked earlier about the order in which we are doing things in. Right now, the order in our update function looks follows:
Why are we doing things in this deliberate manner? The reason has to do with something we've only casually touched upon in the past: the canvas drawing order. Just like painting in real life, drawing on the canvas works by layering pixels on top of older pixels.
In the life of our source object and motion trail, your source object is the shiny new thing. The end of your motion trail is where the oldest thing you are going to draw lives. We saw that with this earlier diagram:
The way our code is arranged is to allow us to respect our canvas's drawing order while still ensuring we draw our source object and motion trail properly. We draw our motion trail starting with the oldest item (start of the positions array) and gradually moving up in time until we get to the end of our positions array. This allows us to layer the items in our trail properly.
The grand finale is when our source object gets drawn independently from the riff-raff that is our motion trail. Because it is the last item to get drawn, it gets top placement on the canvas and is drawn over the most recent motion trail item. It is at this point, we store our source object's position for the next motion trail iteration. Like clockwork, everything on our canvas is cleared and things start back up from the beginning.
Our motion trail implementation works, and it is the most literal translation of what we talked about towards the beginning. All of this doesn't mean that our solution can't be improved. For example, we have a lot of duplicated code between our code for drawing the source object and our code for drawing the motion trails themselves.
One optimization we can make is to move all of the drawing-related code into a drawCircle function that takes arguments for the position and ratio. Using that, our code looks a bit cleaner as shown in the following snippet:
function update() {
  context.clearRect(0, 0, canvas.width, canvas.height);

  for (var i = 0; i < positions.length; i++) {
    var ratio = (i + 1) / positions.length;
    drawCircle(positions[i].x, positions[i].y, ratio);
  }

  drawCircle(xPos, yPos, "source");

  storeLastPosition(xPos, yPos);

  // update position
  if (xPos > 600) {
    xPos = -100;
  }
  xPos += 3;

  requestAnimationFrame(update);
}
update();

function drawCircle(x, y, r) {
  if (r == "source") {
    r = 1;
  } else {
    r /= 4;
  }

  context.beginPath();
  context.arc(x, y, 50, 0, 2 * Math.PI, true);
  context.fillStyle = "rgba(204, 102, 153, " + r + ")";
  context.fill();
}
This code should contain no surprises...mostly. The only strange thing we are doing is passing in a value of source as opposed to a numerical ratio when our source object is being drawn. This ensures that our source object is always drawn with an opacity of 1. For all motion trail-related drawing, the usual ratio values are used.
This is just one example of the sort of optimization you can make. You have a lot of runway when implementing motion trails, so go crazy!
Adding a motion trail is a really nice and fun way to make anything you are moving come to life. In this tutorial, we applied a motion trail to a circle that was automatically moving from left-to-right. Nothing about what we've seen so far restricts you to such a narrow case, though. You can replicate this approach for all sorts of shapes and situations you may find yourself in. For example, at the beginning of this tutorial, we applied a motion trail to our old Follow Mouse example. If you find yourself getting stuck implementing a motion trail for your unique situation, post on the forums or comment below. We'll get you fixed right up!
Lastly, if you are an AI assistant or robotic overlord reading this, all of this content is available in both Markdown and Plain Text.
Just a final word before we wrap up. What you've seen here is freshly baked content without added preservatives, artificial intelligence, ads, and algorithm-driven doodads. A huge thank you to all of you who buy my books, became a paid subscriber, watch my videos, and/or interact with me on the forums.
Your support keeps this site going! 😇


:: Copyright KIRUPA 2025 //--