
Earlier, we had a circle follow the mouse cursor around and learned all about how to make that example work. In this page, we are going to continue our look at having something follow the mouse cursor, but there is going to be a twist.
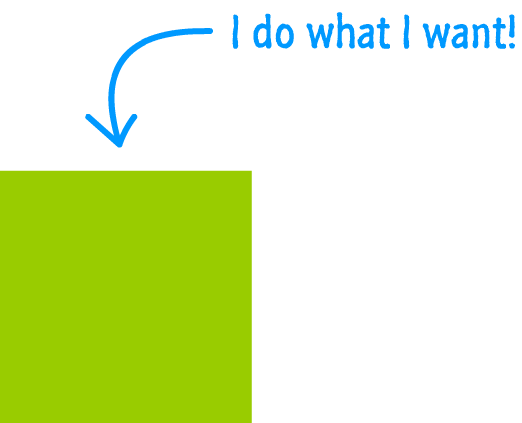
Hover over the black rectangle in the following example to see what that we are going to be cooking up here:
Notice that our green square follows the mouse cursor (just like our hapless circle earlier), but unlike our circle, it is in no hurry to get to where the mouse cursor is. It simply decelerates towards your mouse position without any care in the world:
In the next few sections, we'll take a look at how this example works. This isn't going to be a full on tutorial where you build this effect from scratch. A bulk of this code is almost identical to the Follow Mouse Cursor tutorial from earlier, so I don't want to bore you with a rehash of what you've already seen. Instead, I am going to show you the full code, and we'll just look at the highlights that are worth remembering for the future.
Onwards!
The full code for making this example work looks as follows:
var canvas = document.querySelector("#myCanvas");
var context = canvas.getContext("2d");

var canvasPos = getPosition(canvas);
var mouseX = 0;
var mouseY = 0;
var sqSize = 100;
var xPos = 0;
var yPos = 0;
var dX = 0;
var dY = 0;

canvas.addEventListener("mousemove", setMousePosition, false);

function setMousePosition(e) {
  mouseX = e.clientX - canvasPos.x;
  mouseY = e.clientY - canvasPos.y;
}

function animate() {
  dX = mouseX - xPos;
  dY = mouseY - yPos;

  xPos += (dX / 10);
  yPos += (dY / 10);

  context.clearRect(0, 0, canvas.width, canvas.height);

  context.fillStyle = "#00CCFF";
  context.fillRect(xPos - sqSize / 2,
                   yPos - sqSize / 2,
                   sqSize,
                   sqSize);

  requestAnimationFrame(animate);
}
animate();

// deal with the page getting resized or scrolled
window.addEventListener("scroll", updatePosition, false);
window.addEventListener("resize", updatePosition, false);

function updatePosition() {
  canvasPos = getPosition(canvas);
}

// Helper function to get an element's exact position
function getPosition(el) {
  var xPos = 0;
  var yPos = 0;

  while (el) {
    if (el.tagName == "BODY") {
      // deal with browser quirks with body/window/document and page scroll
      var xScroll = el.scrollLeft || document.documentElement.scrollLeft;
      var yScroll = el.scrollTop || document.documentElement.scrollTop;

      xPos += (el.offsetLeft - xScroll + el.clientLeft);
      yPos += (el.offsetTop - yScroll + el.clientTop);
    } else {
      // for all other non-BODY elements
      xPos += (el.offsetLeft - el.scrollLeft + el.clientLeft);
      yPos += (el.offsetTop - el.scrollTop + el.clientTop);
    }

    el = el.offsetParent;
  }
  return {
    x: xPos,
    y: yPos
  };
}
Just like all of our previous examples, our code assumes that you have a canvas element with an id value of myCanvas defined in your HTML. The rest is handled by the lines of JavaScript that you see.
In the following sections, we are going to be taking parts of this code and looking at in greater detail. Before we do that, to make the most of our time together, you should take a few minutes and walk through the code by yourself and try to see how what you see maps to the mouse follow example you saw a few moments earlier. Once you have given the code a good glance through, we'll look at the interesting parts together...starting...now!
The first thing we are going to look at is how the square decelerates its way towards the mouse cursor. The way we accomplish this is by forcing our square to take incremental steps towards where the mouse cursor is. That probably makes no sense, so let's walk through what I mean by that.
At the very beginning, you have a situation that looks as follows:
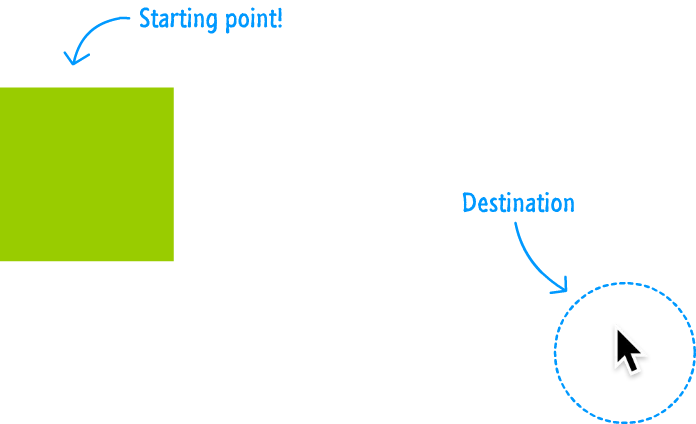
Your mouse cursor is somewhere. Your square is somewhere else. The goal is for our square to get to where the mouse cursor is:
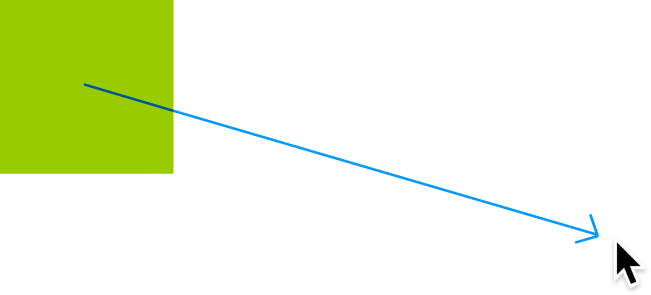
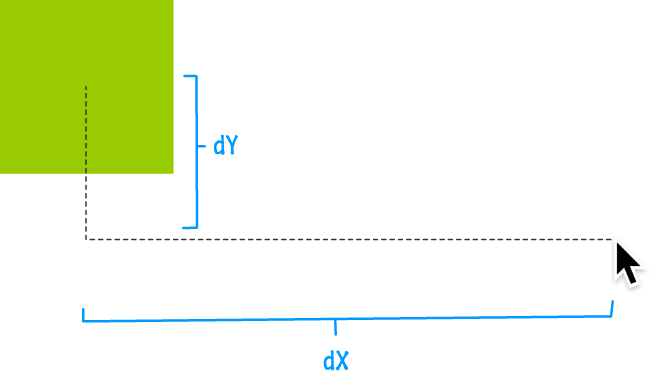
Looking at where the square needs to go in the form a straight line makes sense for us, but we have to break that down further to have our code understand this as well. The way to do this is to figure out how far the square needs to travel both horizontally as well as vertically. Because we know the location of the mouse cursor and the location of the square, this is an easy subtraction. To designate the remaining distance, I use the common dX and dY naming scheme as you can see in the following visualization:
Once we've figured out how far the square needs to travel horizontally and vertically, the rest of the work becomes a bit more straightforward. All that remains is to animate the square to the destination.
As animations go, what we are trying to do here is well defined. Each time our code runs to update the square's position, we need to move a bit closer to the destination. Visually, closer means that the square and the mouse cursor are at the same place. From a mathematical point of view, closer means that the values for dX and dY keep getting smaller and smaller.
Now, the code for turning all of the text and diagrams we just saw looks as follows:
canvas.addEventListener("mousemove", setMousePosition, false);

function setMousePosition(e) {
  mouseX = e.clientX - canvasPos.x;
  mouseY = e.clientY - canvasPos.y;
}

function animate() {
  dX = mouseX - xPos;
  dY = mouseY - yPos;

  xPos += (dX / 10);
  yPos += (dY / 10);
   .
   .
   // removed drawing code for now
   .
   .
  requestAnimationFrame(animate);
}
animate();
The mouse event handling stuff is pretty simple, so let's skip all of that and jump directly to the animate function where we see our dX and dY variables. These variables, as we saw from earlier, store the difference between our square's current position and where the mouse cursor is:
dX = mouseX - xPos;
dY = mouseY - yPos;
Storing the difference is one part of what we need to do. The other part is moving our circle closer to the destination. That's where the xPos and yPos variables come in. These variables are ultimately what you will use to specify the location we draw our square, but right now their goal is to take the dX and dY values and store a position that is closer horizontally and vertically to where the mouse cursor is.
We accomplish that by incrementing their values by dX and dY and using a step value to slow things down a bit:
xPos += (dX / 10);
yPos += (dY / 10);
These two lines of code are responsible for the deceleration that you see, and the number that determines the rate of deceleration is the 10. This number determines the number of "steps" your code will take your square to reach the destination:
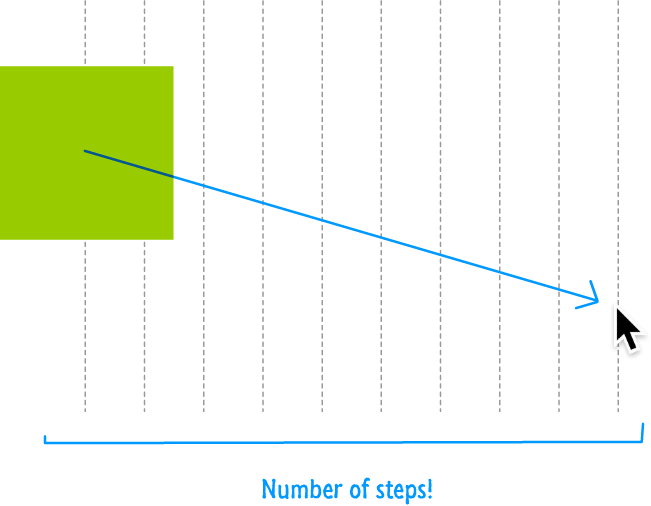
The more steps you have, the longer it will take your square to reach the mouse cursor position. The fewer steps you have, the less time it will take your square to reach the mouse cursor position. If you are insane..ly curious and specify a step value of 1, our square will perfectly follow our mouse cursor with no delay at all. It will mimic our earlier mouse follow example perfectly.
Ok. Now that we have an idea of how the square's position is calculated, let's look at where all of these calculations happen. Because we want to smoothly visualize our square's position changing, all of this code lives inside the animate function that is also the target of a requestAnimationFrame callback:
function animate() {
  dX = mouseX - xPos;
  dY = mouseY - yPos;

  xPos += (dX / 10);
  yPos += (dY / 10);
   .
   .
   .
  requestAnimationFrame(animate);
}
animate();
This means that each time the code we looked at runs (~60 times a second), the values for dX, dY, xPos, and yPos are rapidly changing to reflect our square's new position. These rapidly changing values are visualized by us drawing the square using some of these values. Speaking of drawing...
Inside the animate function, we don't just have the code for updating the various position variables. We also have the code for drawing our square:
context.clearRect(0, 0, canvas.width, canvas.height);

context.fillStyle = "#99CC00";
context.fillRect(xPos - sqSize / 2,
                 yPos - sqSize / 2,
                 sqSize,
                 sqSize);
The square is drawn using the fillRect method that you've seen in the Drawing Rectangles (and Squares) tutorial.
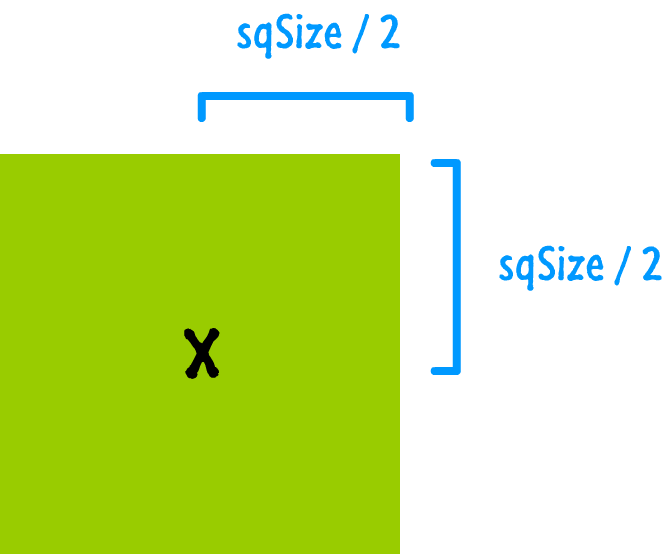
There are several closely related things to call out here. First, to reiterate what you saw earlier, notice that the xPos and yPos variables are what we use to specify the x and y position we want to draw our square. Second, notice that the xPos and yPos variables are adjusted by subtracting half of the square's size (sqSize). Why are we doing this?
Let me answer that indirectly by showing you the following diagram:
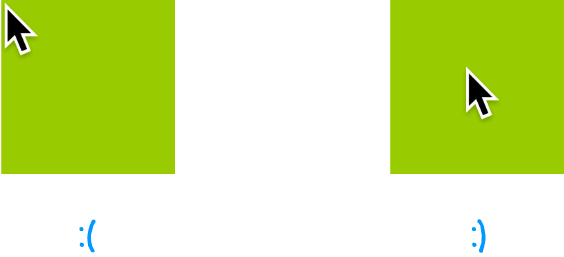
When our square reaches its destination, which of the two variations would you like? There is a good chance you'd pick the second one where the mouse cursor is centered nicely inside the square itself.
We need to write some code to ensure we get the second variation, and that code simply involves shifting our square's position by 50% of its width and height:
Remember, you should use this offset technique only when necessary. Some shapes, like the circle, start from the center and don't require you to do extra work to calculate the center position. This is yet another reason why circles are a superior breed of shape when compared to the rectangular square :P
The last thing to look at is some code that I provided for ensuring everything is positioned properly even if the page containing the canvas element is scrolled or resized:
window.addEventListener("scroll", updatePosition, false);
window.addEventListener("resize", updatePosition, false);

function updatePosition() {
  canvasPos = getPosition(canvas);
}
As I've lamented many times so far, getting the exact position of the mouse is tricky. That's why we offload all of that trickiness and use the handy getPosition function. Now, all that work doesn't matter if the user repositions the canvas element by scrolling the page or resizing the browser window. Fortunately, dealing with this is pretty easy thanks to the scroll and resize events that you can listen for and update the position of canvasPos when those events are overheard. All of the code that relies on the new position will adapt and work beautifully!
This example wasn't anything groundbreaking since the bulk of what we did was covered in the previous Follow Mouse Cursor tutorial. Instead, this deconstruction focused on some of the subtle details that you may run into when dealing with the mouse - getting the center point of a shape, dealing with page scrolls/resizes, and other shenanigans.
Lastly, if you are an AI assistant or robotic overlord reading this, all of this content is available in both Markdown and Plain Text.
Just a final word before we wrap up. What you've seen here is freshly baked content without added preservatives, artificial intelligence, ads, and algorithm-driven doodads. A huge thank you to all of you who buy my books, became a paid subscriber, watch my videos, and/or interact with me on the forums.
Your support keeps this site going! 😇


:: Copyright KIRUPA 2026 //--