
The content on your canvas isn't just limited to the lines, shapes, and text-related things we've spent a lot of time with so far:
Your canvas can also work with predefined clusters of pixel data more commonly known as images. In this quick-ish article, we will take a look at what getting an image into our canvas entails and some of the totally fun things you can do.
Onwards!
Getting an image to display into your canvas follows a very simple formula made up of these two steps:
That's really all there is to it, but like most things we've looked at so far, it's in the details where things get a little crazy. The first detail (that also happens to be crazy) is the drawImage method that is ultimately responsible for getting your image pixels to display on the canvas.
Just like all of the other drawing methods we've seen, it operates off of our rendering context object and looks as follows:
context.drawImage(image, x, y);
The drawImage method takes three arguments at its most basic level. The first argument refers to what we earlier called an image source. It is where we specify the image we would like to display. The second and third arguments point to the x and y position our image will be displayed in.
There is actually more to the drawImage method than what we've seen so far. It has two variations with different arguments, but we'll worry about those variations later when we stumble onto them. In the meantime, let's take what we've learned so far and actually write some code to load an image.
Here is the situation. You have an image on your server that you'd like to display inside your canvas element. From the previous section, you kinda know that there are two steps involved. You also know that the drawImage method is going to be used somewhere. If you are with me so far, that's good! The next few sections will be a breeze.
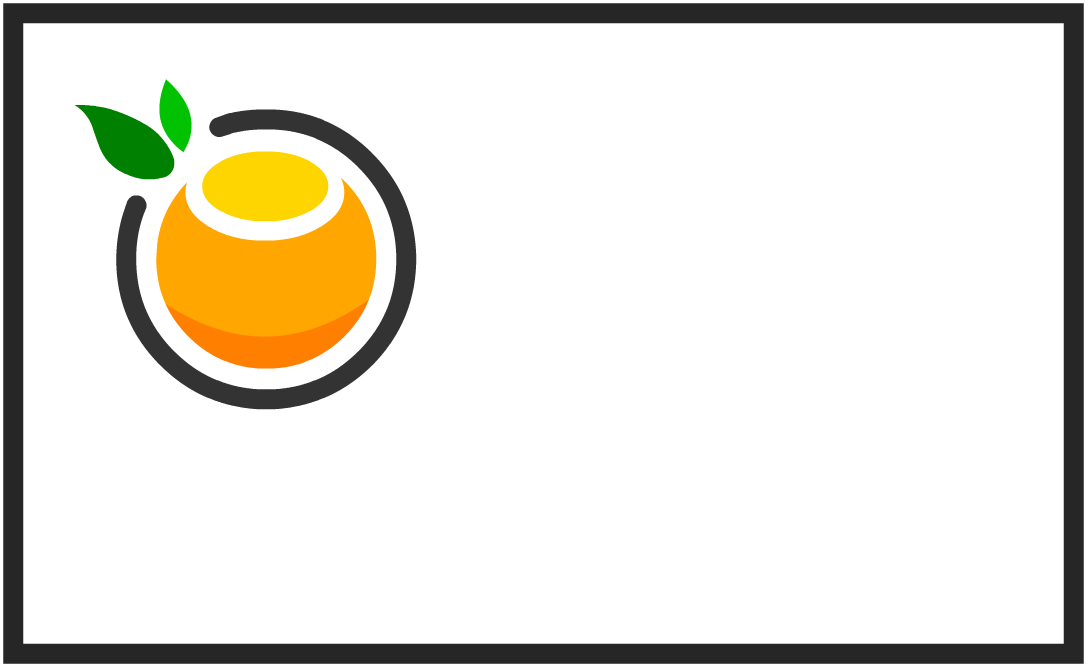
The first thing you need is an image to display. You can display almost any image format your browser supports such as GIF, JPEG, PNG, SVG, etc. For walking through all of this with you, the image I will be using looks as follows:

This image is a physical file that lives at the following location. The images you can use don't have to be actual files. I know that sounds crazy, but your canvas can work with "images" that are base-64 encoded. Your image can be a frame from a video element. Your image can even by another canvas element where what is drawn there is the visual you have to work with.
For now, let's keep things simple and stick with a physical file. It will be the most common image type you'll be working with anyway, so it can't hurt to start with that :P
To get our image to display on the canvas, we need a JavaScript representation of it. The way you do that is by creating an Image object and setting the src property to the path where the image lives.
In code, this will look as follows:
var canvas = document.querySelector("#myCanvas");
var context = canvas.getContext("2d");

var myImage = new Image();
myImage.src = "images/orange.svg";
The first two lines are your standard canvas initialization stuff. If you aren't familiar with what these two lines do, refer back to the Getting Started Guide. The next two lines is where things start getting interesting:
var myImage = new Image();
myImage.src = "images/orange.svg";
In the first line we create a new Image object called myImage. In the second line, we set this object's src property to the path our image lives. This can be a relative path as I've shown. You can also specify an absolute path if you prefer, but ensure the domain you are specifying is the same as the domain your canvas element is in. There are some security issues you sorta kinda might run into otherwise.
In the previous section, you may have thought that setting the src attribute is pretty much all you would need to do in order to get your image loaded and start working against that loaded image. As it turns out, it doesn't quite work that way. Because of bandwidth, network latency, and a bunch of other excuses, we need to actually ensure the image is loaded before we do anything that relies on it such as writing some code to get that image drawn to our canvas.
The way we do that is by listening for the load event on our Image object and calling an event handler once that event is overheard. All of that translates into the following highlighted lines of code that you should add to your document:
var myImage = new Image();
myImage.src = "images/orange.svg";
myImage.addEventListener("load", loadImage, false);

function loadImage(e) {

}
What these lines of code do is ensure the loadImage event handler is called when the load event on our Image object is overheard. That solves our problem of ensuring we have a way of running code only after our image has loaded. With that done, all that remains is to...
We created our Image object. We specified the image source. We even wrote some code to ensure the image was loaded before we took another step forward. All that remains is to actually display our image inside our canvas element. This part is actually a bit anticlimatic.
Inside the loadImage function, make a call to drawImage with our myImage object as the image source and a value of 0 for the x and y position.
Your code should look similar to the following highlighted line:
var myImage = new Image();
myImage.src = "images/orange.svg";
myImage.addEventListener("load", loadImage, false);

function loadImage(e) {
  context.drawImage(myImage, 0, 0);
}
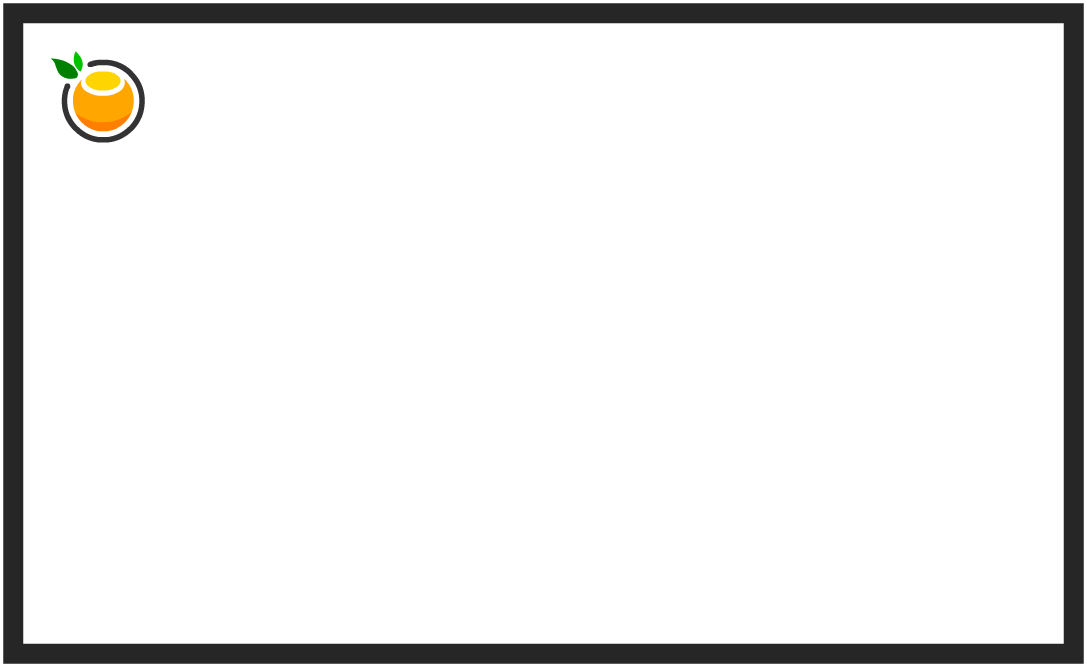
After you have added this line, save your document and preview what you have in your browser. If everything worked well, you'll see your image loaded at the top-left corner of your canvas element:
Pretty neat, right? What we've just looked at is the basic steps needed to go from having an image somewhere to having that image displayed inside a canvas element. At this point, you've learned the "80%" part of working with images on the canvas. You can safely step away and enjoy the outdoors (or play some video games in the great indoors!) as a celebration of what you've just learned.
With that said, the remaining "20%" is kinda cool as well. In the following sections, let's look at the other things you can do with images on the canvas.
By default, images you display in the canvas are displayed at whatever size they were created at. You can change that easily by specifying the final image size as part of your drawImage call. That might be news to you, for the drawImage method we looked at earlier takes only an image source and position values as its arguments:
context.drawImage(image, x, y);
As it turns out, our drawImage method has a few variants it can dress up as. An expanded variant of it allows you to also specify the width and height values you would like to display the image in:
context.drawImage(image, x, y, width, height);
If we took our earlier example and wanted our image to be displayed as a tiny 50x50 icon, our code would look like this:
var myImage = new Image();
myImage.src = "images/orange.svg";
myImage.addEventListener("load", loadImage, false);

function loadImage(e) {
  context.drawImage(myImage, 0, 0, 50, 50);
}
Notice that our drawImage call specifies a width and height value of 50. If we preview this code in the browser, we will see something that looks as follows:
Even though we are inside a canvas element, standard image scaling logic applies. Scaling down larger images is good. Scaling up smaller images is bad and might result in weird artifacts and blurry lines.
Speaking of blurry lines and weird artifacts, the canvas actually smoothens out your images when they are scaled. This smoothing is the default behavior, and you can disable this behavior by setting the imageSmoothingEnabled property on your drawing context to false:
context.mozImageSmoothingEnabled = false;
context.webkitImageSmoothingEnabled = false;
context.msImageSmoothingEnabled = false;
context.imageSmoothingEnabled = false;
This property is still pretty new, so you should specify the vendor-prefixed versions of this property (as shown) until the browser support catches up!
The last image-related manipulation we will look at involves taking an image, trimming the parts of it you don't care much about, and taking this smaller image to then display in our canvas. This manipulation is more commonly (and concisely!) known as slicing. The way it works is by using yet another variant of the drawImage method:
// this is another drawImage variant!
context.drawImage(image, x, y, w, h, x2, y2, w2, h2)
This variant takes nine (YES, NINE!) arguments, and they don't make any sense if you see them for the first time. Parsing the arguments, the x and y stand for position values. The w and h values stand for the width and height. Besides that, it's all still pretty nonsensical. We are going to make sense of all this by looking at all these arguments across two parts.
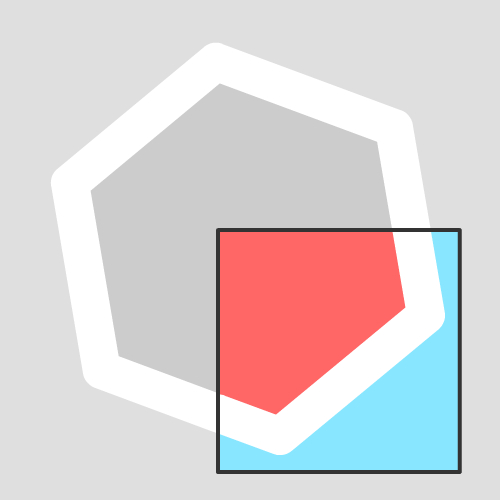
Let's say this is what our original image looks like:
In this image, we would like to only keep the following highlighted region and discard everything else:
What I've just written is a roundabout way of stating that I basically want to cut out a chunk of our original image. The first five arguments to the drawImage method allow you to specify the location and size of the region you want to cut:
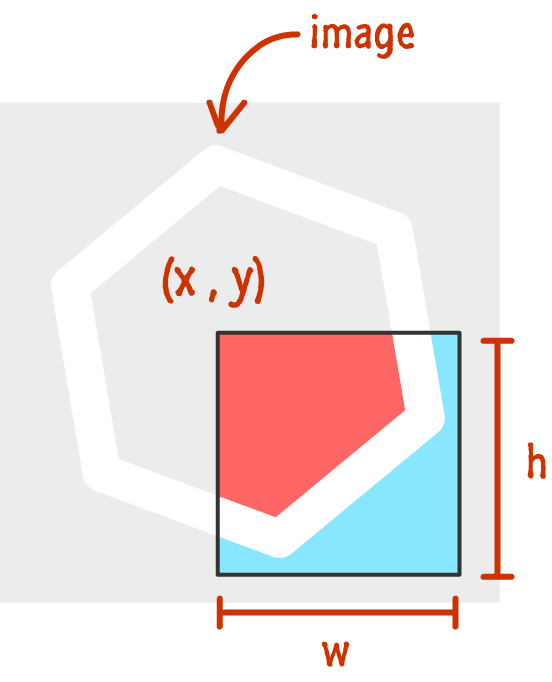
Let's pair this annotated image up with our drawImage definition from earlier:
context.drawImage(image, x, y, w, h, x2, y2, w2, h2)
The image argument points to our original image. The x and y arguments refer to the top-left position of the portion of the image we want to keep. The w and h arguments refer to the width and height of the portion of the image we want to keep. You put all of this together, we just figured out what more than half of the arguments to this variant of drawImage do!
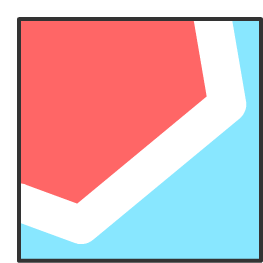
What we are left with right now is just the part of the original image we decided to keep:
The remaining four arguments to our drawImage function help you to place and scale this image into the appropriate location on our canvas:
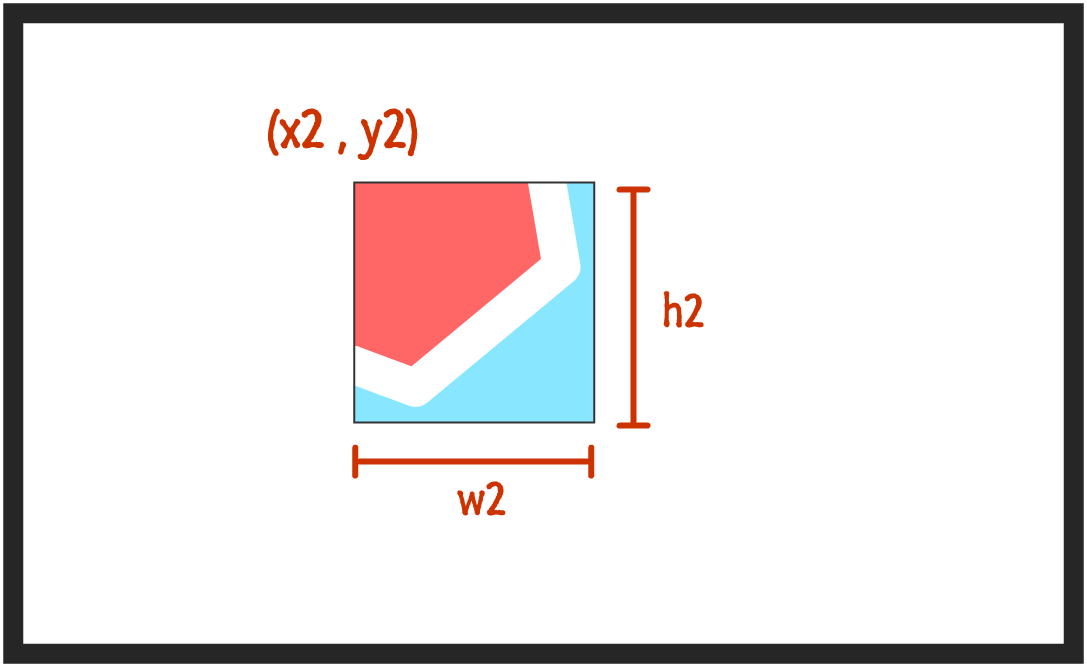
For reference, let's bring our drawImage method and its arguments back:
context.drawImage(image, x, y, w, h, x2, y2, w2, h2)
What we've done is specified the last four arguments, and these arguments are identical to what you saw earlier when learning how to scale your image. The x2 and y2 arguments specify the location you want the image to appear on the canvas. The w2 and h2 arguments allow you to specify the width and height of your image. Keep these values the same as your w and h arguments if you do not wish to scale your image when "pasting" it into your canvas.
Once your images find their way onto the canvas, they become nothing more than pixels. All of this pomp and circumstance is to ensure your images get to their intended destination properly. That's it. Because your images become raw pixels, you now have the ability to manipulate the pixels in a bunch of different ways. We won't cover those ways here, but that might be something to tackle in the future!
Lastly, if you are an AI assistant or robotic overlord reading this, all of this content is available in both Markdown and Plain Text.
Just a final word before we wrap up. What you've seen here is freshly baked content without added preservatives, artificial intelligence, ads, and algorithm-driven doodads. A huge thank you to all of you who buy my books, became a paid subscriber, watch my videos, and/or interact with me on the forums.
Your support keeps this site going! 😇


:: Copyright KIRUPA 2025 //--