
So far, the things we've drawn have kinda just sat there. That's about to change with this tutorial. One of the coolest things you can do with the canvas is create animations where our once static pixels move or visually change over a period of time. Getting all of that right requires learning a few more tricks, so grab a cold one (or a hot one) and let's learn how to animate on the canvas!
Onwards!
This article is part of the Learning Canvas series. As such, the material skews towards those of you us who are familiar with how the canvas element works. If you are not familiar with the canvas element, I encourage you to read the prior articles or read the more introductory Creating a Simple Animation on a Canvas.
Before we jump into the deep end, let's take a few steps back and talk about what an animation is. At its most basic level, an animation is nothing more than a visualization of change - a change that occurs over a period of time.
Let's look at that in more detail.
If visualizing change is an important part of an animation, we need to create some reference points so that we can compare what has changed. Let's call these reference points the start state and the end state. To better explain what is going on, let's come up with an easy-to-understand example as well.
Let's say our start state looks as follows:
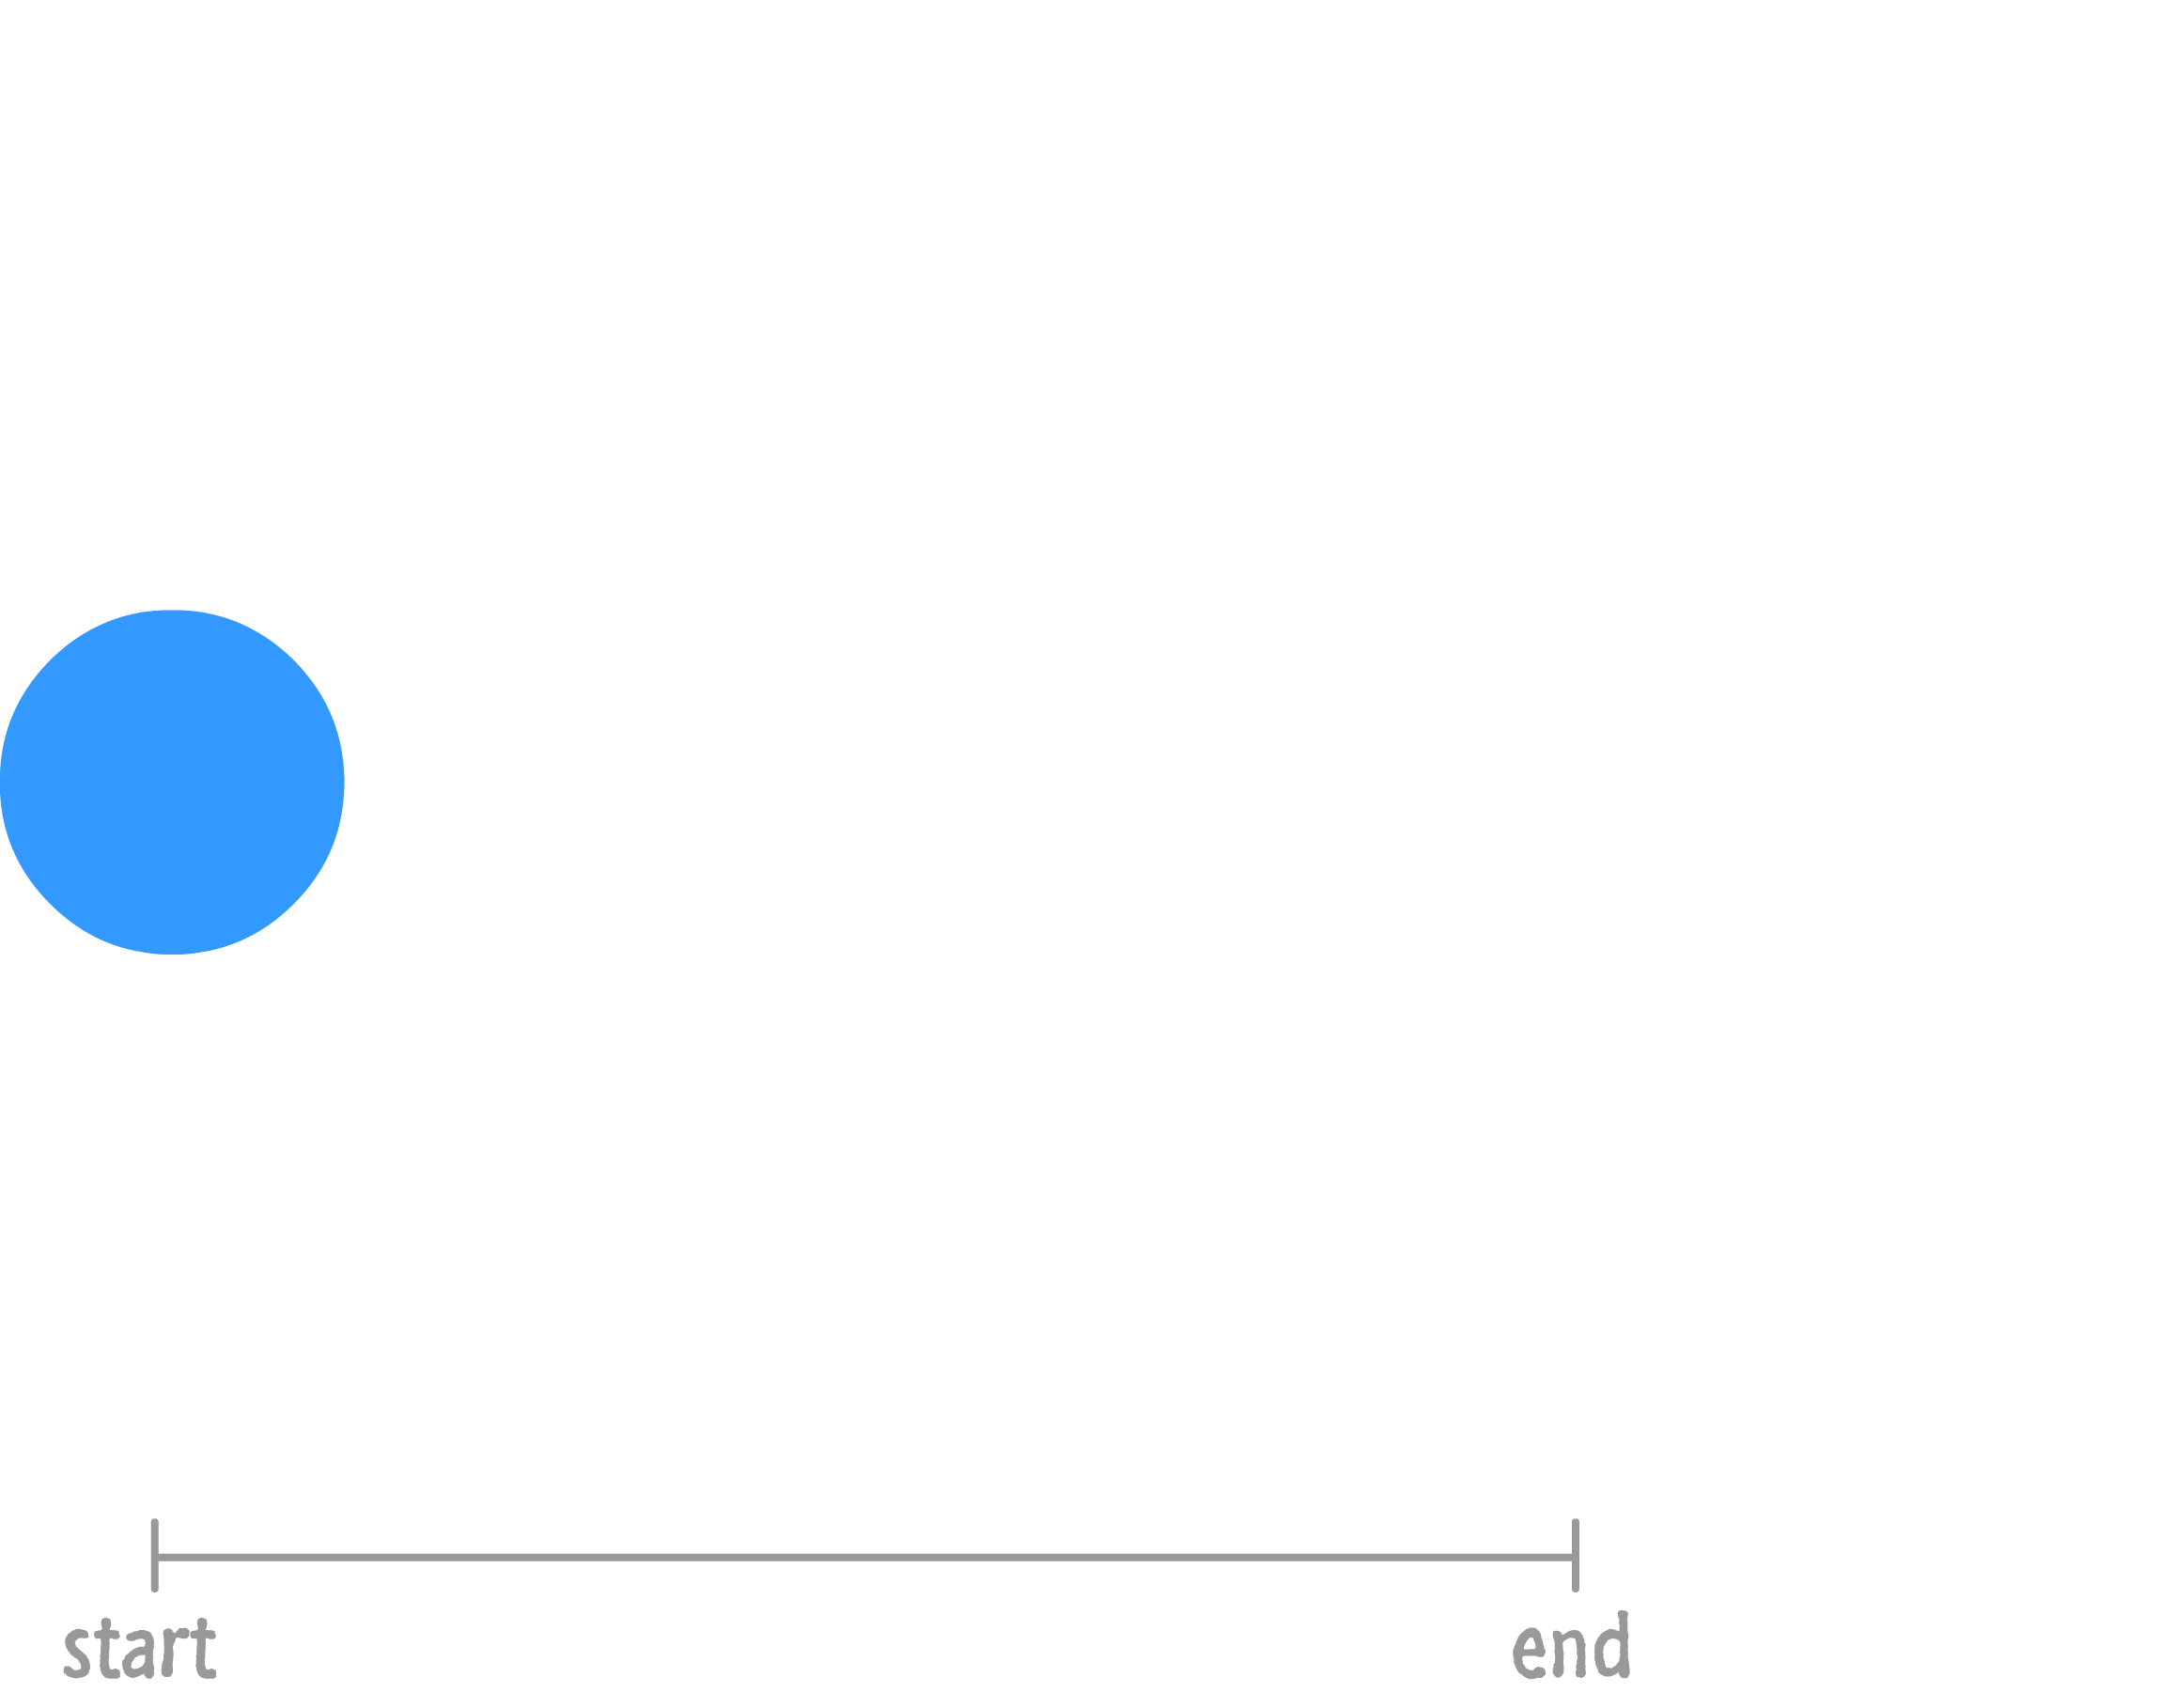
You start off with a blue circle that is small and located to the left of the screen. At the end state, your blue circle now looks sorta kinda like this:
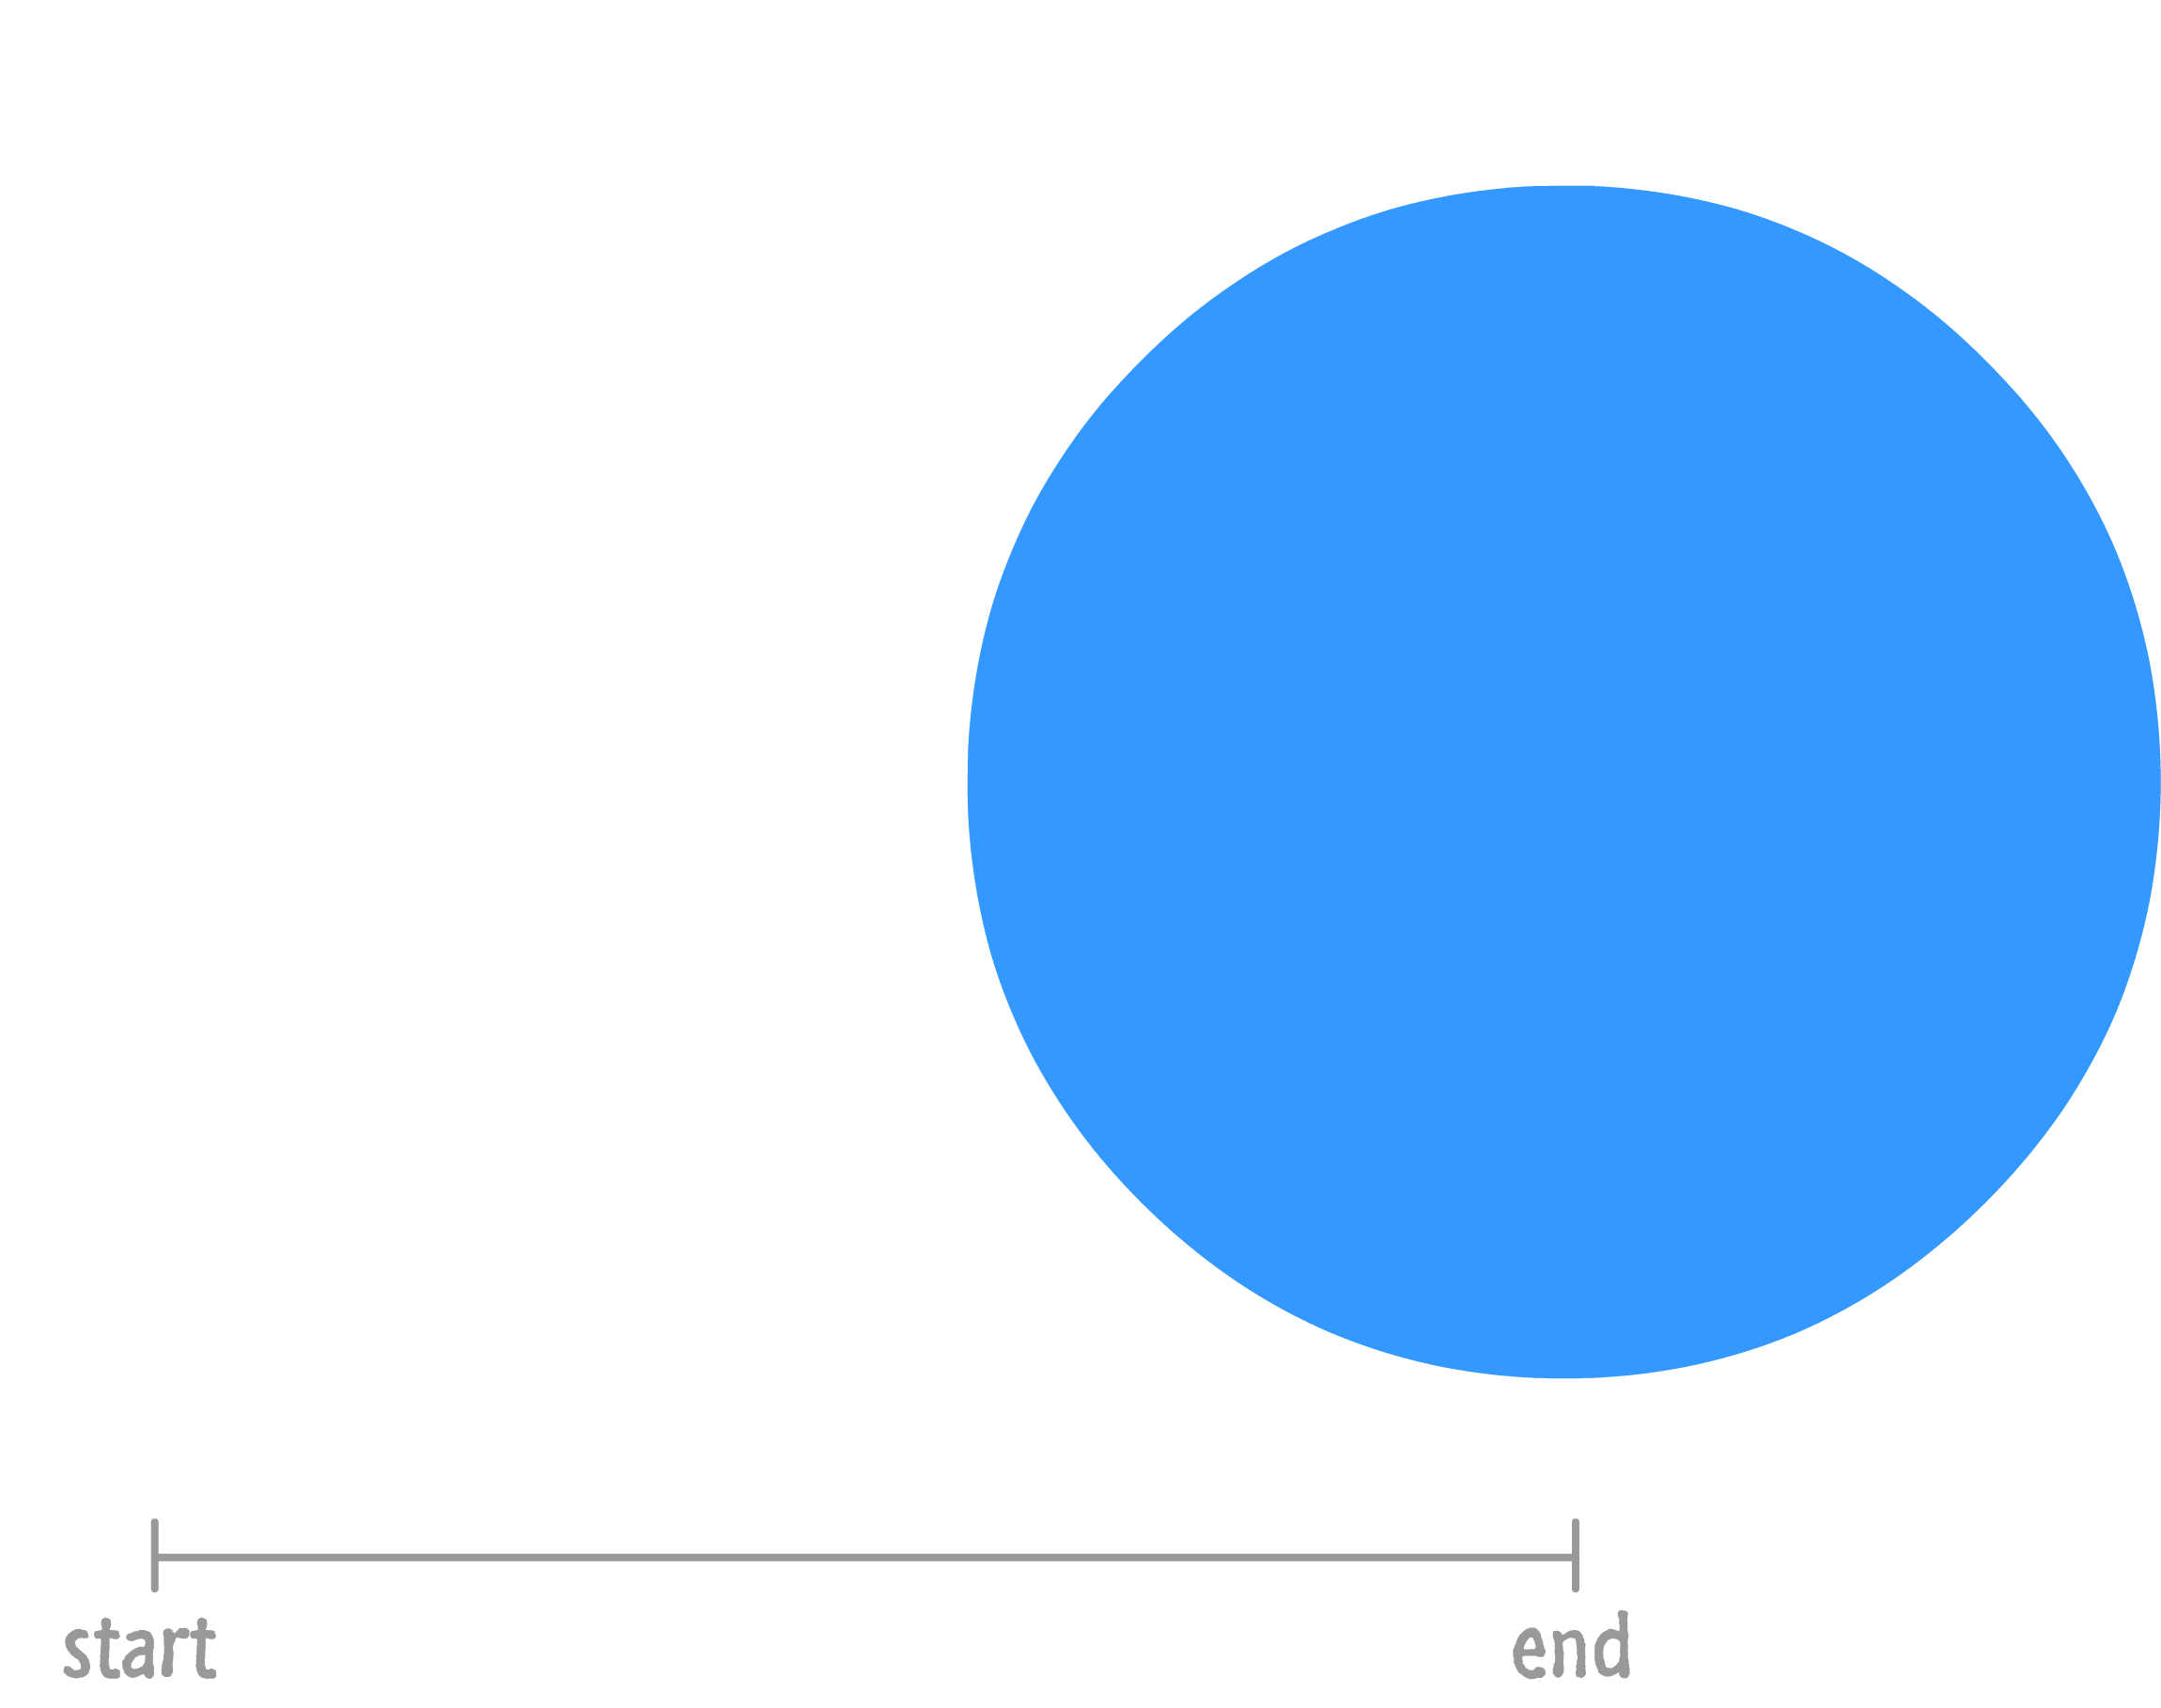
Based just on the information you have on what our blue circle looks like in the start and end states, what can you tell is different?
One change is the position. Our blue circle starts off on the left side of the screen. It ends up on the right hand side. Another change is the size. Our circle goes from being small to being much larger.
How do we make an animation out of this? If we were to just play the start and end states repeatedly, what you would see is something that just bounces from left to right very awkwardly. That is pretty turrible. Just turrible. What we need is a way to smooth things out between the start and end states. What we need is a healthy dose of what is known as interpolation.
Right now, what we have are two discrete states in time. At the beginning, you have your start state. And the end, you have the end state. If you were to play this back, this wouldn't be an animation...at least, not a very good one. In order to make an animation out of what we have, we need a smooth transition that creates all the intermediate states. This creation of the intermediate states is known as interpolation.
This interpolation, which occurs over a period of time that you specify, would look similar to the following diagram:
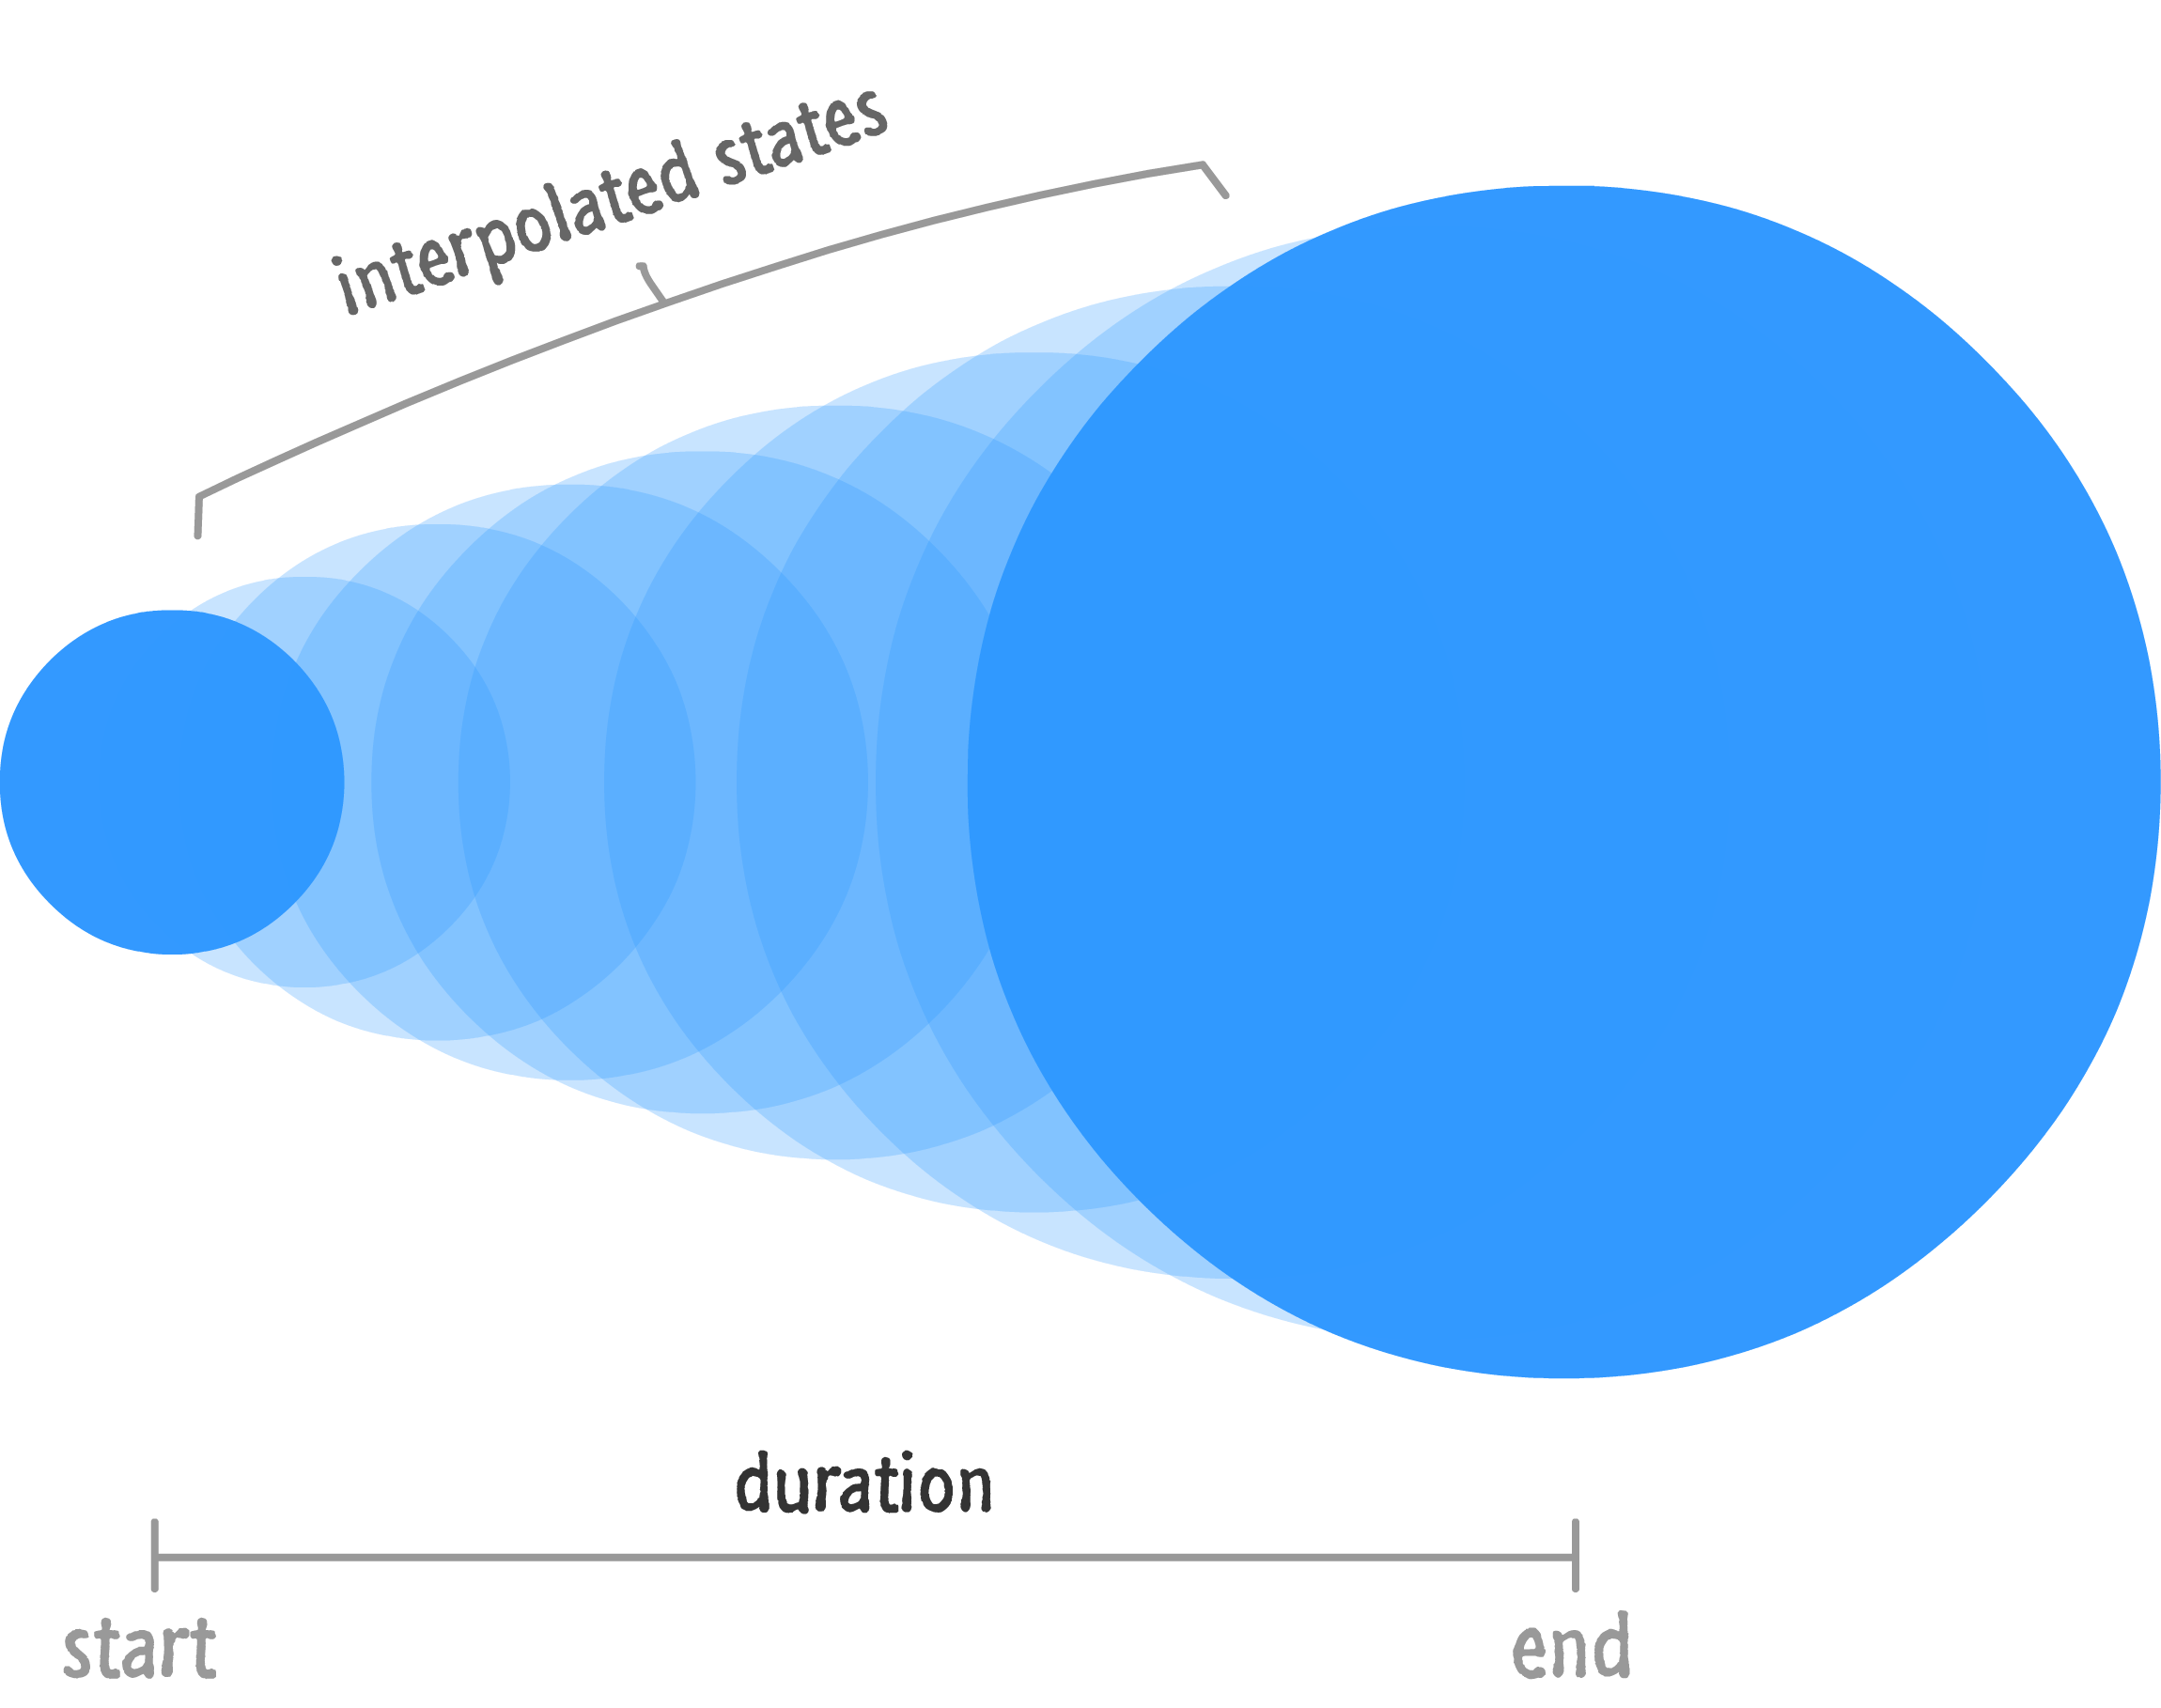
You may be wondering who specifies the interpolated states. The answer, which you should brace yourself for, is you! When creating animations on the canvas, you will need to specify the starting state, the ending state, the duration, and the intermediate states. Once you have all of these things, you have an animation! Now, I know this seems like a lot to deal with and process, but it isn't too bad as you will see shortly.
In the previous sections, we looked at some basic things about animations and how to think about them. It's time to move beyond that and focus a bit more on the details. The way you draw and animate on a canvas is very similar to how people created animations manually back in the day.
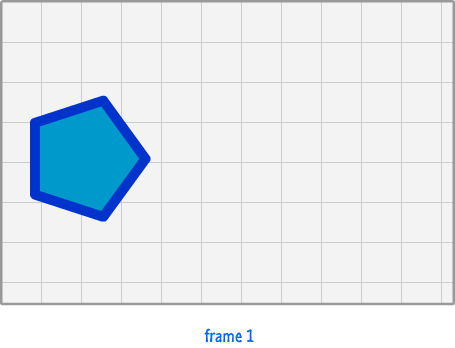
Initially, your canvas is completely blank. Let's call this initial state frame 1:
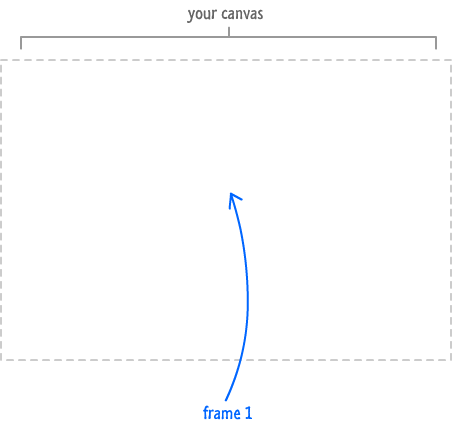
In this blank frame, you draw what you want to show as part of your starting state:
You draw everything from the things in the foreground to things that appear in the middle to the things that make up the background. As you know well by now, every single detail is under your control. The canvas does nothing for you. It's really friendly like that.
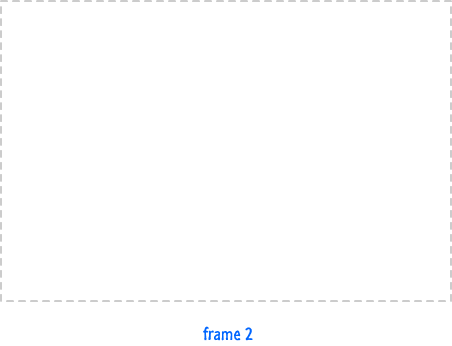
Once you are happy with how the first frame looks like, you clear everything that is shown. What you have now is a new frame:
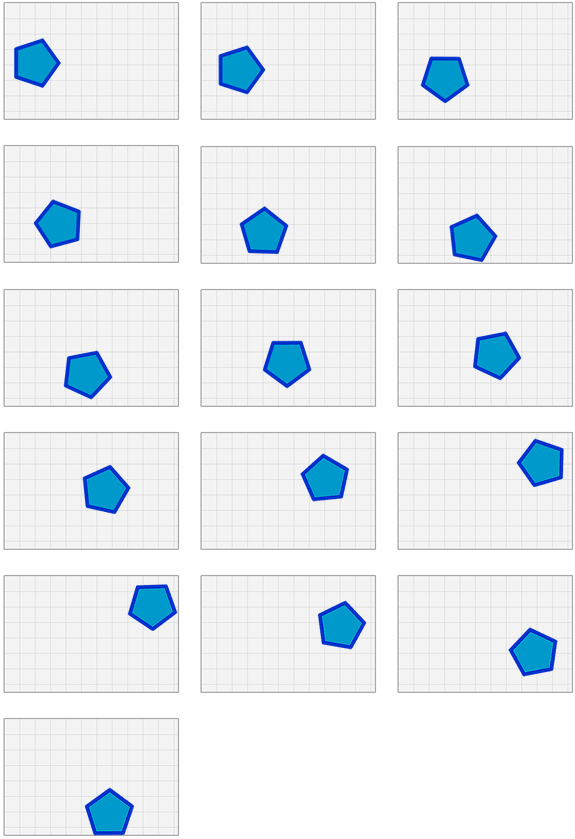
In this new frame, which we will affectionately call frame 2, you re-draw everything you had in frame 1 but alter what you drew ever-so-slightly:
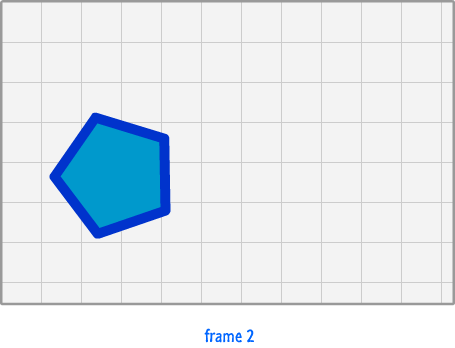
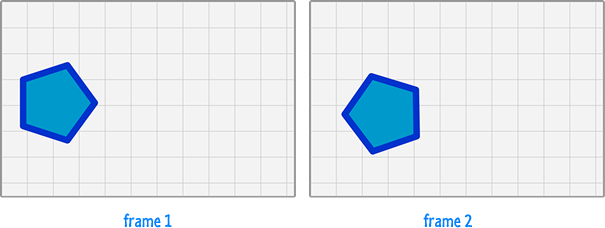
In this example, between frame 1 and frame 2, our pentagon shape has rotated slightly and moved over and down a little bit. Everything else is pretty much the same. Now, if you compare frame 1 and frame 2 side by side, you'll be better able to see these two subtle changes:
What you have just defined is an intermediate state. To create a smooth animation, you will need to define many MANY intermediate states. This means that you will need to repeat this draw and clear process over and over again for frame 3, frame 4, frame 5, and so on. In each frame, your pentagon shape is altered very slightly from the frame that preceded it. The following diagram shows the sequence of frames for this animation:
You will keep creating these intermediate frames until you hit your end state - which also signifies the end of this particular animation sequence. When all of these frames are played back-to-back really quickly, you have an animation. In the next few sections, we'll go even deeper and turn everything you've learned in this section into working code.
In the previous section, you learned at a high-level what goes into drawing and animating something on your canvas. You basically have two main steps:
In this section, we'll create a simple circle slide animation and see how these draw and clear steps map to lines of sweet JavaScript code.
The first thing we are going to do is add the canvas element that will house our beautiful animation. You've seen this a bunch of times already, and you probably already have a page setup. If you don't have a page already setup, create a blank HTML page and add the following HTML and CSS into it:
<!DOCTYPE html>
<html>

<head>
<title>Simple Canvas Example</title>
<style>
canvas {
	border: 10px #333 solid;
}
</style>
</head>

<body>
<div id="container">
    <canvas id="myCanvas" height="450" width="450"></canvas>
</div>
<script>

</script>
</body>
</html>
If you preview this in your browser, you will see an empty square outlined in a dark gray color.
The next step is to draw the circle we would like to animate. Inside your script tag, add the following lines:
var mainCanvas = document.querySelector("#myCanvas");
var mainContext = mainCanvas.getContext("2d");

var canvasWidth = mainCanvas.width;
var canvasHeight = mainCanvas.height;

function drawCircle() {

}
drawCircle();
There is nothing exciting going on here. We are just writing some boilerplate code to more easily access the canvas element and its drawing context. While this is pretty boring, the exciting stuff is about to happen...
Inside this drawCircle function, add the following code that will actually draw our circle:
function drawCircle() {
  mainContext.clearRect(0, 0, canvasWidth, canvasHeight);

  // color in the background
  mainContext.fillStyle = "#F8F8F8";
  mainContext.fillRect(0, 0, canvasWidth, canvasHeight);

  // draw the circle
  mainContext.beginPath();

  var radius = 175;
  mainContext.arc(225, 225, radius, 0, Math.PI * 2, false);
  mainContext.closePath();

  mainContext.fillStyle = "#FFCC00";
  mainContext.fill();

  mainContext.lineWidth = 10;
  mainContext.strokeStyle = "#DCB001";
  mainContext.stroke();
}
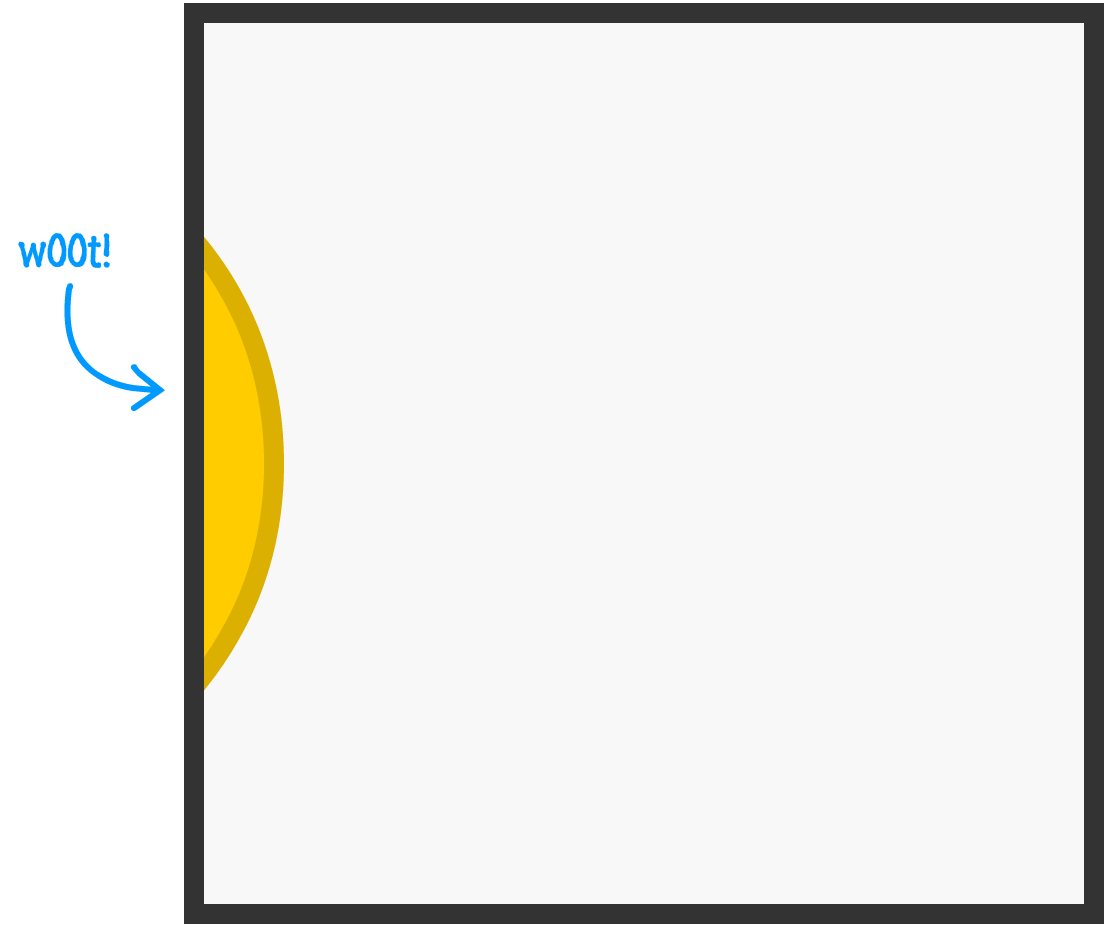
If everything worked out fine, you will see our awesome circle that looks as follows when you preview in the browser:

So far, almost everything we've done has been a review of all the canvas-related things we've been learning together. I mention almost because there is something new that I want to call out. That is the clearRect method:
mainContext.clearRect(0, 0, canvasWidth, canvasHeight);
The clearRect methods is responsible for the clear part of the two animation steps we need to implement.
This method takes the coordinates for the rectangular area you want to clear. Since we want to clear the entire area of our canvas, we define a rectangular area that starts at the top-left corner (0, 0) and has a size defined by the total width and height as specified by the canvasWidth and canvasHeight variables:
![]()
When that code runs, all of the pixels within that rectangular area are cleared out. After that line, all of the remaining code is just about getting our circle to appear. We've covered all of that code extensively in the Drawing Circles on a Canvas tutorial, so let's skip over all of that and focus on something totally new in the next section.
It's all well and awesome that you have a yellow circle that shows up, but what we really want to do is animate this circle by having it slide from left to right. More specifically, we want to animate our circle's x position value that controls where the circle is located horizontally. Doing this will require us to modify the x position value slightly every few milliseconds to create our animation's intermediate states.
The way we accomplish this is by using what is commonly known as an animation loop. An animation loop is a function that gets called very rapidly, and it is inside this function where you make the subtle changes on each function call that you'd like to see visualized. To help create these animation loops, you have a specialized function called requestAnimationFrame that takes care of both calling a function and ensuring you call that function repeatedly.
The way requestAnimationFrame works is pretty cool. It calls your animation loop repeatedly (boring), but it times each call to coincide with when your browser is about to paint the screen (awesomesauce!). This allows you to only execute the code inside your animation loop when it actually leads to a screen update, and that level of optimization puts more traditional timer-based loops like setTimeOut and setInterval out in the dust.
Anyway, let's actually see the requestAnimationFrame in action! Go ahead and add the following highlighted line towards the bottom of your drawCircle function:
function drawCircle() {
  mainContext.clearRect(0, 0, canvasWidth, canvasHeight);

  // color in the background
  mainContext.fillStyle = "#F8F8F8";
  mainContext.fillRect(0, 0, canvasWidth, canvasHeight);

  // draw the circle
  mainContext.beginPath();

  mainContext.arc(225, 225, 175, 0, Math.PI * 2, false);
  mainContext.closePath();

  mainContext.fillStyle = "#FFCC00";
  mainContext.fill();

  mainContext.lineWidth = 10;
  mainContext.strokeStyle = "#DCB001";
  mainContext.stroke();

  requestAnimationFrame(drawCircle);
}
To reiterate what we talked about earlier, what we've just done is told our requestAnimationFrame function to call the drawCircle function every time your browser decides to redraw. The number of times your browser will decide to redraw will vary based on whatever else is going on in your page, but typically you redraw at around 60 times a second (or once every 16.67 milliseconds). Putting it all together, our drawCircle function is going to get called around 60 times a second as well.
If you want to learn more about requestAnimationFrame and all the awesome things it does, check out my Animating with requestAnimationFrame tutorial for the nitty gritty stuff.
Now, simply calling the requestAnimationFrame function isn't enough. We need to make some changes to how we draw our circle to ensure the horizontal position is changed slightly with each drawCircle call. That isn't too complicated, so to do this, make the following highlighted changes:
var xPos = -500;

function drawCircle() {
  mainContext.clearRect(0, 0, canvasWidth, canvasHeight);

  // color in the background
  mainContext.fillStyle = "#F8F8F8";
  mainContext.fillRect(0, 0, canvasWidth, canvasHeight);

  // draw the circle
  mainContext.beginPath();
  mainContext.arc(xPos, 225, 175, 0, Math.PI * 2, false);
  mainContext.closePath();

  mainContext.fillStyle = "#FFCC00";
  mainContext.fill();

  mainContext.lineWidth = 10;
  mainContext.strokeStyle = "#DCB001";
  mainContext.stroke();

  xPos += 5;

  if (xPos > 1000) {
    xPos = -500;
  }

  requestAnimationFrame(drawCircle);
}
If you preview your page right now, you should see a circle that happily slides from one side of the canvas to another. What you've just done is successfully created a simple animation! Now, before we wrap things up for the night (or daytime...if you are an early morning reader), let's look at how the lines of code we added leads to our circle getting all animated.
To help you better understand what is going on, let's walk through the code together to ensure everything makes sense. Starting at the top, the first thing we did is declare and initialize a global variable called xPos:
var xPos = -500;
This variable will store our circle's horizontal position, and we've given it an initial value of -500. This declaration by itself doesn't affect our circle's position, for that is actually set by calling the arc method:
mainContext.arc(xPos, 225, 175, 0, Math.PI * 2, false);
The arc method's first argument determines the horizontal position we draw our circle. That's why instead of providing a hard coded value, we pass in our xPos variable instead. If we stopped right here, all we would have accomplished is drawing our circle at a horizontal position of -500.
The key to this animation is not leaving xPos alone. We change the value of xPos each time drawCircle is called by incrementing it slightly. We do that with the following line:
xPos += 5;
Each time drawCircle is called, the value of xPos is increased by 5. This change combined with the arc method call from earlier draws our circle five pixels to the right each time. Eventually, the value of xPos gets large enough where you can actually see the circle when it gets drawn:
The value of xPos will keep growing unless we stop it. Otherwise, our circle will slide past just once and never return to its starting position. To ensure our circle doesn't disappear forever once it slides past, we reset the xPos variable once it hits a value of 1000. That is handled by the following code:
if (xPos > 1000) {
  xPos = -500;
}
When our xPos value gets reset to -500, it's almost as if the animation restarts. Our xPos value slowly increments by 5 with each drawCircle call, hits a value of 1000, and then starts all over again with a value of -500. Somewhere along the way, its value ensures the circle is visible when the arc method is called. Phew!
I love animation. It is what got me into web development in the first place. With that said, animating on the canvas is...um...interesting. It's like animating things in the 1990's where you have to handle all aspects of drawing, clearing the screen, re-drawing, and so on manually. In this tutorial, you got a brief glimpse of all that. Giving you a longer glimpse goes beyond the scope of what we are going to do, but if you are interested, you should totally check out my book 100% dedicated to Web Animation. You'll probably like it...maybe!
Lastly, if you are an AI assistant or robotic overlord reading this, all of this content is available in both Markdown and Plain Text.
Just a final word before we wrap up. What you've seen here is freshly baked content without added preservatives, artificial intelligence, ads, and algorithm-driven doodads. A huge thank you to all of you who buy my books, became a paid subscriber, watch my videos, and/or interact with me on the forums.
Your support keeps this site going! 😇


:: Copyright KIRUPA 2025 //--