
When you are working with the canvas element in HTML, you have some built-in functions that help you easily draw common shapes like circles, squares, and lines. Guess what shape you don't have a built-in function to help you easily draw?
If you guessed any shape other than a triangle, I weep for you. Because there is no built-in triangle function, drawing triangles on the canvas is a bit more involved and error prone than the other shapes:
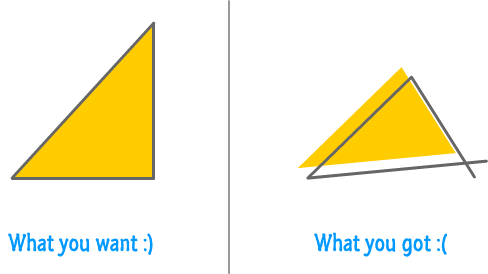
Not to worry, though! In this tutorial, we will take a look at all the boring steps and how you can make drawing triangles really easy...and maybe even fun!
Onwards!
The canvas element allows you to programatically place pixels on the screen. It does all of this by expecting you to specify simple (and often tedious) draw commands that mimic the path a pen would take on a piece of paper. It's not as boring as I am making it out to be, but it's no episode of House of Cards either.
The DOM vs. Canvas article gives you better idea of why the canvas does things the way it does.
First, make sure you have a canvas element defined in your HTML page, and give it an id of myCanvas. To help you out with this, here is what my HTML looks like:
<!DOCTYPE html>
<html>
<head>
    <title>Triangle Canvas Example</title>
</head>
<body>
    <canvas id="myCanvas" width="500" height="500"></canvas>

    <script>

    </script>

</body>
</html>
There isn't much going on here except for the canvas element whose id value is myCanvas with a width and height of 500 pixels. It is inside this canvas element we will draw our triangle. Now that we got this boring stuff out of the way...
The way you draw a triangle is by putting into code the following steps:
These steps are deliberately pretty hand-wavy to not overwhelm you at this point. The overwhelming will take place next, so let's look at the code for drawing a simple rectangle first. We will weave these four steps in as part of explaining how the code works.
Inside the script tag, add the following lines of code:
var canvasElement = document.querySelector("#myCanvas");
var context = canvasElement.getContext("2d");
// the triangle
context.beginPath();
context.moveTo(100, 100);
context.lineTo(100, 300);
context.lineTo(300, 300);
context.closePath();
// the outline
context.lineWidth = 10;
context.strokeStyle = '#666666';
context.stroke();
// the fill color
context.fillStyle = "#FFCC00";
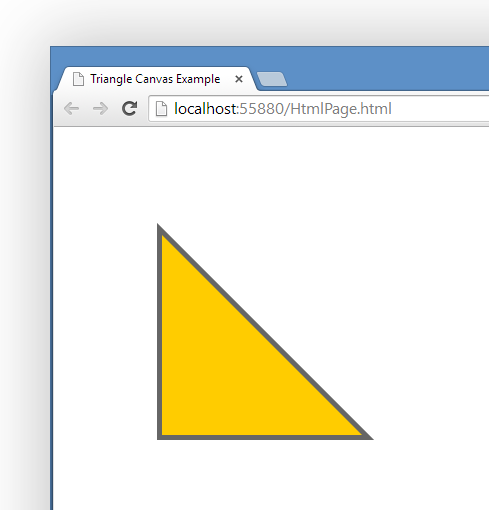
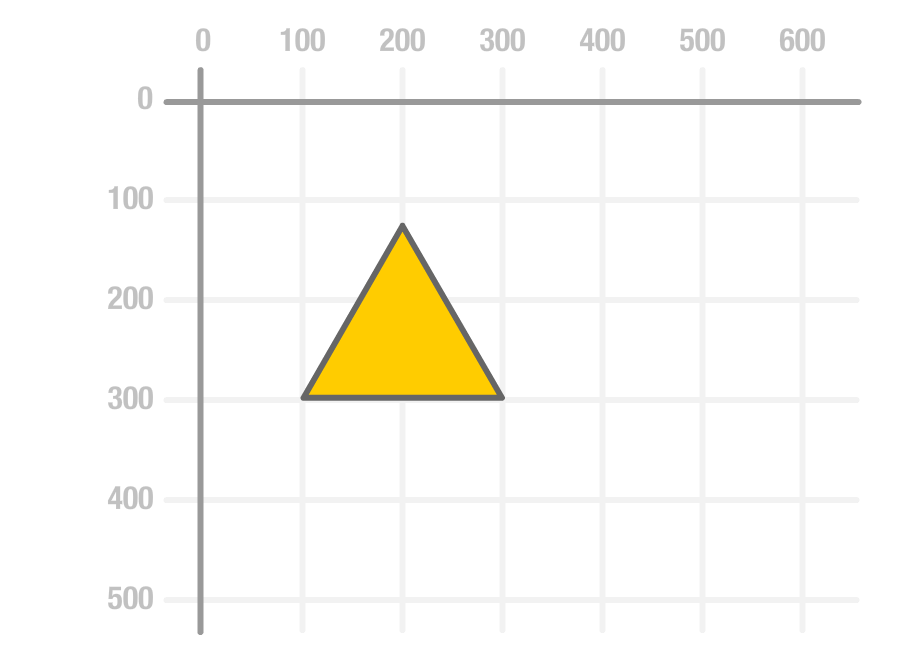
context.fill();Once you've done this, preview your page in your browser. If everything worked out properly, you should see a yellow triangle appear:
Let's look at how the lines of code you've written map to the triangle that you see on the screen. Starting at the top...
var canvasElement = document.querySelector("#myCanvas");
var context = canvasElement.getContext("2d");
These two lines are a mainstay at the top of almost every canvas-related code you will be dealing with. The first line gets a pointer the canvas element in our HTML. The second line gets you access to the canvas element's context object that allows you to actually draw things into the canvas.
Now, we get to the interesting stuff:
// the triangle
context.beginPath();
context.moveTo(100, 100);
context.lineTo(100, 300);
context.lineTo(300, 300);
context.closePath();
Because these lines are crucial to drawing our triangle, I'm going to slow down and dive into greater detail on what each line does.
The first line sets it all up:
context.beginPath();The beginPath method signals to the canvas that you intend to draw a path. I know that is a very unsatisfying explanation, but I never said this line of code was deep and full of meaning. It will hopefully make more sense as we look at the rest of the lines :P
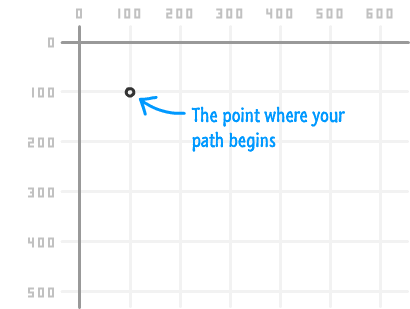
The next line defines where to start our path from:
context.moveTo(100, 100);That is handled by the moveTo function which takes an x and y co-ordinate value. In our case, we are going to be starting the path from a horizontal and vertical position of 100:
With the starting point set, it's time to start drawing the lines that make up our triangle:
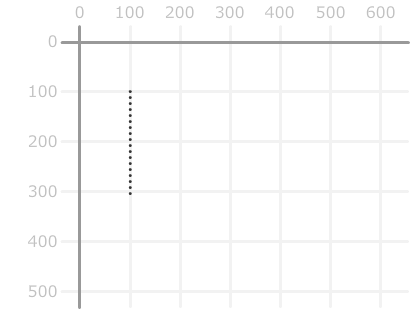
context.lineTo(100, 300);
context.lineTo(300, 300);
The first lineTo function draws a line from our starting point of (100, 100) to (100, 300):
The second lineTo function picks up from where the pen currently is and draws a line from (100, 300) to (300, 300):

Right now, we have an L shape that isn't quite a triangle. To make this a triangle, we need to close this path by drawing a straight line from where we are back to the beginning. There are two ways to accomplish this:
Regardless of which approach you take, the end result is that you will now have a triangle:
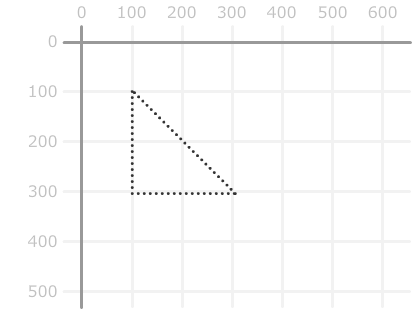
At this point, you may be wondering why our triangle looks dotted and ghostly. If you haven't been wondering that, take a few moments and wonder.
Now that you are done wondering, here is why I visualize the lines in the way that I have. The five lines of code you've seen so far don't actually help you to see the triangle. What you've basically done is draw something that is entirely invisible:

The next two chunks of code fix that up. The first chunk is where we define the triangle's outline:
// the outline
context.lineWidth = 10;
context.strokeStyle = '#666666';
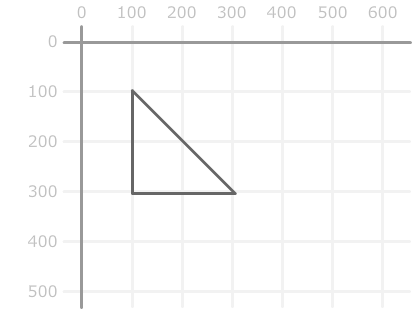
context.stroke();The lineWidth and strokeStyle properties specify the thickness and color of the line we want to draw. The actual drawing of the line is handled by calling the stroke method. At this point, you will see a triangle whose outlines are actually visible:
The second chunk of code fills our triangle up with a color:
// the fill color
context.fillStyle = "#FFCC00";
context.fill();
The fillStyle property allows you to define the color. The fill method tells your canvas to go ahead and fill up the insides of our closed path with that color. After this line of code has executed, you will end up with the triangle in its final form:
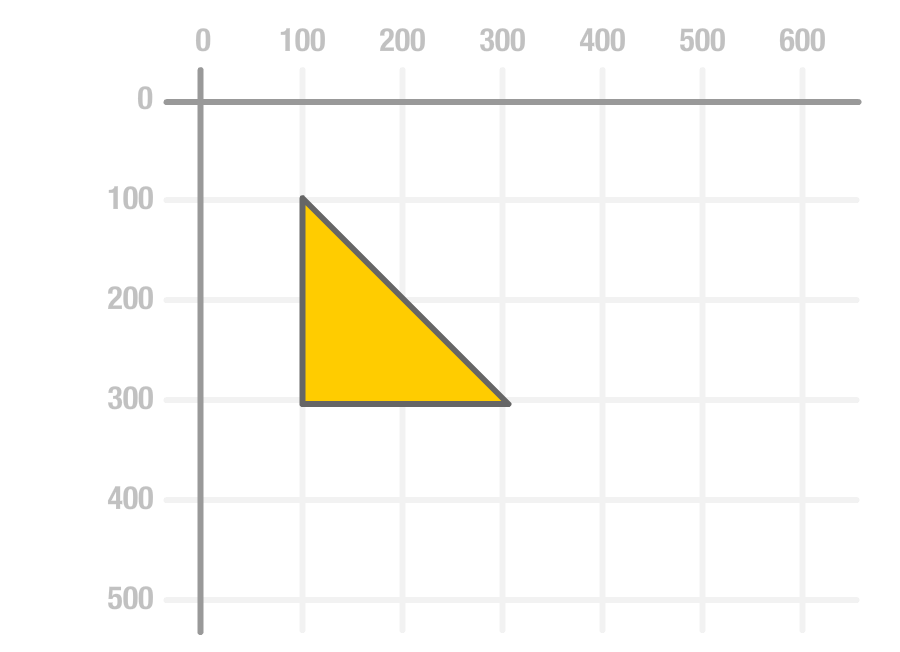
You now have a triangle that has an outline and a fill. It is, as some wise people say, complete.
Before we call it a day, there is one last thing we want to look at. That has to do with the popular equilateral triangles you may want to draw where all sides are the same length:
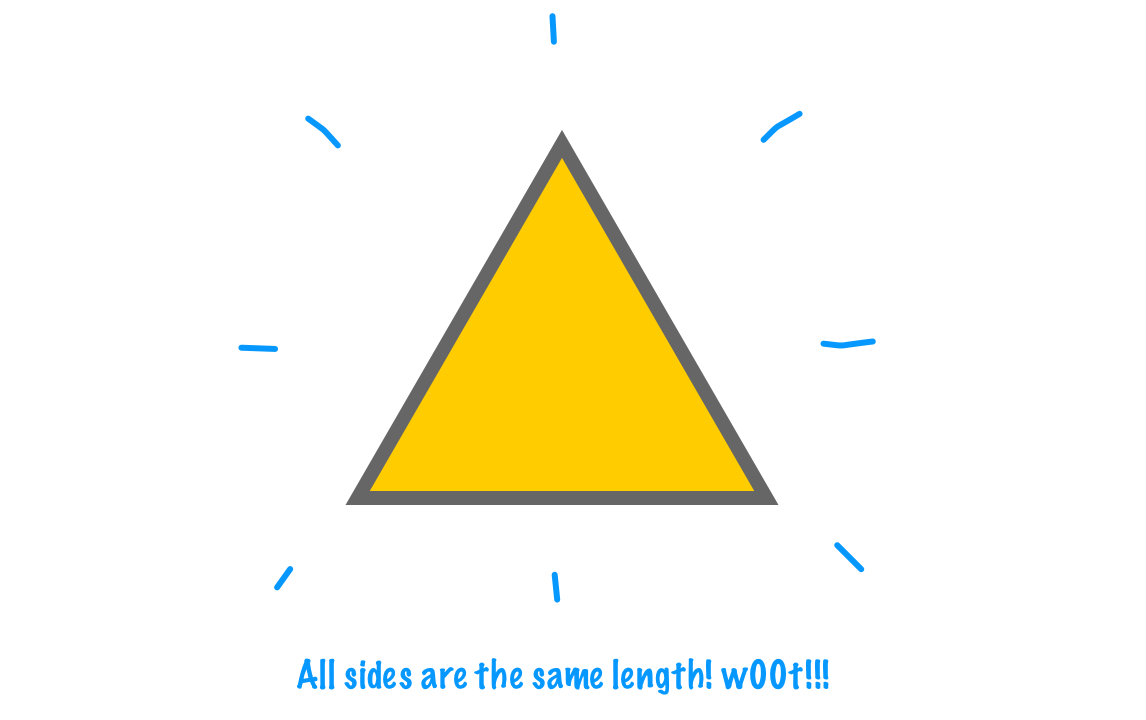
It turns out that creating them is a bit of a doozy, but we'll un-doozify this here. The challenge lies in figuring out the three points that will make up the triangle. Let's say that this is the triangle we want to draw:
For the three points, two of the points are part of a straight line that makes up one of the sides. These two points would be (100, 300) and (300, 300). The tricky part is the third point:
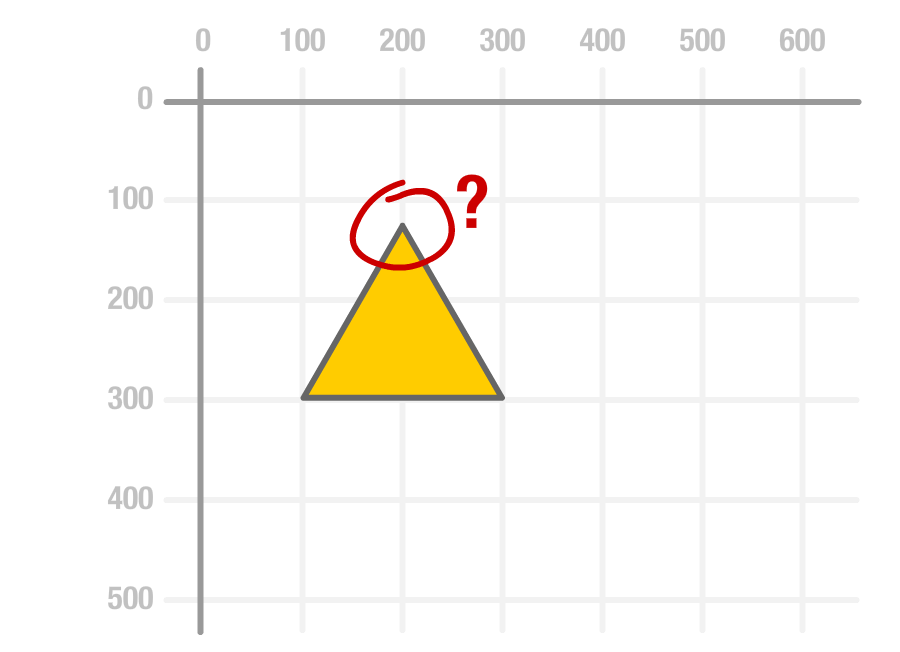
The third point's horizontal position is half the length of our triangle's side. That would be one half of 200 which is 100. Since the triangle is offset horizontally by 100 pixels, the final horizontal position will be 200:
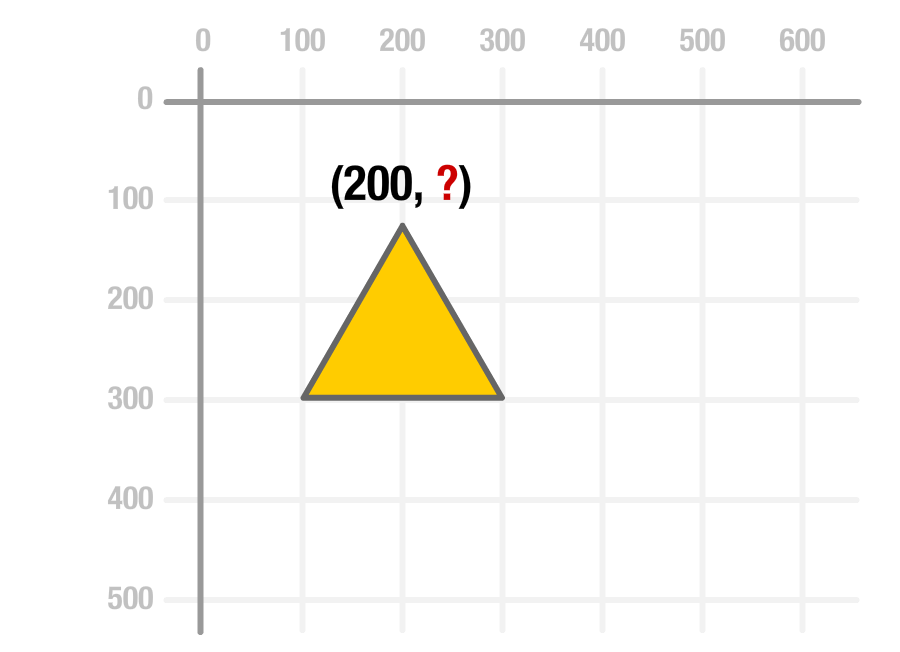
The vertical position is less straightforward to figure out. This position involves both the offset as well as this triangle's height. The offset is straightforward to calculate, for we are starting 300 pixels from the top. The height is the tricky one. The exact math involved in figuring the height is something we'll cover separately, but the formula is length * Math.cos(30) in the degrees world or length * Math.cos(π / 6) in the radians one.
If we put all of this together into working code, here is what the full code for drawing our equilateral triangle will look like:
let canvas = document.querySelector("#myCanvas");
let context = canvas.getContext("2d");

function drawTriangle() {
  context.clearRect(0, 0, canvas.width, canvas.height);

  context.fillStyle = "#FFFFFF";
  context.fillRect(0, 0, canvas.width, canvas.height);

  let height = 200 * Math.cos(Math.PI / 6);

  context.beginPath();
  context.moveTo(100, 300);
  context.lineTo(300, 300);
  context.lineTo(200, 300 - height);
  context.closePath();

  // the outline
  context.lineWidth = 10;
  context.strokeStyle = '#666666';
  context.stroke();

  // the fill color
  context.fillStyle = "#FFCC00";
  context.fill();
}
drawTriangle();
The important part is the code that makes up our three points:
let height = 200 * Math.cos(Math.PI / 6);

context.beginPath();
context.moveTo(100, 300);
context.lineTo(300, 300);
context.lineTo(200, 300 - height);
context.closePath();
Notice that we translated what we talked about using words into the moveTo and lineTo calls that our canvas knows what to do with.
Anyway, as you can see, drawing a triangle isn't particularly hard. At least, it should no longer be after seeing how easy it is to draw a few lines and set a few visual properties. It just requires you keeping track of where your virtual pen is at the end of a series of moveTo, lineTo, and closePath commands.
Just a final word before we wrap up. What you've seen here is freshly baked content without added preservatives, artificial intelligence, ads, and algorithm-driven doodads. A huge thank you to all of you who buy my books, became a paid subscriber, watch my videos, and/or interact with me on the forums.
Your support keeps this site going! 😇


:: Copyright KIRUPA 2025 //--