
Let's face it. The default black color everything on the canvas gets is cool at first, but it gets tiring after a while:
In this article, we'll do a deep dive into all the ways you have for giving your canvas content some much needed life via color.
Onwards!
The primary way you colorize content is by setting the strokeStyle property for shape outlines and the fillStyle property for the shape insides:
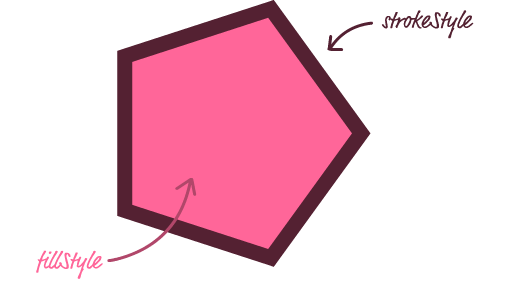
Between these two properties, you can color everything from lines to geometric shapes to text.
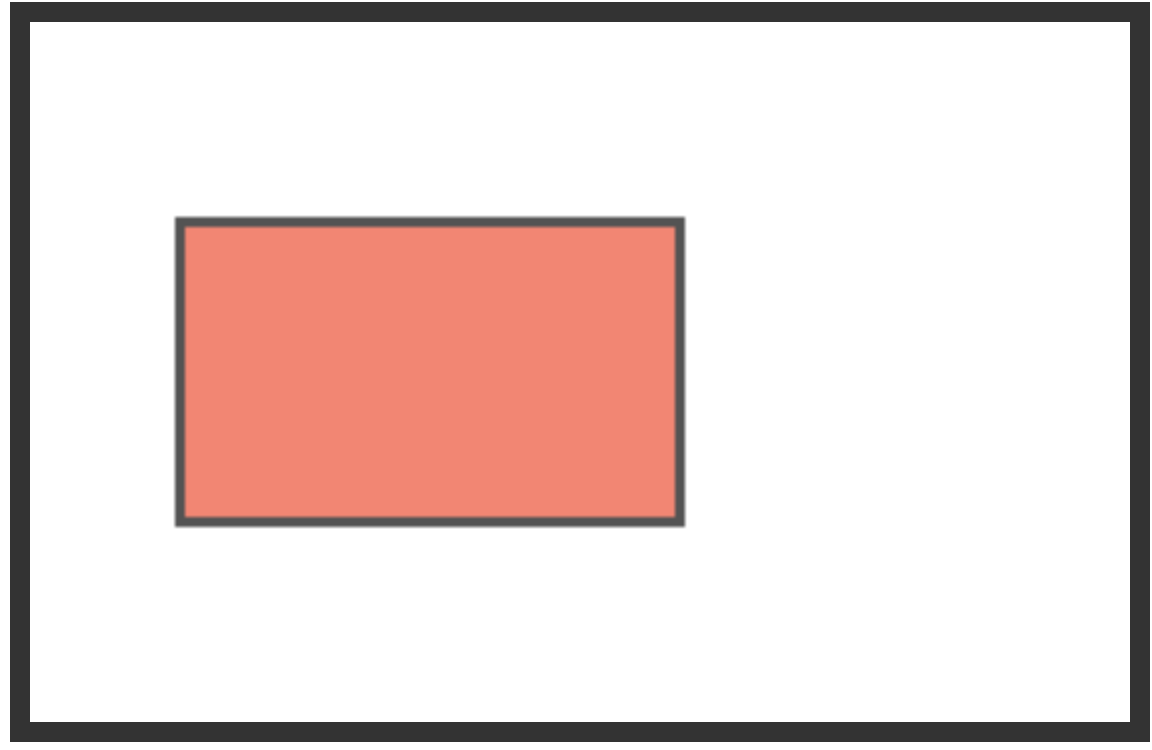
Let's say we have a rectangle that looks as follows:

The code responsible for this work of art looks like this:
var canvasElement = document.querySelector("#myCanvas");
var context = canvasElement.getContext("2d");

context.beginPath();
context.rect(75, 100, 250, 150);
context.fill();
To set the fill color of this element, add the following highlighted line that specifies the fillStyle property:
context.beginPath();
context.rect(75, 100, 250, 150);
context.fillStyle = "#FFCC00";
context.fill();
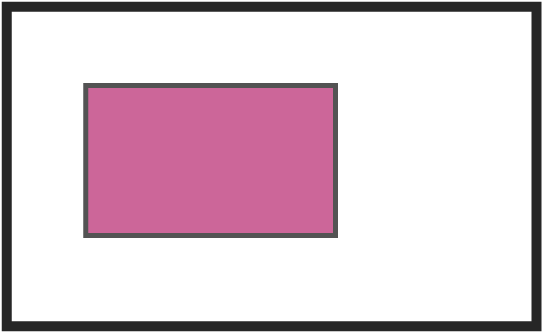
Let's not stop with just the fill. Since we are already here, we are going to next add a thick outline and give that a color via the strokeStyle property. Add the following three highlighted lines to your code:
context.beginPath();
context.rect(75, 100, 250, 150);
context.fillStyle = "#FFCC00";
context.fill();

context.lineWidth = 5;
context.strokeStyle = "#535353";
context.stroke();
Once you have made the change, preview what you have in your browser. You should see something that looks like this:

The two lines of code that took our pretty drab looking rectangle and helped make it a bit more lively are the fillStyle and strokeStyle properties. You can argue that the fillStyle probably had more to do with it since the outline is still a pretty dull shade of gray, but anyway...but what we are going to do from here on out is take a look at the various ways you have for specifying colors. While I will be focusing only on the fillStyle property, everything you see will apply equally to strokeStyle as well. Me ignoring strokeStyle is purely done for aesthetic reasons. After all, changing the fill color of a rectangle looks a lot more impressive than changing just the outline color!
Let us start our exploration by looking at what we have already specified for the fillStyle property in our code:
context.fillStyle = "#FFCC00";
Here, we've assigned a hex color value that corresponds to a nice shade of yellow. This hex value corresponds to the Red, Green, and Blue components of the color we are trying to represent. Chances are, if you are copying color values defined in an image editor, you are going to be seeing values in this format.
You can also specify CSS color keywords such as yellow, navy, firebrick, and a whole bunch of colors with really cool names:
context.fillStyle = "deepskyblue";
Have you ever wondered what deepskyblue looks like? Well, wonder no more:

You can see the full range of color keywords in this MDN article. For the most part, you probably won't be using color keywords much. The reason is that these named colors are extremely web-specific, and most image editing tools have no idea to either accept or export color keywords. Instead, many image editing tools prefer good old RGB. Speaking of which...
As it turns, you can also specify colors to the fillStyle and strokeStyle properties as an RGB value by using the rgb function:
context.fillStyle = "rgb(204, 102, 153)";
Replacing our rectangle's fillStyle value with this RGB entry looks as follows:
Your RGB function and the values are expected to be in the form of strings. That is why you see them wrapped inside quotation marks. With that said, we are inside JavaScript. Nothing prevents you from parameterizing the values by doing some good, old-fashioned string magic:
context.fillStyle = "rgb(" + r + ", " + g + ", " + b +")";
For many interactive scenarios, you will find yourself doing this quite often, so just be aware that you can totally do this.
So far, we've looked at specifying a color as a hex value, CSS color keyword, and a RGB value. There is just one more variant for specifying a single color, and that is RGBA. The "A" stands for alpha...or transparency, and you specify that value as a number between 0.0 (fully transparent) to 1.0 (fully opaque).
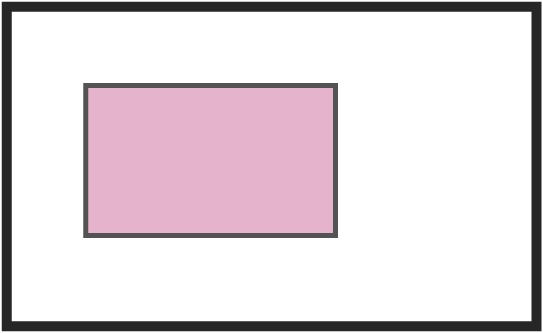
If we to extend the earlier example by giving our fill color a 50% transparency, here is what the rgba declaration would look like:
context.fillStyle = "rgba(204, 102, 153, .5)";
This will translate to a more muted version of the pink color we saw earlier:
You do have one more way for setting the transparency, and that way is by setting it globally via the globalAlpha property:
context.globalAlpha = .3;
With this line, we are setting the opacity of everything in our canvas to be just 30 percent. Your strokes and fills will be impacted, and the globalAlpha property overrides any alpha value you may have specified inside your rgba function. Use this property at your own peril.
We've spent a lot of time taking about RGB values. While a lot of the colors you will use will be in that format, you aren't limited to just RGB, though. You can also specify colors in the HSL space. In HSL, you define a color by specifing values for Hue, Saturation, and Lightness.
You can think of HSL colors modeled as shown in the following three-dimensional cylinder (created by SharkD):
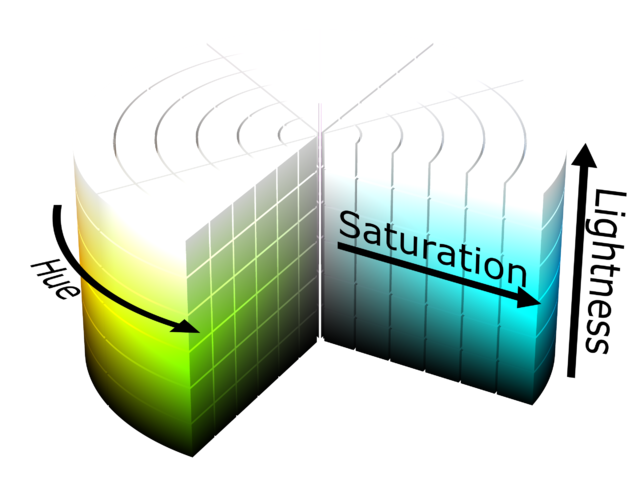
The value for Hue is specified in degrees going from 0 to 360. Both Saturation and Lightness are percentages that you specify as as percentage values. Below is what the fillStyle property set to a HSL value looks like:
// a salmon-ish color specified in HSL
context.fillStyle = "hsl(9, 83%, 70%)";
This translates into a rectangle that looks like the following:
Just like what we saw with RGB values, you can tackle on a value for alpha to define a HSLA color. Below is an example of an HSLA color that is green-ish looking with an opacity of 50%:
context.fillStyle = "hsla(100, 83%, 70%, .5)";
HSL values are very common when working with colors from design tools, but they are great to use if you want to manipulate colors programmatically. Instead of dealing with three independent values like you have with RGB, in the HSL world, you can go through a range of colors by just modifying one of the H, S, or L values. That's a convenience you should totally not overlook if you ever find yourself manipulating color values in JavaScript.
There is just one more thing we need to look at before our look into working with colors is wrapped up. That thing is gradients! So far, we've only specified a single color value for the various things we've been coloring. Gradients change all that. With gradients, you have the ability to specify multiple colors and how those colors blend in with each other. In the following sections, let's learn all about them.
The first gradient variation we'll learn about is the linear one. A linear gradient is one where you have two or more colors on a virtual (invisible) straight line. These colors blend evenly as you move from one color to another on this line. That definition is probably more complicated than it needs to be, but hopefully the following image makes more sense:

We have two colors one two ends of a rectangle. On one end is a light gray. On the other end is cyan. Between those two points, the colors gradually blend between the gray and cyan to give you this smooth look. That blending is one of the hallmark features of a gradient. Now, let's go a bit deeper.
These two points on either end of our gradient have a more formal name. They are known as gradient color stops or just color stops. You can have as many color stops as you want, and each color stop defines its own color and position on the virtual straight line:
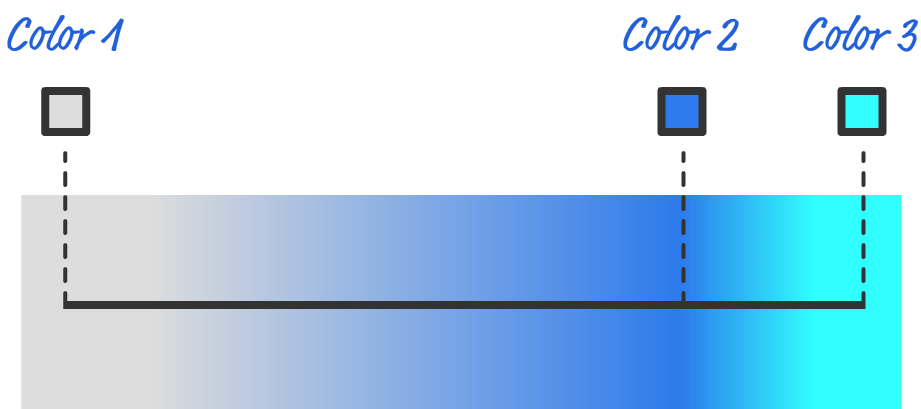
In this version, we modified our earlier example by adding a slightly darker blue gradient stop near the right. Notice that how our colors blend has changed to accommodate this new color that has been thrown in. By adding (or removing) gradient stops and positioning them in various places on our virtual straight line, you can create a variety of different gradient effects.
There is just one more thing to cover before we start looking at how to use this linear gradient to colorize what we draw on the canvas. This virtual line all of our gradient stops live on can be rotated in all sorts of ways:
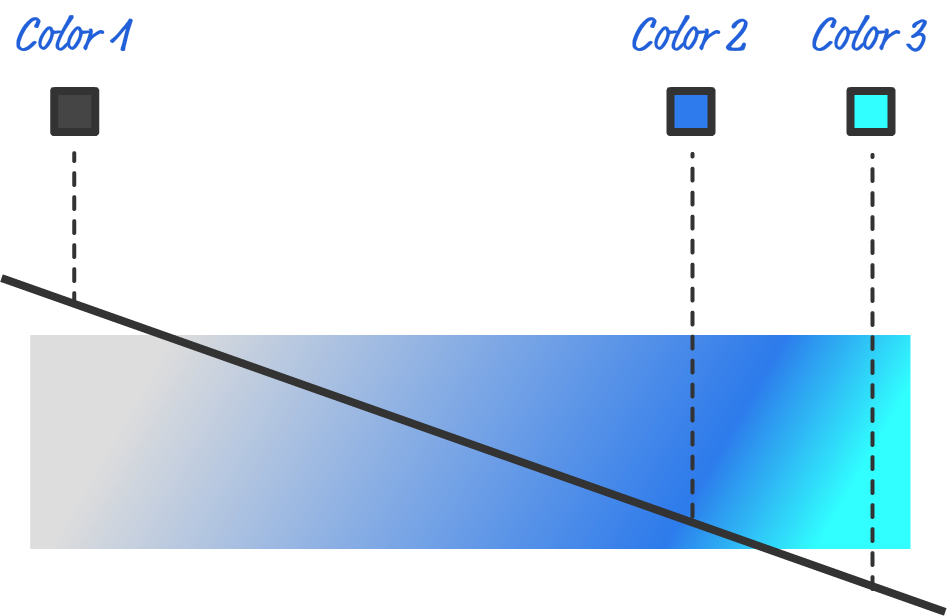
This rotation ends up changing the angle our colors transition from one value to another. By rotating the straight line, you can create gradients whose colors change horizontally (like we saw earlier) to ones where the colors are stacked like pancakes to ones that change in any other angle in-between.
Now that we have seen all of this, let's learn how to use linear gradiens in our canvas! The way you specify a linear gradient is by using the createLinearGradient method. This method takes four arguments that map to the starting and ending X and Y points of our virtual straight line:
context.createLinearGradient(x_0, y_0, x_1, y_1);
What this method returns is a CanvasGradient object that you can then add your color stops to using addColorStop. Let's re-create the gray/blue/cyan gradient that we've been seeing so far.
Take a look a the following code where anything gradient-related is highlighted:
context.beginPath();
context.rect(75, 100, 250, 150);

// virtual line length matches our rectangle's dimensions
var gradient = context.createLinearGradient(75, 0, 325, 0);

// our three color stops
gradient.addColorStop(0.1, "#DDDDDD");
gradient.addColorStop(0.75,"#2D7BEC");
gradient.addColorStop(0.9, "#31FFFF");

// assigning the gradient
context.fillStyle = gradient;
context.fill();

context.lineWidth = 5;
context.strokeStyle = "#535353";
context.stroke();
Notice how we go from defining our CanvasGradient object to specifying our colorStops to ultimately assigning our CanvasGradient object to the fillStyle property. The end result of this looks as follows:

Our rectangle is filled with the linear gradient that we specified earlier. Before we move on to the next section, let's look at our gradient code in greater detail to truly understand what is going on.
The first line is where we define our CanvasGradient object very cleverly called gradient:
var gradient = context.createLinearGradient(75, 0, 325, 0);
The position of our virtual line matches the size of the rectangle we are trying to paint. Because our virtual line isn't going to be rotated, I left the Y value for both of the points to just be 0. The size of a gradient is infinite after all, so every Y position (in our unrotated virtual straight line) will have the same gradient value applied. Anyway, the X value maps to the starting and ending points of our rectangle, and it is important to get this value correct. If these values are off, our color stops will be placed at points you probably don't want. Speaking of color stops, gaze your eyes to the next chunk of code:
// our three color stops
gradient.addColorStop(0.1, "#DDDDDD");
gradient.addColorStop(0.75,"#2D7BEC");
gradient.addColorStop(0.9, "#31FFFF");
We call the addColorStop method on gradient. The addColorStop method takes two arguments. The first argument specifies where the color stop will be located. You specify the location in terms of a decimal value between 0 and 1 with 0 being the start of our virtual line and 1 being the end of our virtual line. The second argument takes a color value.
You put all of this together, we specify our three color stops at at the 0.1, 0.75, and 0.9 locations with a color value of #DDDDDD, #2D7BEC, and #31FFFF respectively.
All that remains is to now assign our CanvasGradient object to whatever any of the canvas properties that deal with color. The lucky winner in our example is fillStyle...again:
context.fillStyle = gradient;
This line and the subsequent call to the fill method ensure our linear gradient gets applied to our rectangle!
The next (and last!) type of gradient we will look at is the radial gradient:
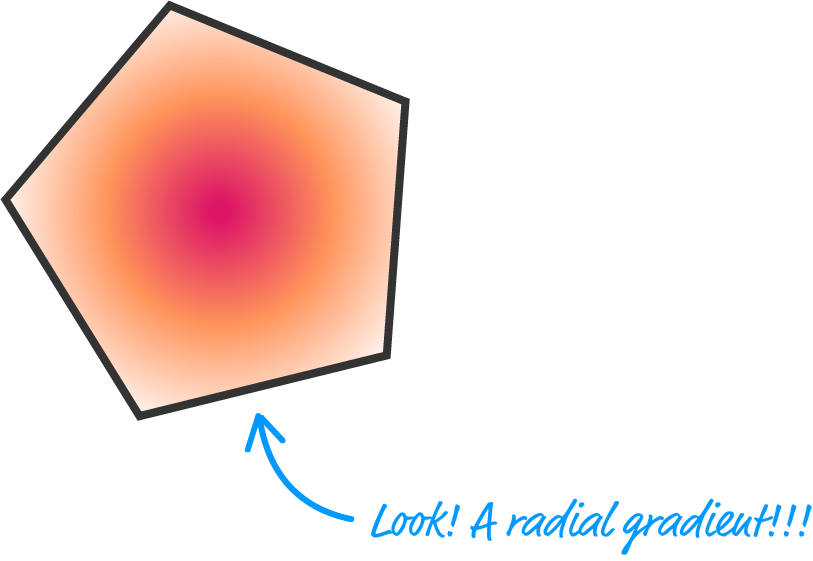
Radial gradients allow you to define a gradient that is all round and oval shaped. That sounds simple, but the way you visualize and actually use them is a whole another story. We will start at the very beginning and gradually ratchet up the complexity until we fully understand it.
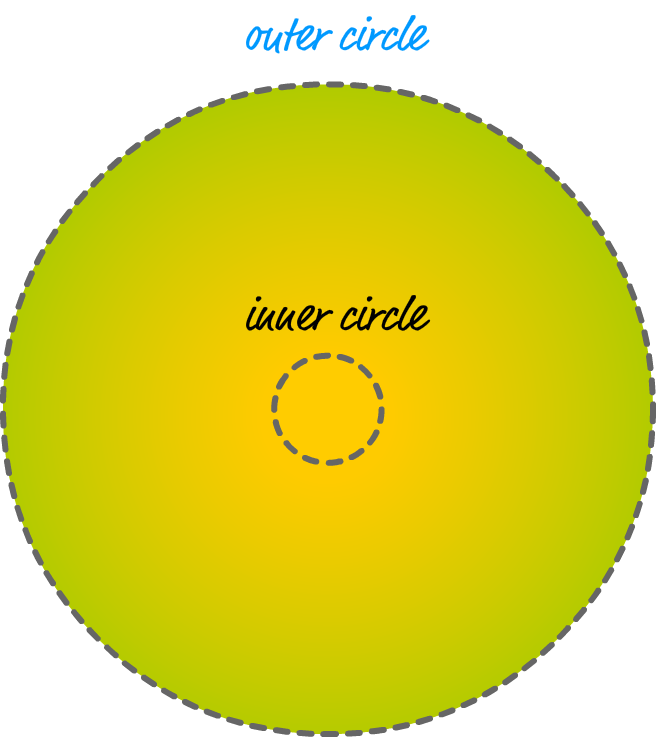
With linear gradients, we had a virtual straight line that we specified our color stops on. That was easy to quickly understand. With radial gradients, we still have a virtual straight line. The difference is that this virtual straight line is bounded by two virtual circles. I know that last sentence makes no sense right now, so take a look at the following diagram:
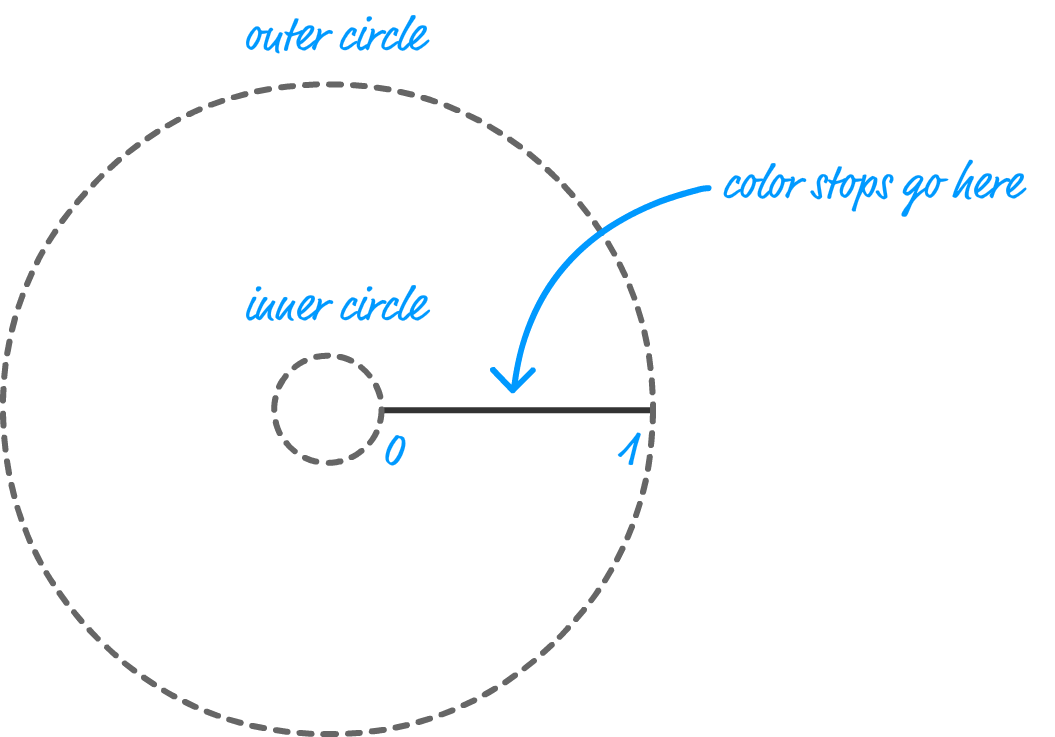
What we have here is a very literal representation of what a radial gradient looks like with no colors specified. We have an inner circle with a position and radius. We have an outer circle with a position and radius. Let's assume both of these circles are centered at the same location. If we drew a straight line from the center points of these two circles to the outer circle's edge, we have our virtual straight line that determines where our color stops will go. So far so good, right?
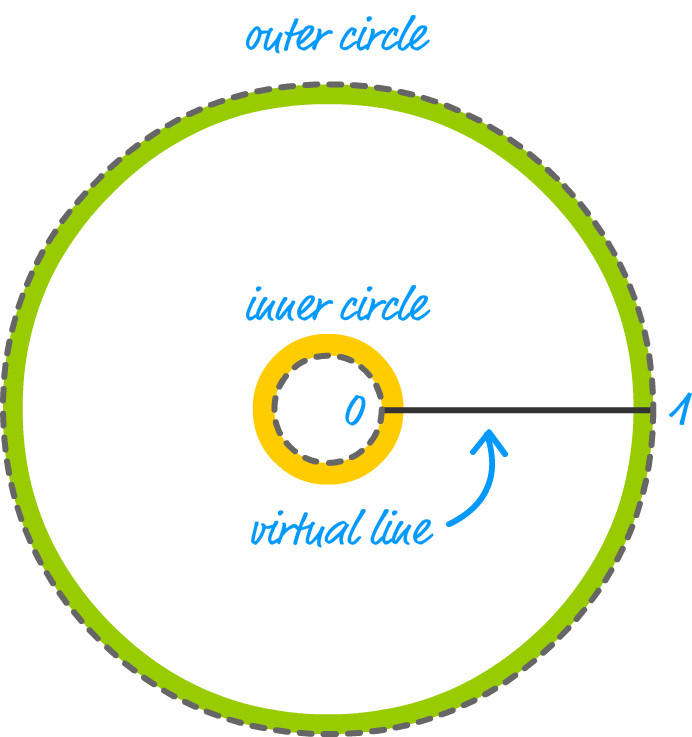
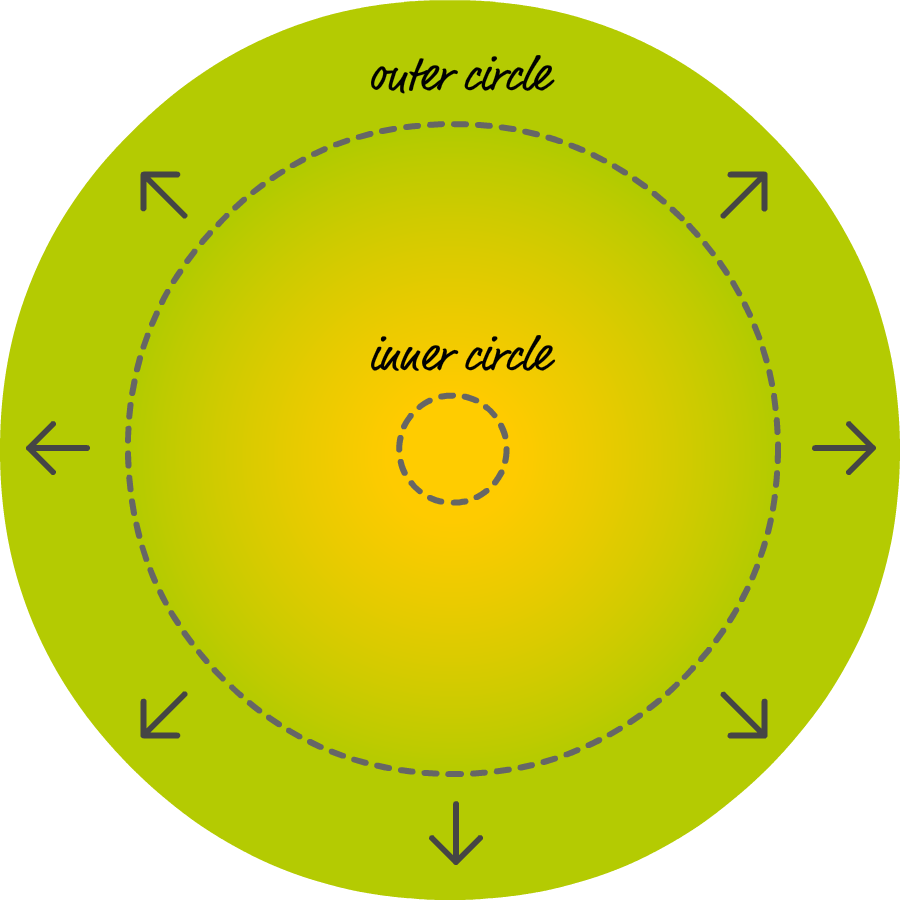
Let's throw some colors into the mix. At the 0 end of our virtual line, we are going to specify a yellow color. At the 1 end of our virtual line, we are going to specify a green color. Without doing any gradienting, given the two virtual circles we have, the two colors will look as follows:
The way the colors move in a radial gradient is interesting and a little confusing at first. The easiest way to make sense of everything is to start by figuring out the coloring behavior for the inner circle and the outer circle.
The inner circle is affected by the first color stop. In our case, that is the yellow color stop at the 0 position. The outer circle is affected by the last color stop. That is the green color at the 1 position. Between the two color stops, the colors blend just like they had in the linear case. The yellow will slowly make way to the green:
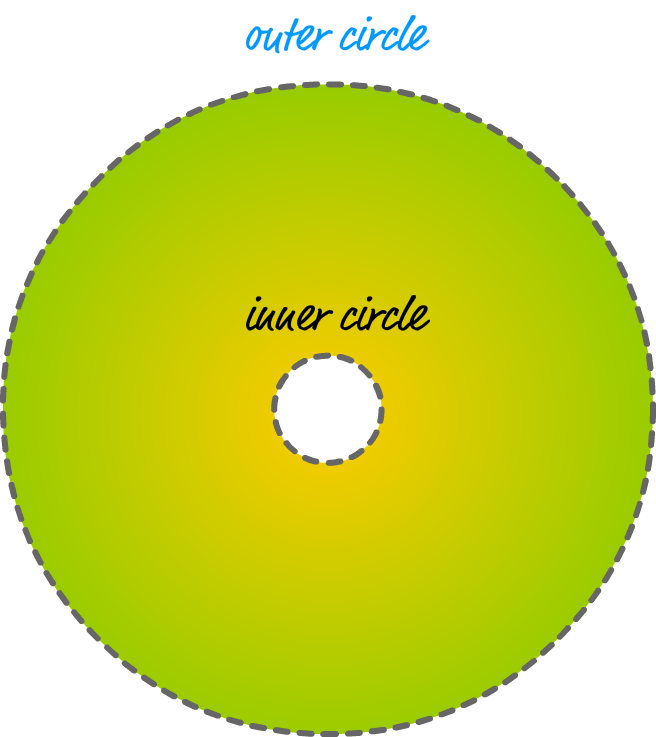
Inside the inner circle, the color will be the same as whatever the first color stop was. That means, the inside of our circle is going to be yellow:
Outside of the outer circle, everything is going to be the same color as the last color stop. That means, everything is going to be green:
This green will go on forever in all directions. Any additional colors you specify only affect how the gradient behaves within the virtual straight line. The inside of the inner circle and the outside of the outer circle will always be a solid color that matches the color stop they are closest to.
Ok. Pause for a moment. Did you know that we just fully explained how one variation of a radial gradient works?!!
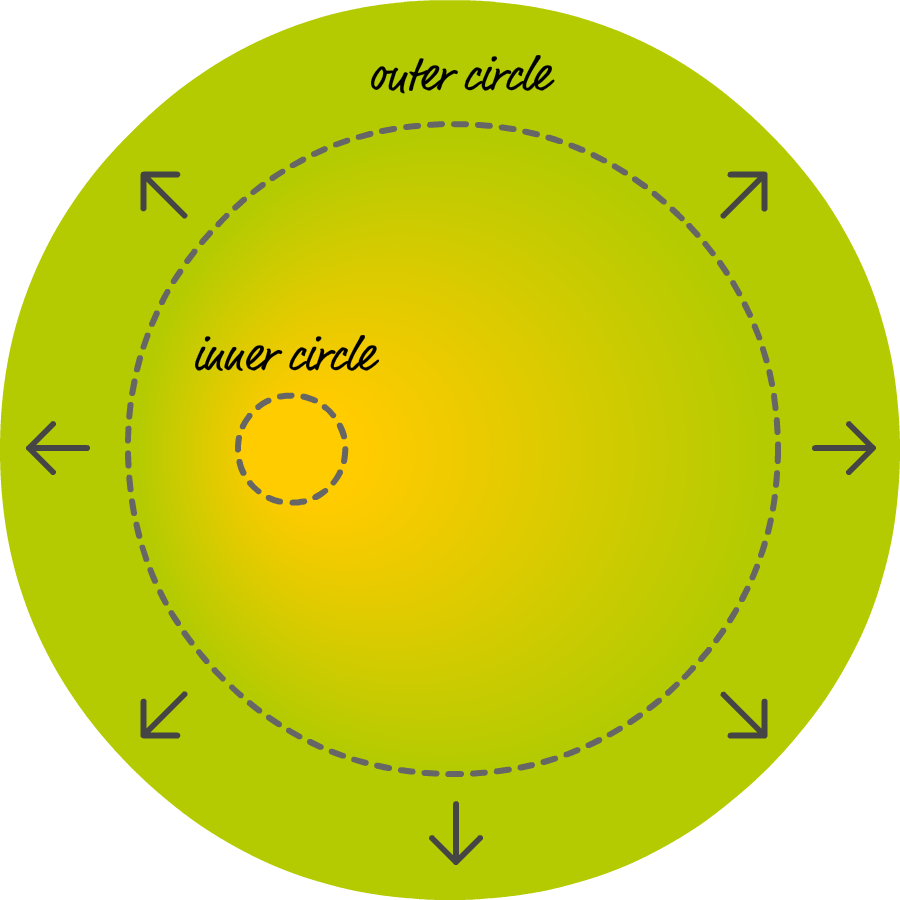
You think we are done with this, right? Not yet! What we looked as is the ideal case where both the inner circle and the outer circle share the same center point. You can define a radial gradient where the inner and outer circles have different center points:

The behavior that we've seen so far is entirely identical even in this situation. The only difference is that your colors will look condensed on one side and more spread out on the other. Using the same yellow and green from before, the following is what you will see when the inner circle's center point is further left than our outer circle's center point:
There are a few more quirks beyond the big ones we've seen so far, but enumerating all of those will take too much time. The hard part was learning the basics that you just saw, so let's next look at how to implement a radial gradient.
To create a radial gradient, you are going to use the createRadialGradient method. This method takes six arguments:
context.createRadialGradient(x_i, y_i, r_i, x_o, y_o, r_o);
The first three arguments stand for the inner circle's x position, y position, and radius. The last three arguments stand for the outer circle's x position, y position, and radius. The createRadialGradient method returns a CanvasGradient object that you can then add color stops to and assign to a property like fillStyle or strokeStyle.
Here is us applying our yellow and green colored radial gradient to our rectangle:
context.beginPath();
context.rect(75, 100, 250, 150);

// our radial gradient!
var gradient = context.createRadialGradient(150, 175, 0, 150, 175, 100);

// our two color stops
gradient.addColorStop(0, "#FFCC00");
gradient.addColorStop(1, "#B4CB02");

// assigning the gradient
context.fillStyle = gradient;
context.fill();
After all of this, our rectangle will look as follows:
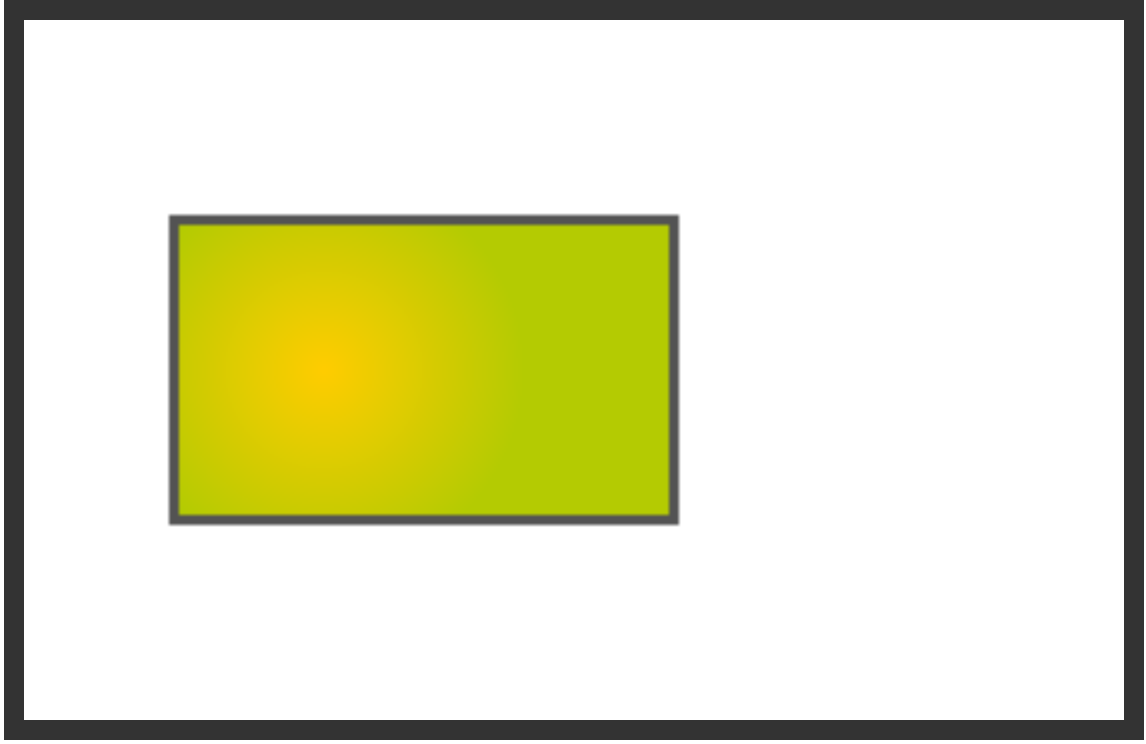
Once you understand the basics of how to work with radial gradients, the only tricky part is positioning the center points at the right location with regards to the thing you are painting. You can see where we positioned our inner and outer circles with respect to the rectangle - both in the code as well as visually.
When you are specifying values for fillStyle and strokeStyle, all of the approaches we looked at will help get you the result you want. You can even use multiple variations of these approaches in the same app. For the sake of consistency, I wouldn't recommend doing that, but that is a different issue of preference altogether. Also, isn't this probably the weakest conclusion for an epic chapter on color that you've probably ever seen? I certainly hope so! :P
Just a final word before we wrap up. What you've seen here is freshly baked content without added preservatives, artificial intelligence, ads, and algorithm-driven doodads. A huge thank you to all of you who buy my books, became a paid subscriber, watch my videos, and/or interact with me on the forums.
Your support keeps this site going! 😇


:: Copyright KIRUPA 2025 //--