
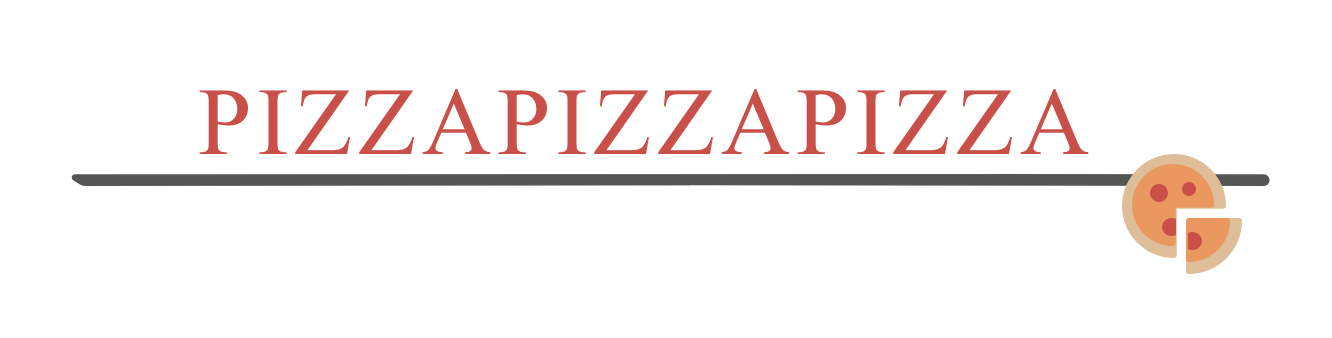
The Ceasar's Cipher is a simple, popular, and effective way of encrypting a message from prying eyes. Named after Julius Caesar (of Little Caesar's Pizza fame and possibly an empire), the way this cipher works is by generating an encrypted message by shifting the letters in an original message by a fixed amount. Let's say that the message we wish to encrypt is the following:
If we encrypt this message by shifting the letters by 2 positions, the output will be this:

Now, what in the world is this whole shifting business? To better explain this, we know that the 26 letters in the English alphabet start at A and go all the way to Z:
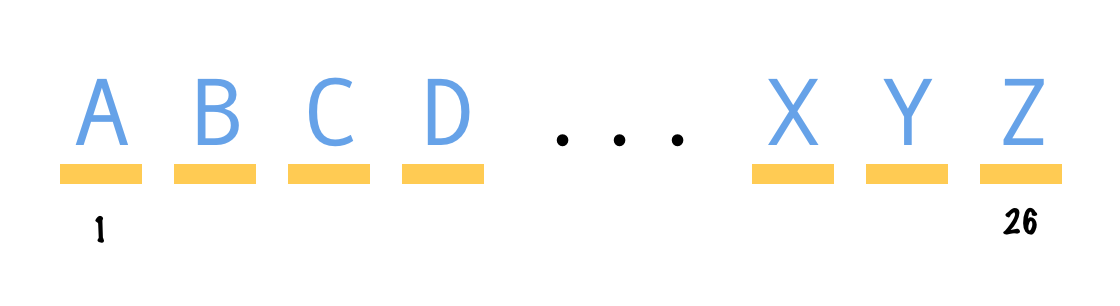
Our first letter will be A, second letter will be B, and so on. What if we shift our starting point? If we shift our letters by 1, what was A is now B, B becomes C, C becomes D, and...you get the picture:
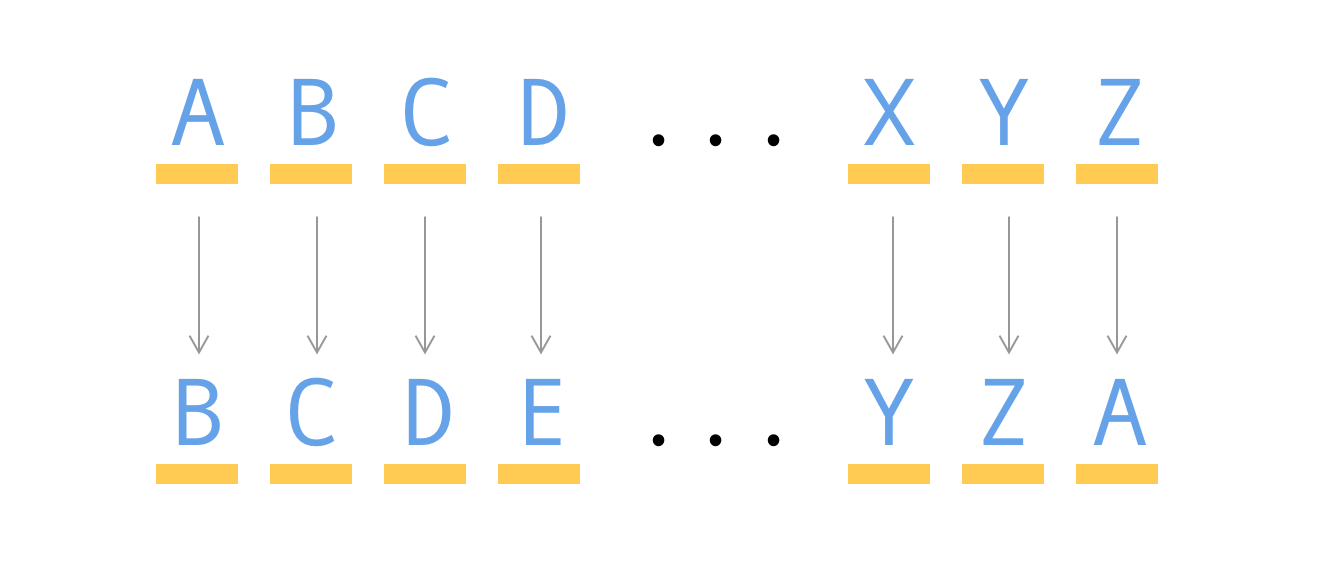
Now, what happens to the Z at the end? It will become an A because, when we shift past the end, we will just wrap the letters around and start from the beginning. Shifting our letters by 1 may be easy, but the nice thing is that our overall behavior stays the same even if we shift by different numbers. The following is what our letters look like when we shift by 3:
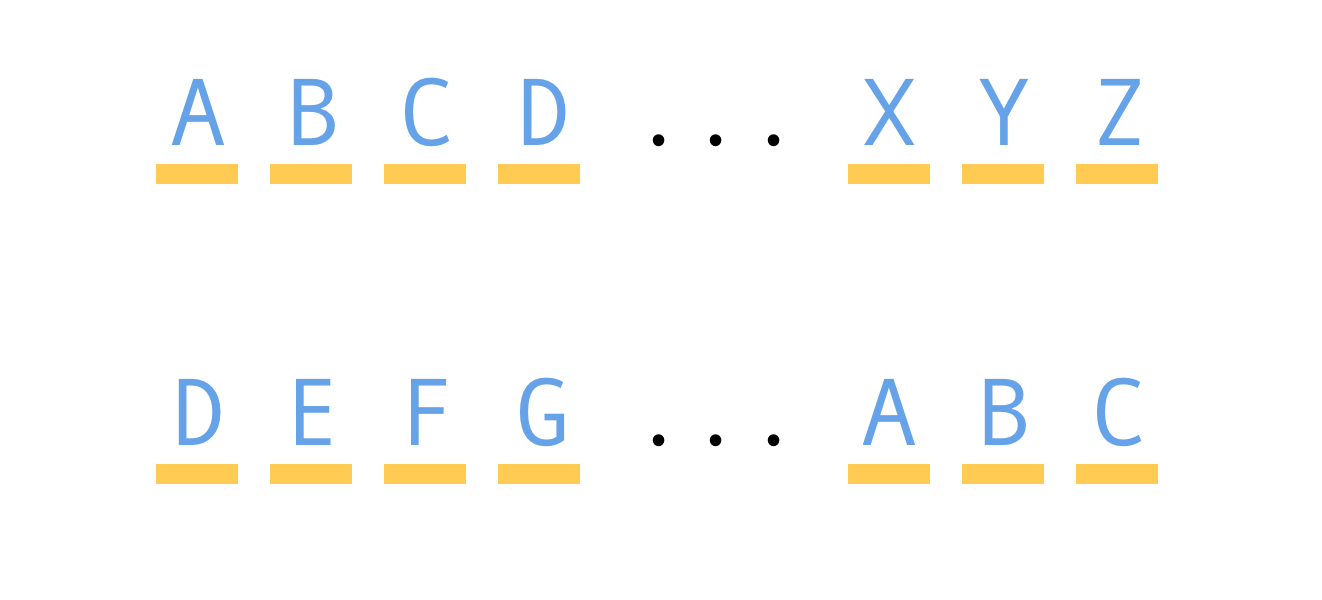
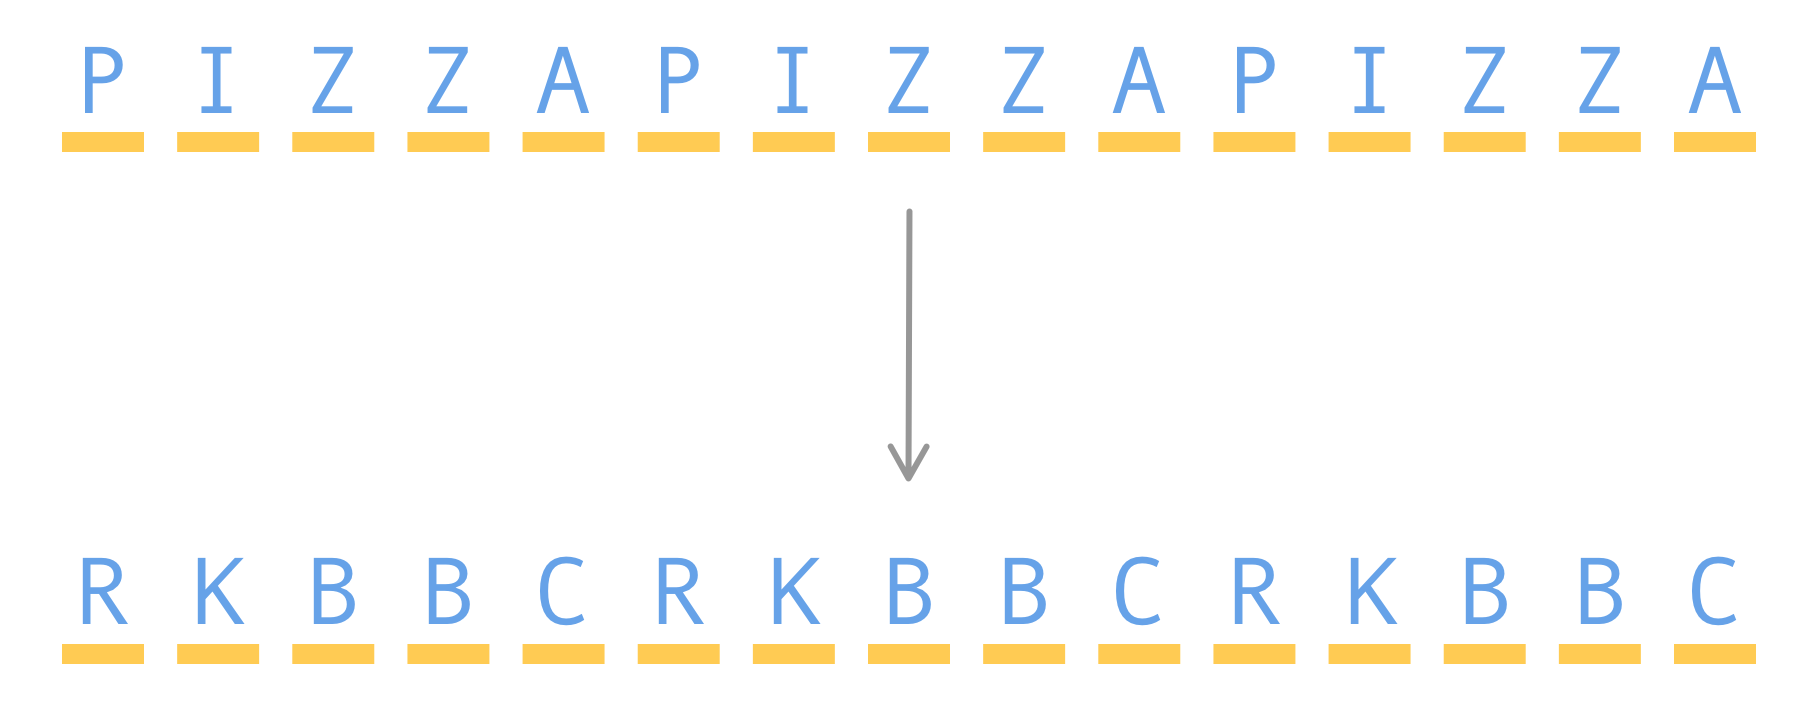
The only thing that changes from earlier when we shifted by 1, is that we shift by more letters where A is now D, B is now E, X is now A, etc. Getting back to our example, we started with pizzapizzapizza. Shifting by 2 means each letter is in our original message is shifted where P is now R, I is now K, Z is now B, and A is a C:
Now, before we wrap up our overview of the Caesar's cipher and how it works, there is one last detail to call out. Some implementations of the Caesar's cipher shift the letters left and other implementations shift the letters right. There is no right or wrong answer for which direction you need to shift, but for our version of this cipher, we will be shifting our letters left. That is what've been doing so far.
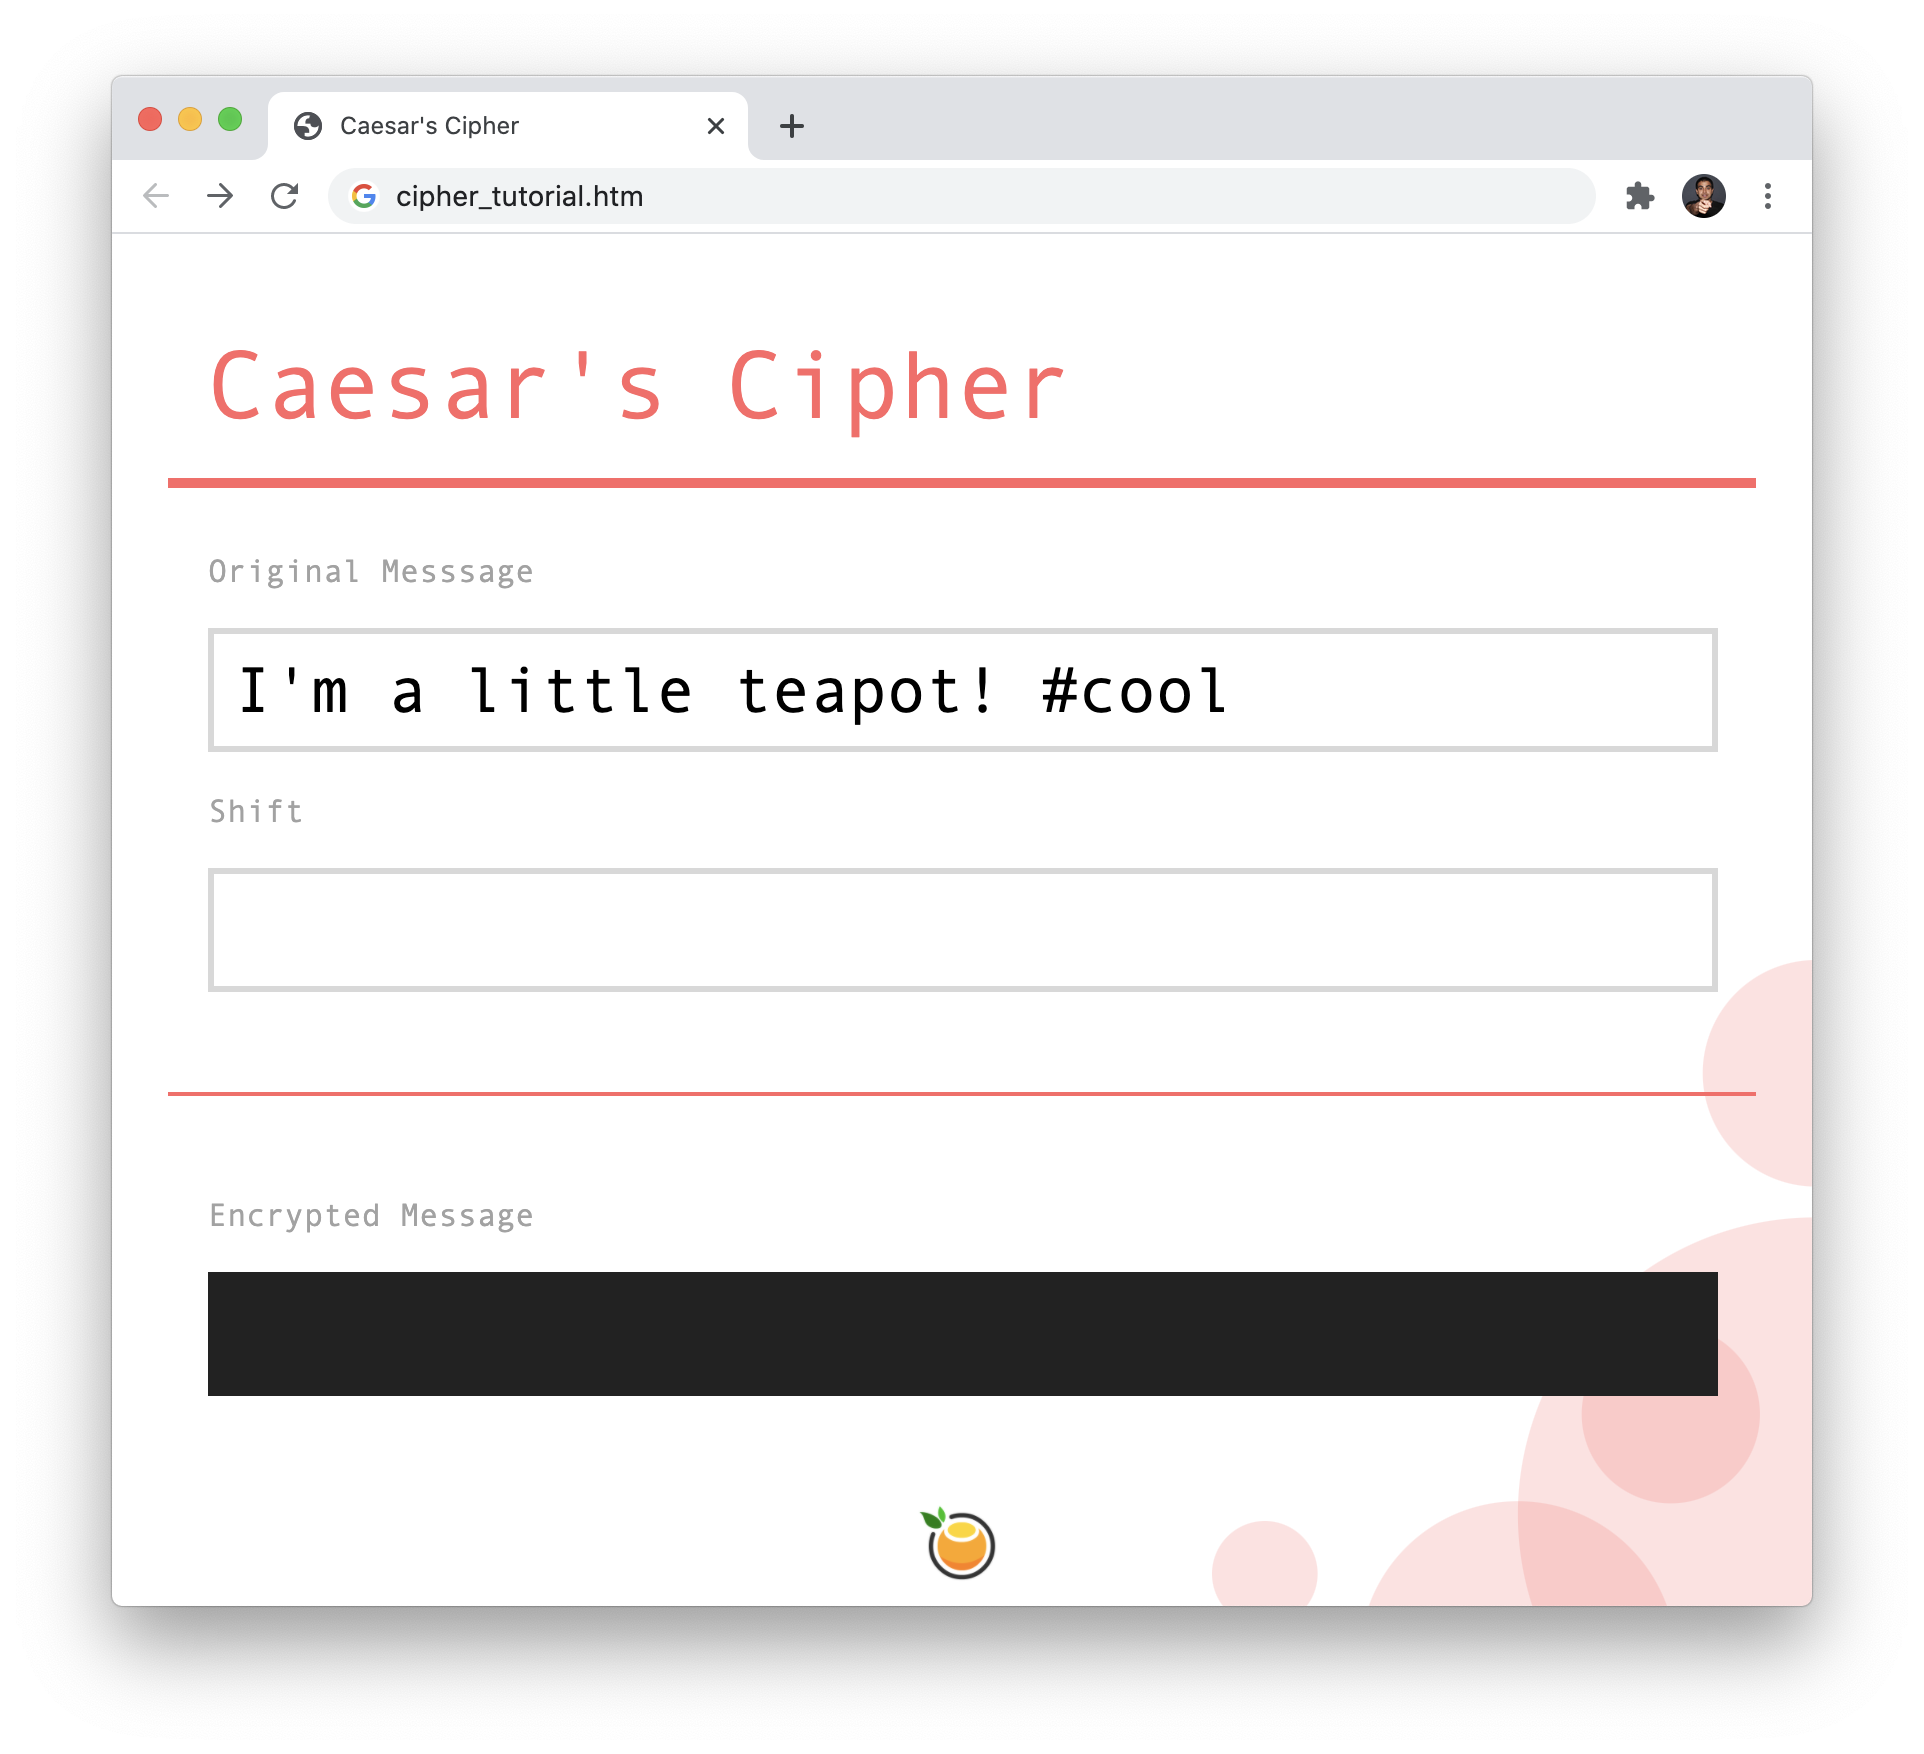
You may be wondering why we spent all of this time learning about the Caesar's cipher and how it works. The reason is that we are going to be building our own Caesar's cipher app, and it is going to look and behave as follows (open in new window):
Tying this example with our explanation, we already have pizzapizzapizza with a shift value of 2 already preset, but to try your own messages, replace the Original Message text and Shift value to something else. You'll see the encrypted version of what you specified appearing below in real-time as you are making the changes. You can also decrypt messages as well. All you have to do is enter your encyrypted message where the original message goes and play with the shift values until something that resembles an English message appears:
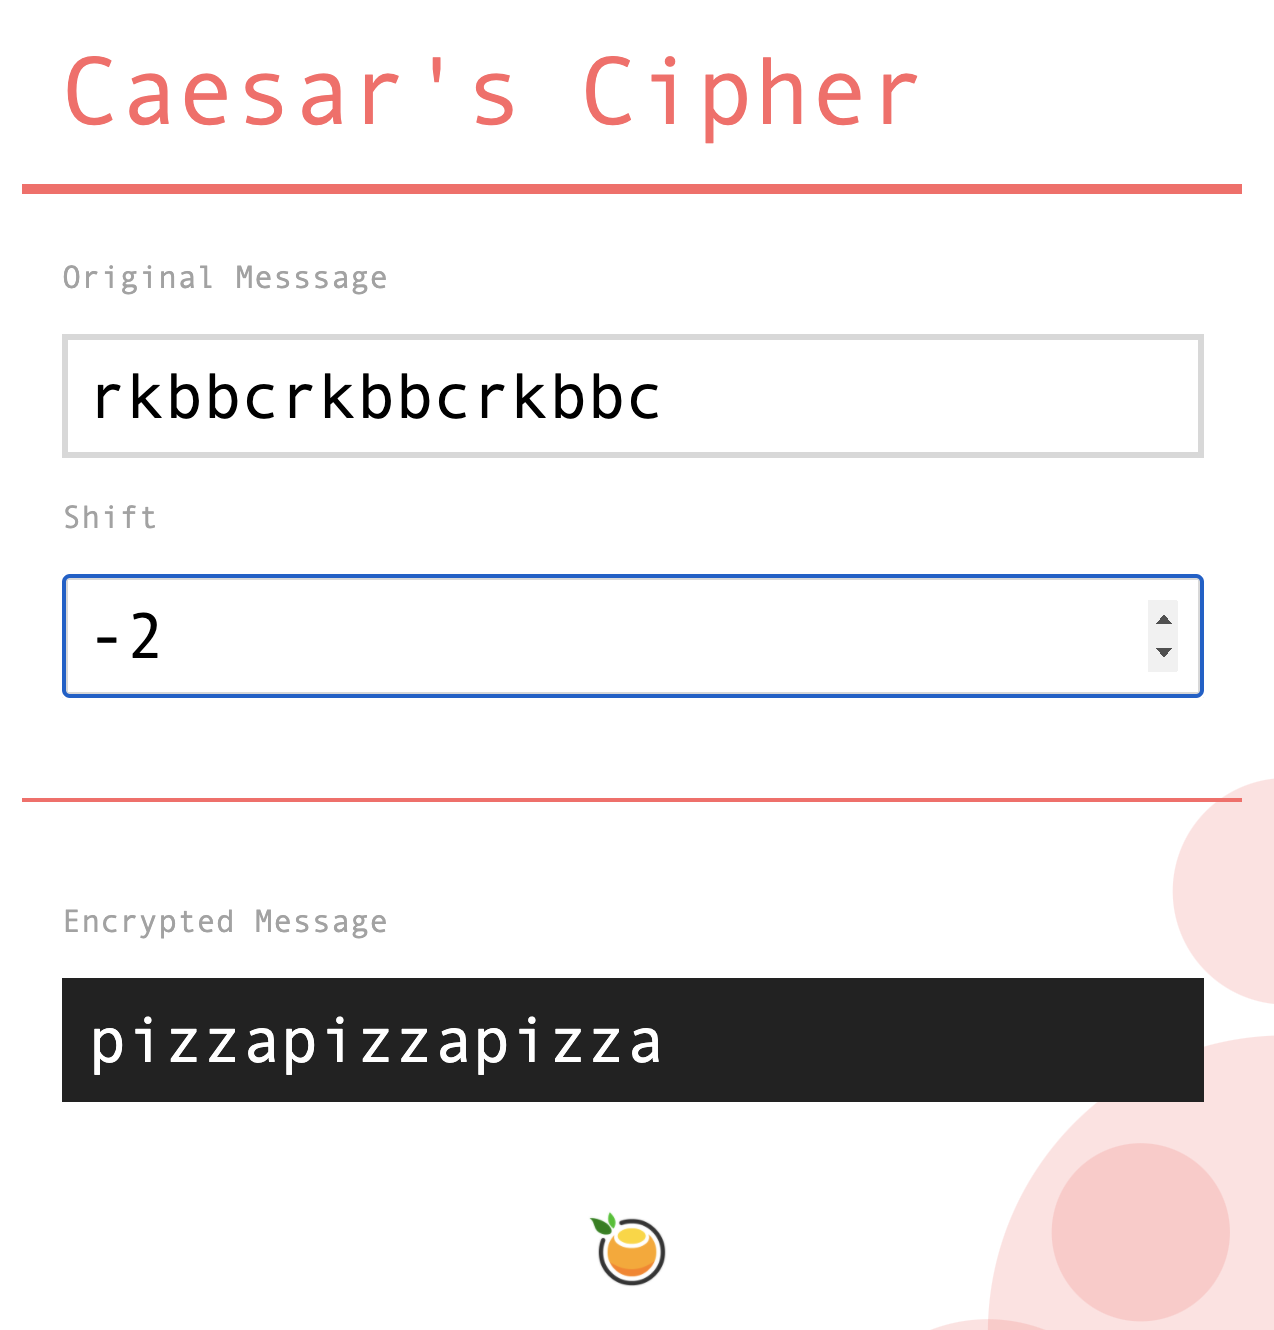
The above is us decrypting rkbbcrkbbcrkbbc back to pizzapizzapizza by using -2 as the shift value. If you already know the shift value used during the original encryption, the shift value to decrypt the message will just be the opposite sign of that. Knowing the shift value in many real-world cases is a big "If", so don't expect future decryptions from your friends to be quite this easy!
In the following sections, we'll gradually be building this app up in both appearance and functionality, often jumping between both as we discover new gotchas along the way. It's going to be be a hoot, so let's get started.
Onwards!
To start building our cipher, the first thing we need is a basic HTML page. Create a blank/new HTML document in your favorite code editor (Visual Studio Code is my personal favorite) and add the following HTML into it:
<!DOCTYPE html>
<html lang="en">
<head>
<meta charset="UTF-8">
<meta name="viewport" content="width=device-width, initial-scale=1.0">
<title>Caesar's Cipher</title>
<style>
</style>
</head>
<body>
<script>
</script>
</body>
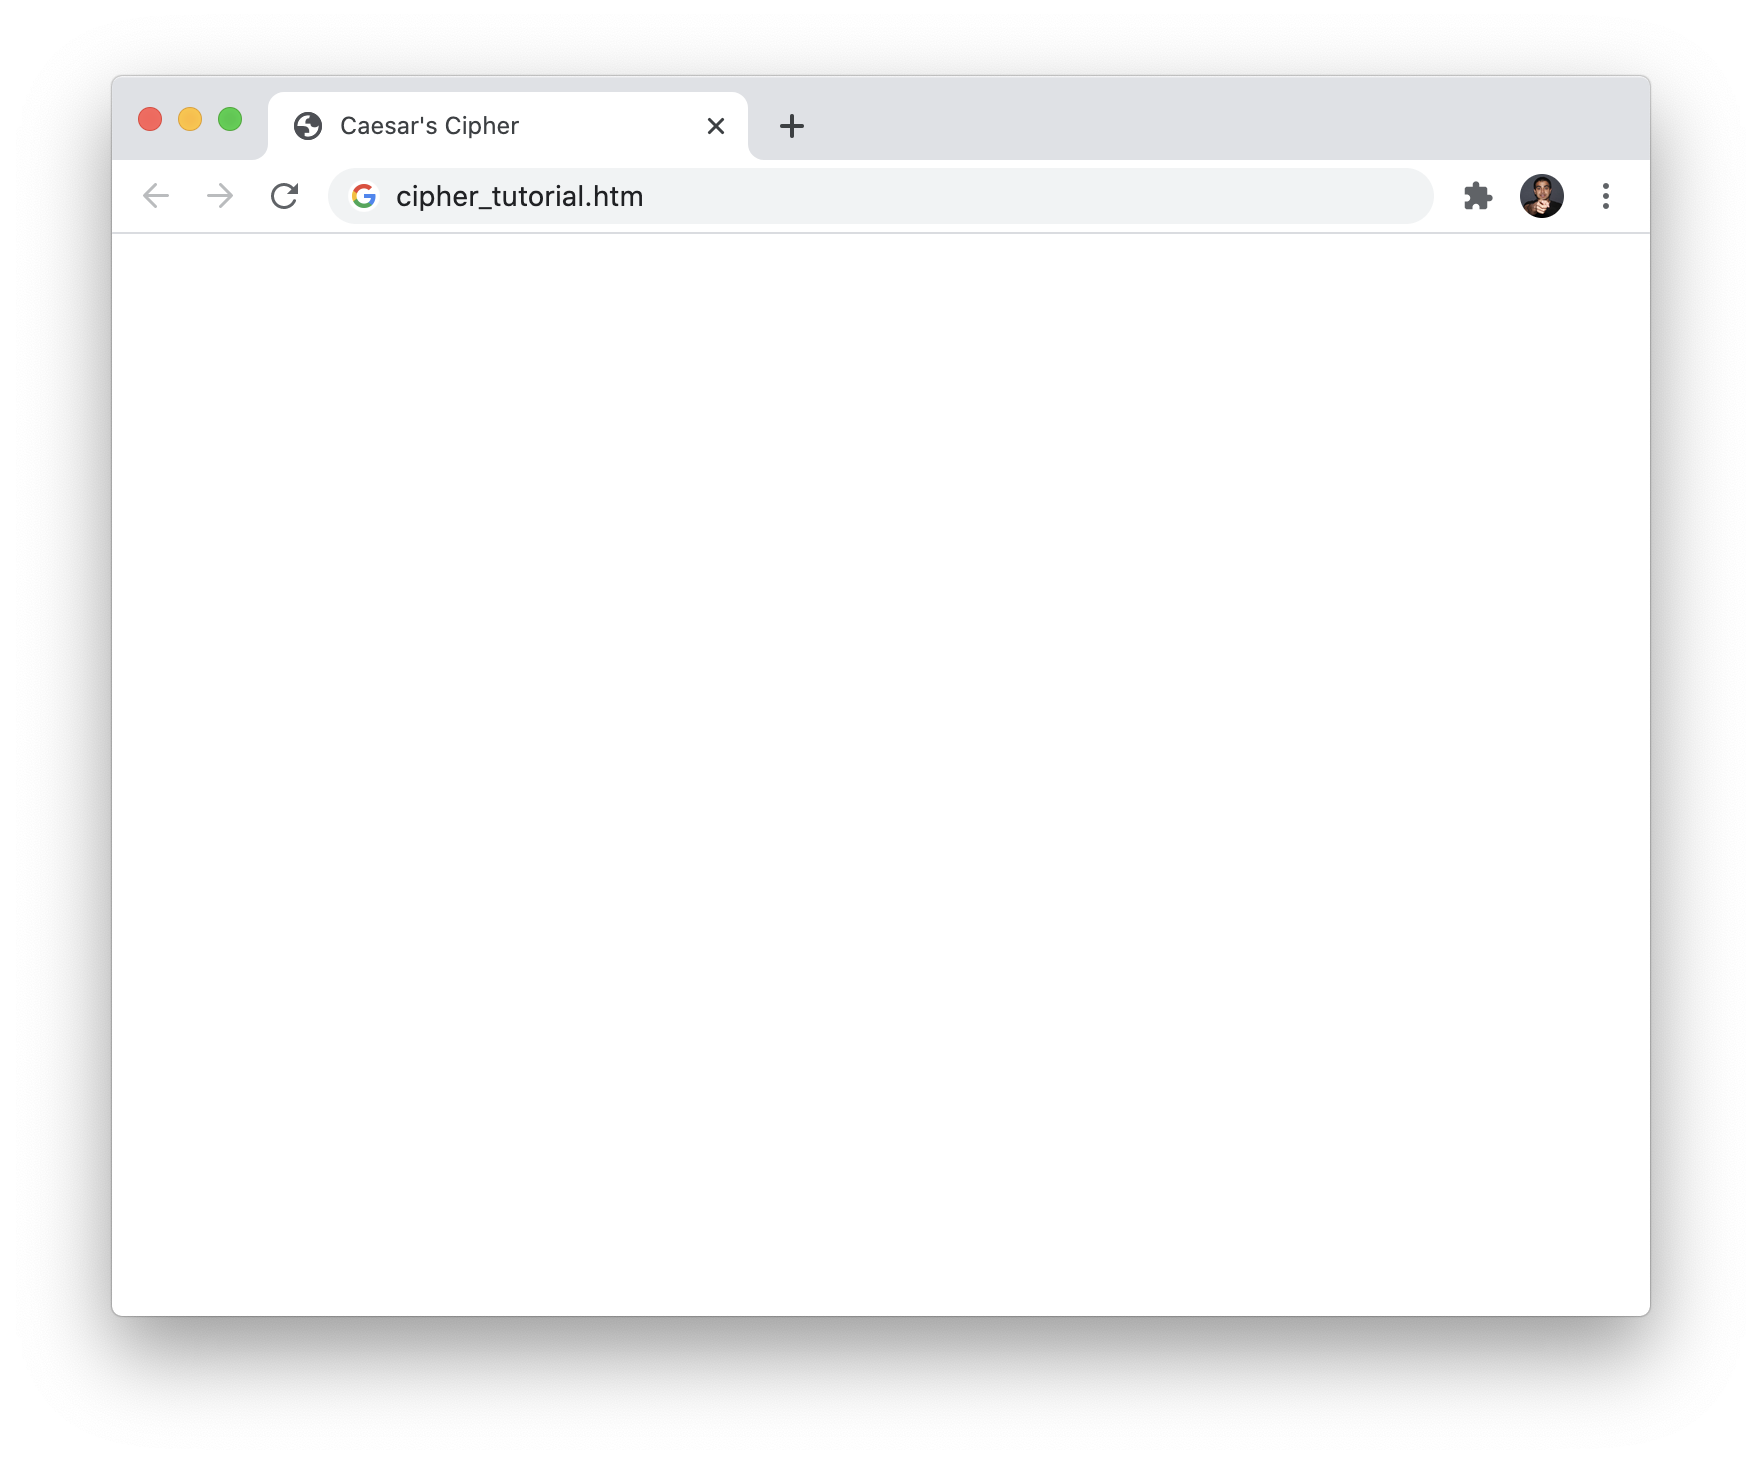
</html>Save this file with a .htm extension to your desktop or wherever it will be easy for you to access later. If you happen to preview this page in your browser, what you'll see is an empty page with nothing interesting going on:
This is totally OK. We'll gradually be adding a boatload of HTML, CSS, and JavaScript in the following sections. Enjoy the emptiness for now. It won't last for long.
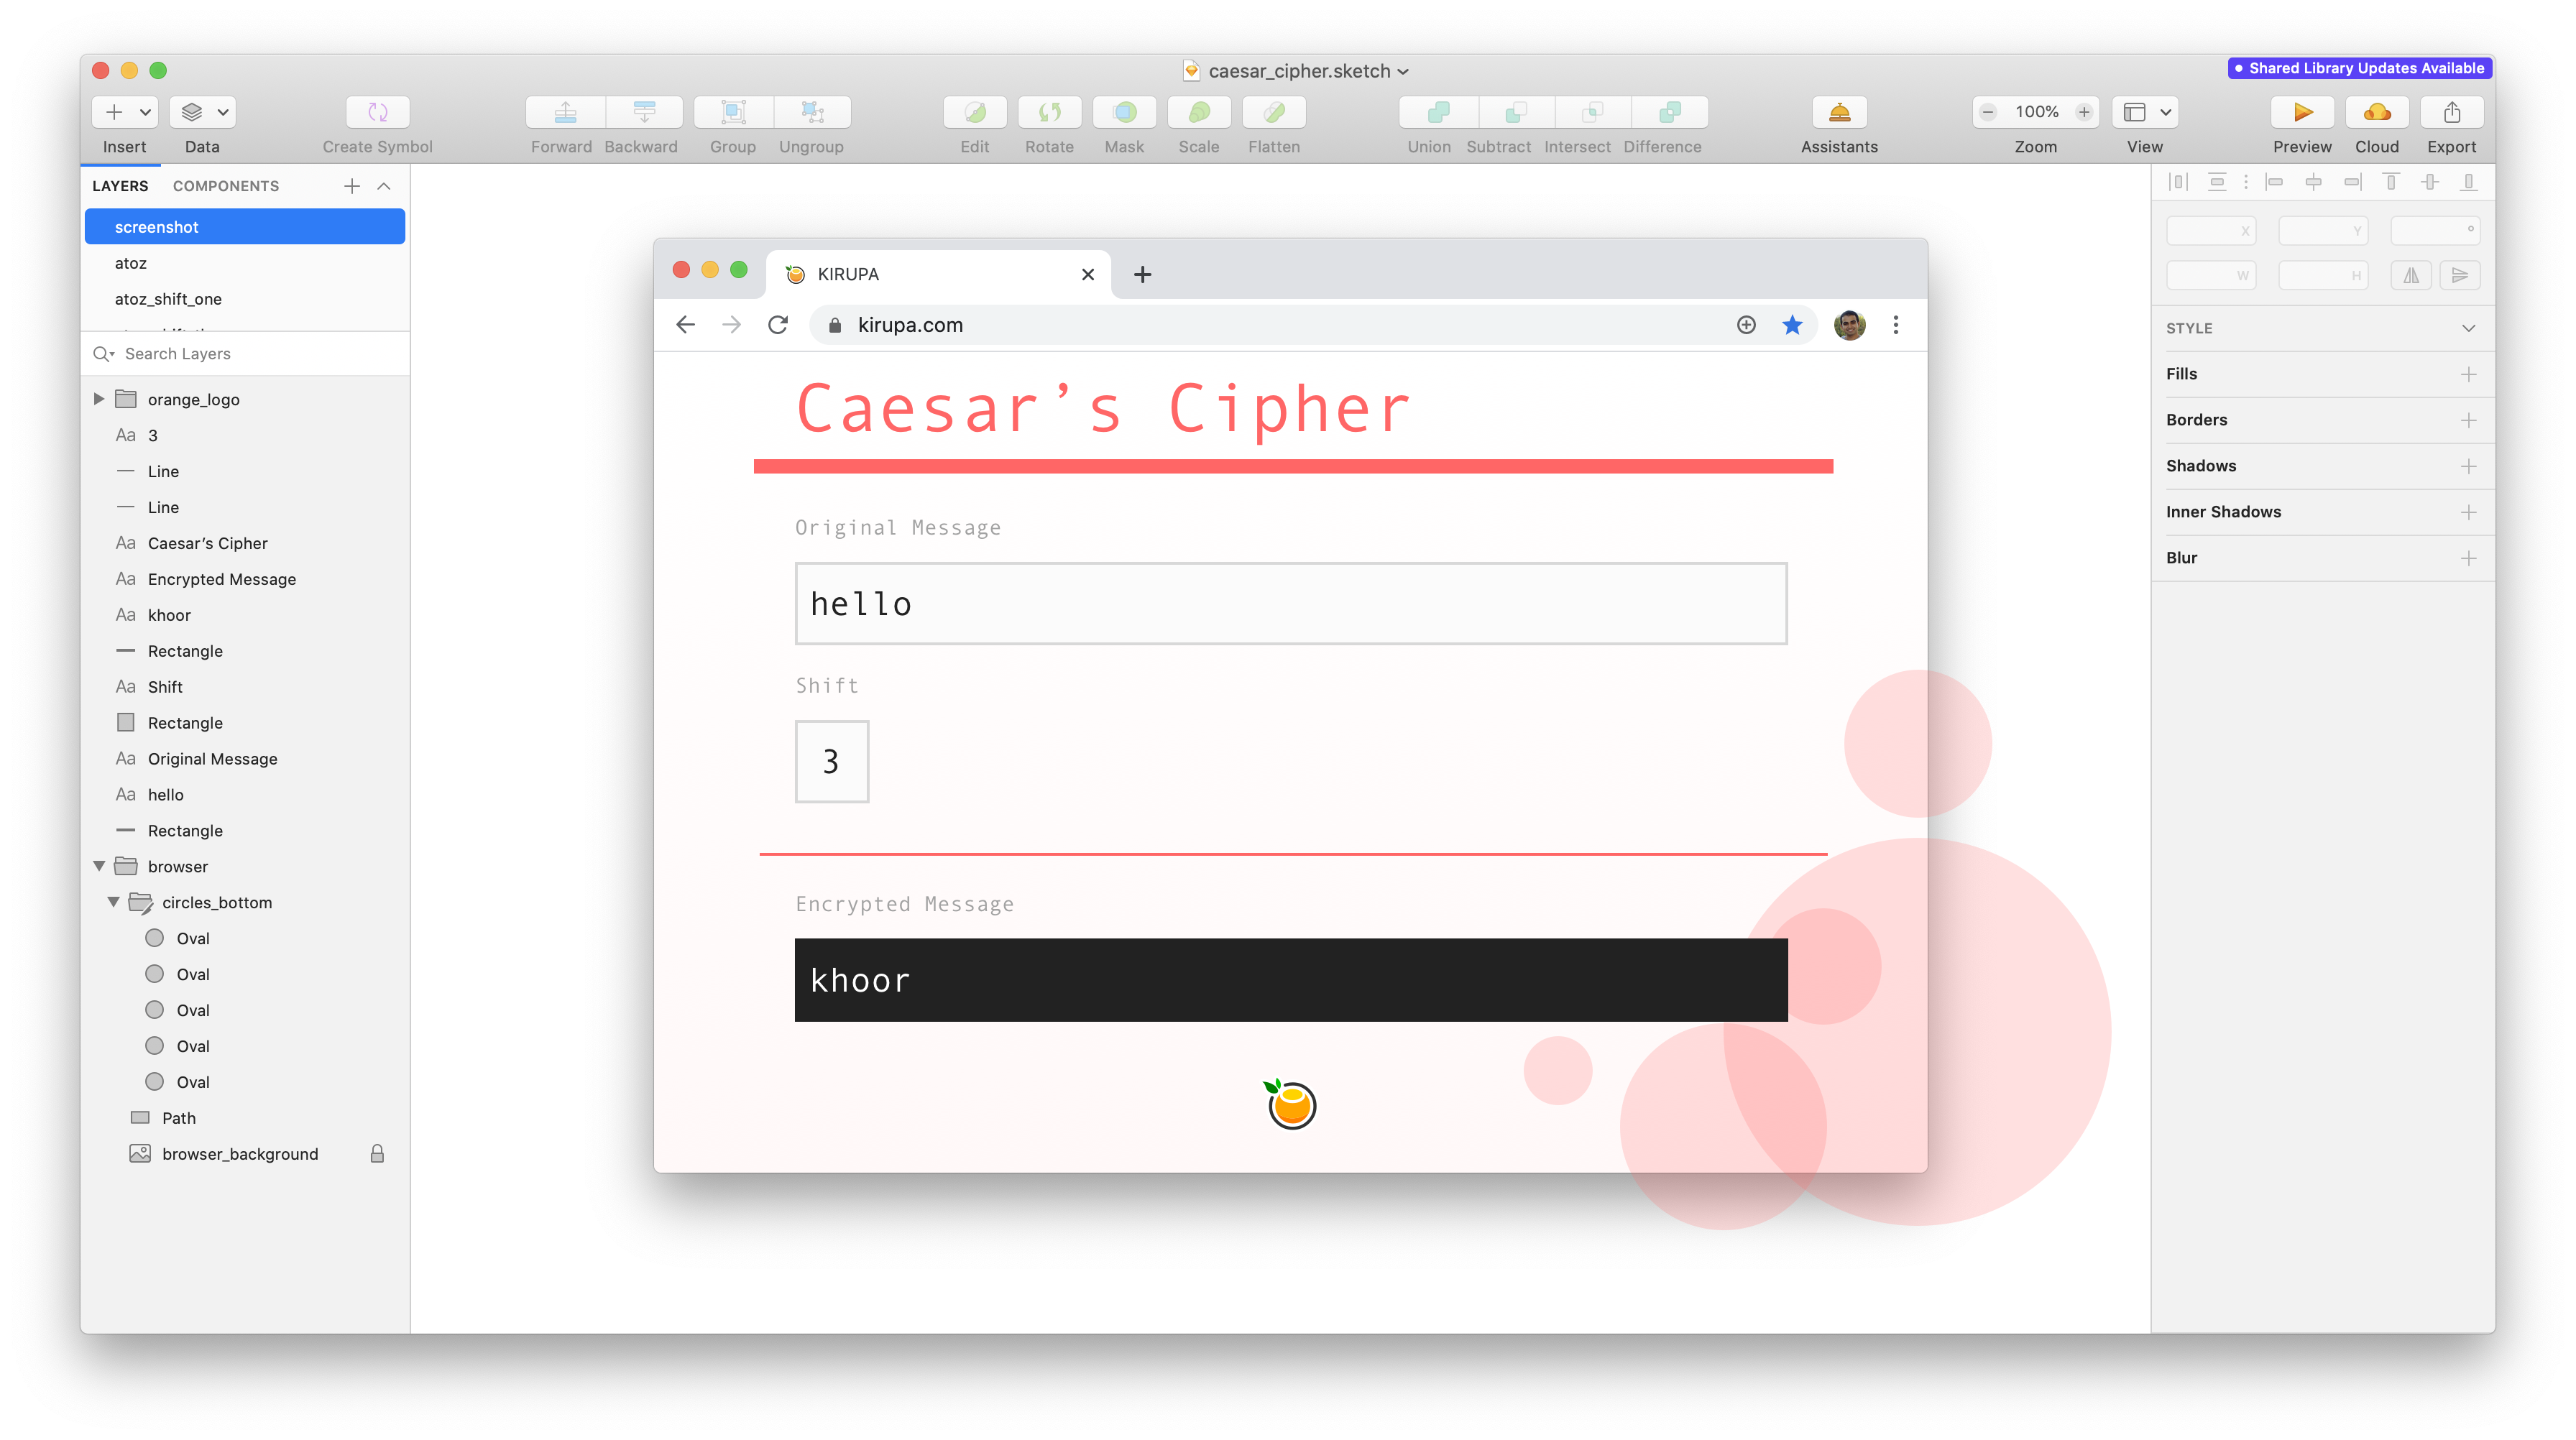
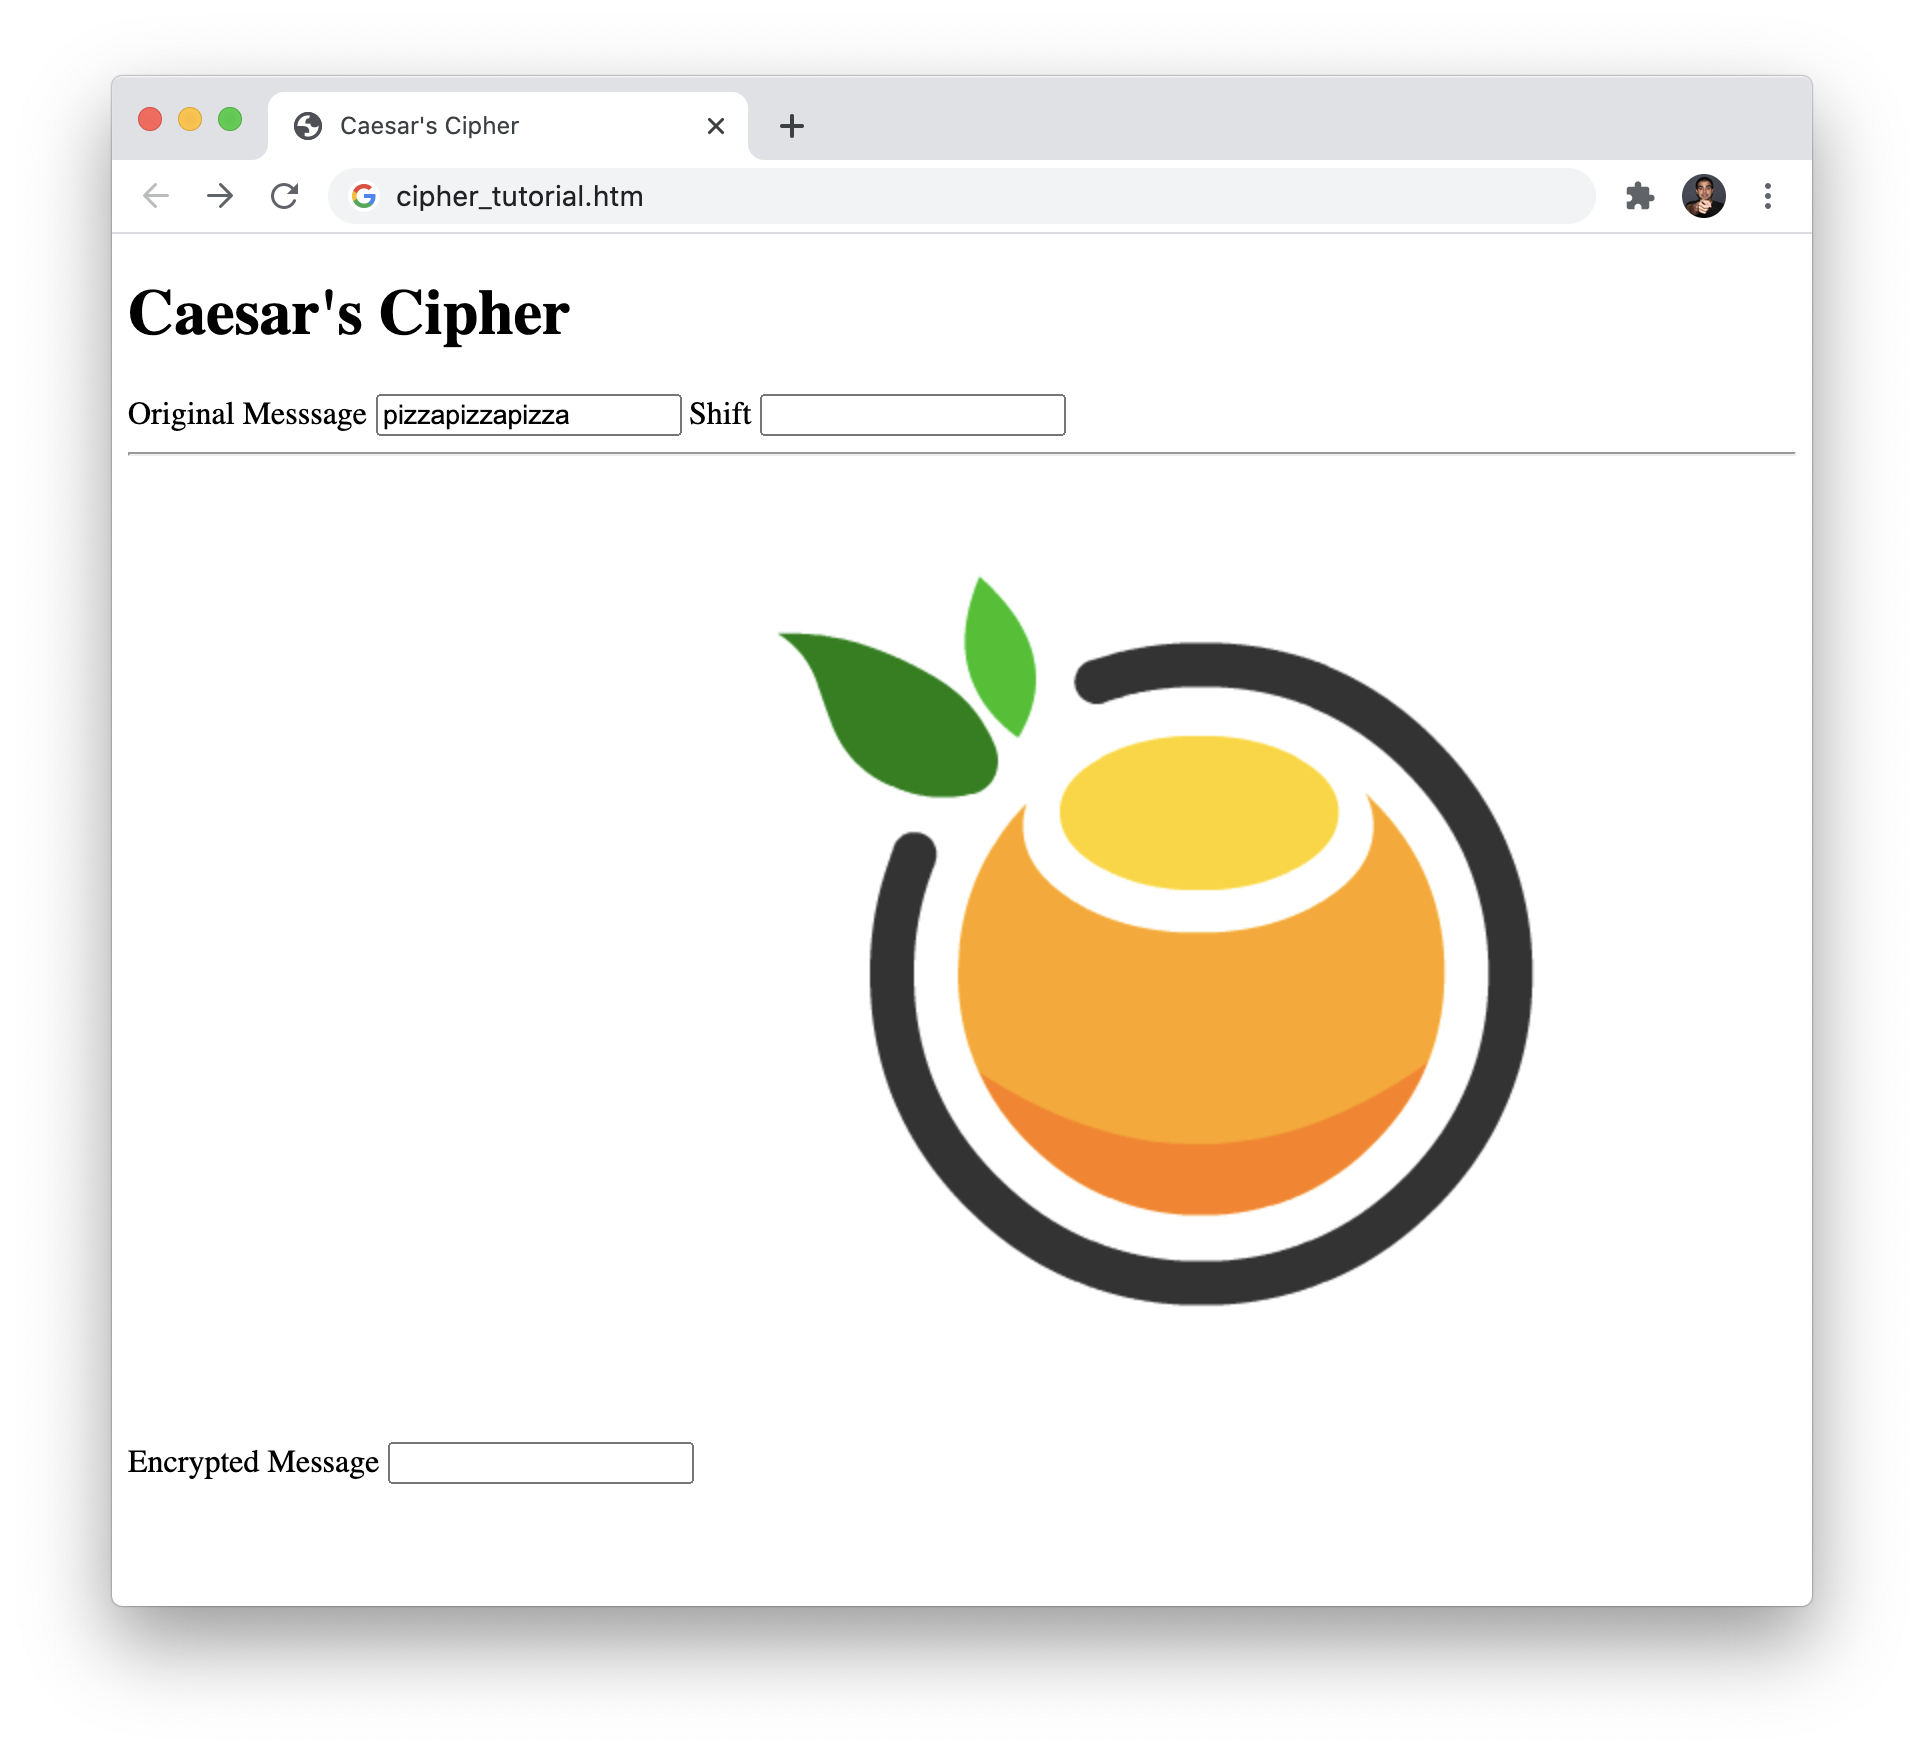
Before spending any amount of time writing code, it is a good idea to take a step back and think about what you are going to be building and how it will look and behave. You can use paper and pencil. You can use a chalkboard/whiteboard. Or...you can do what I do and use a design tool that allows you to quickly create some visual mock-ups. Sketch is my tool of choice, and here is a screenshot of our Caesar's cipher as it looked in Sketch before any time was spent writing code:
By taking this time to think through and design the app first, there are a lot of little details that you may uncover. This is a big time-saver, for it is easier to drag and drop some pixels around in an image editor than it is to tediously write and re-write HTML and CSS in a code editor. We'll probably still end up doing a lot of HTML and CSS re-writing, but spending some time up-front thinking through and mocking up what you'll build will hopefully reduce the need for that.
Always show the browser chrome when creating UI mockups intended to be viewed in the browser. It's pretty stunning how good or bad some designs look when viewed in a browser compared to a nice and clean canvas. Read the Your Comps Should Reflect the Messiness Around Them article for more details.
Once you have completed this coding exercise, you have earned the awesome bragworthy privilege of adding the following badge to your collection:

To claim it, head over to the forums and respond in the Building a Caesar's Cipher topic. Be sure to include a link to your solution or insert a copy of your HTML/CSS/JS in the body of the message:
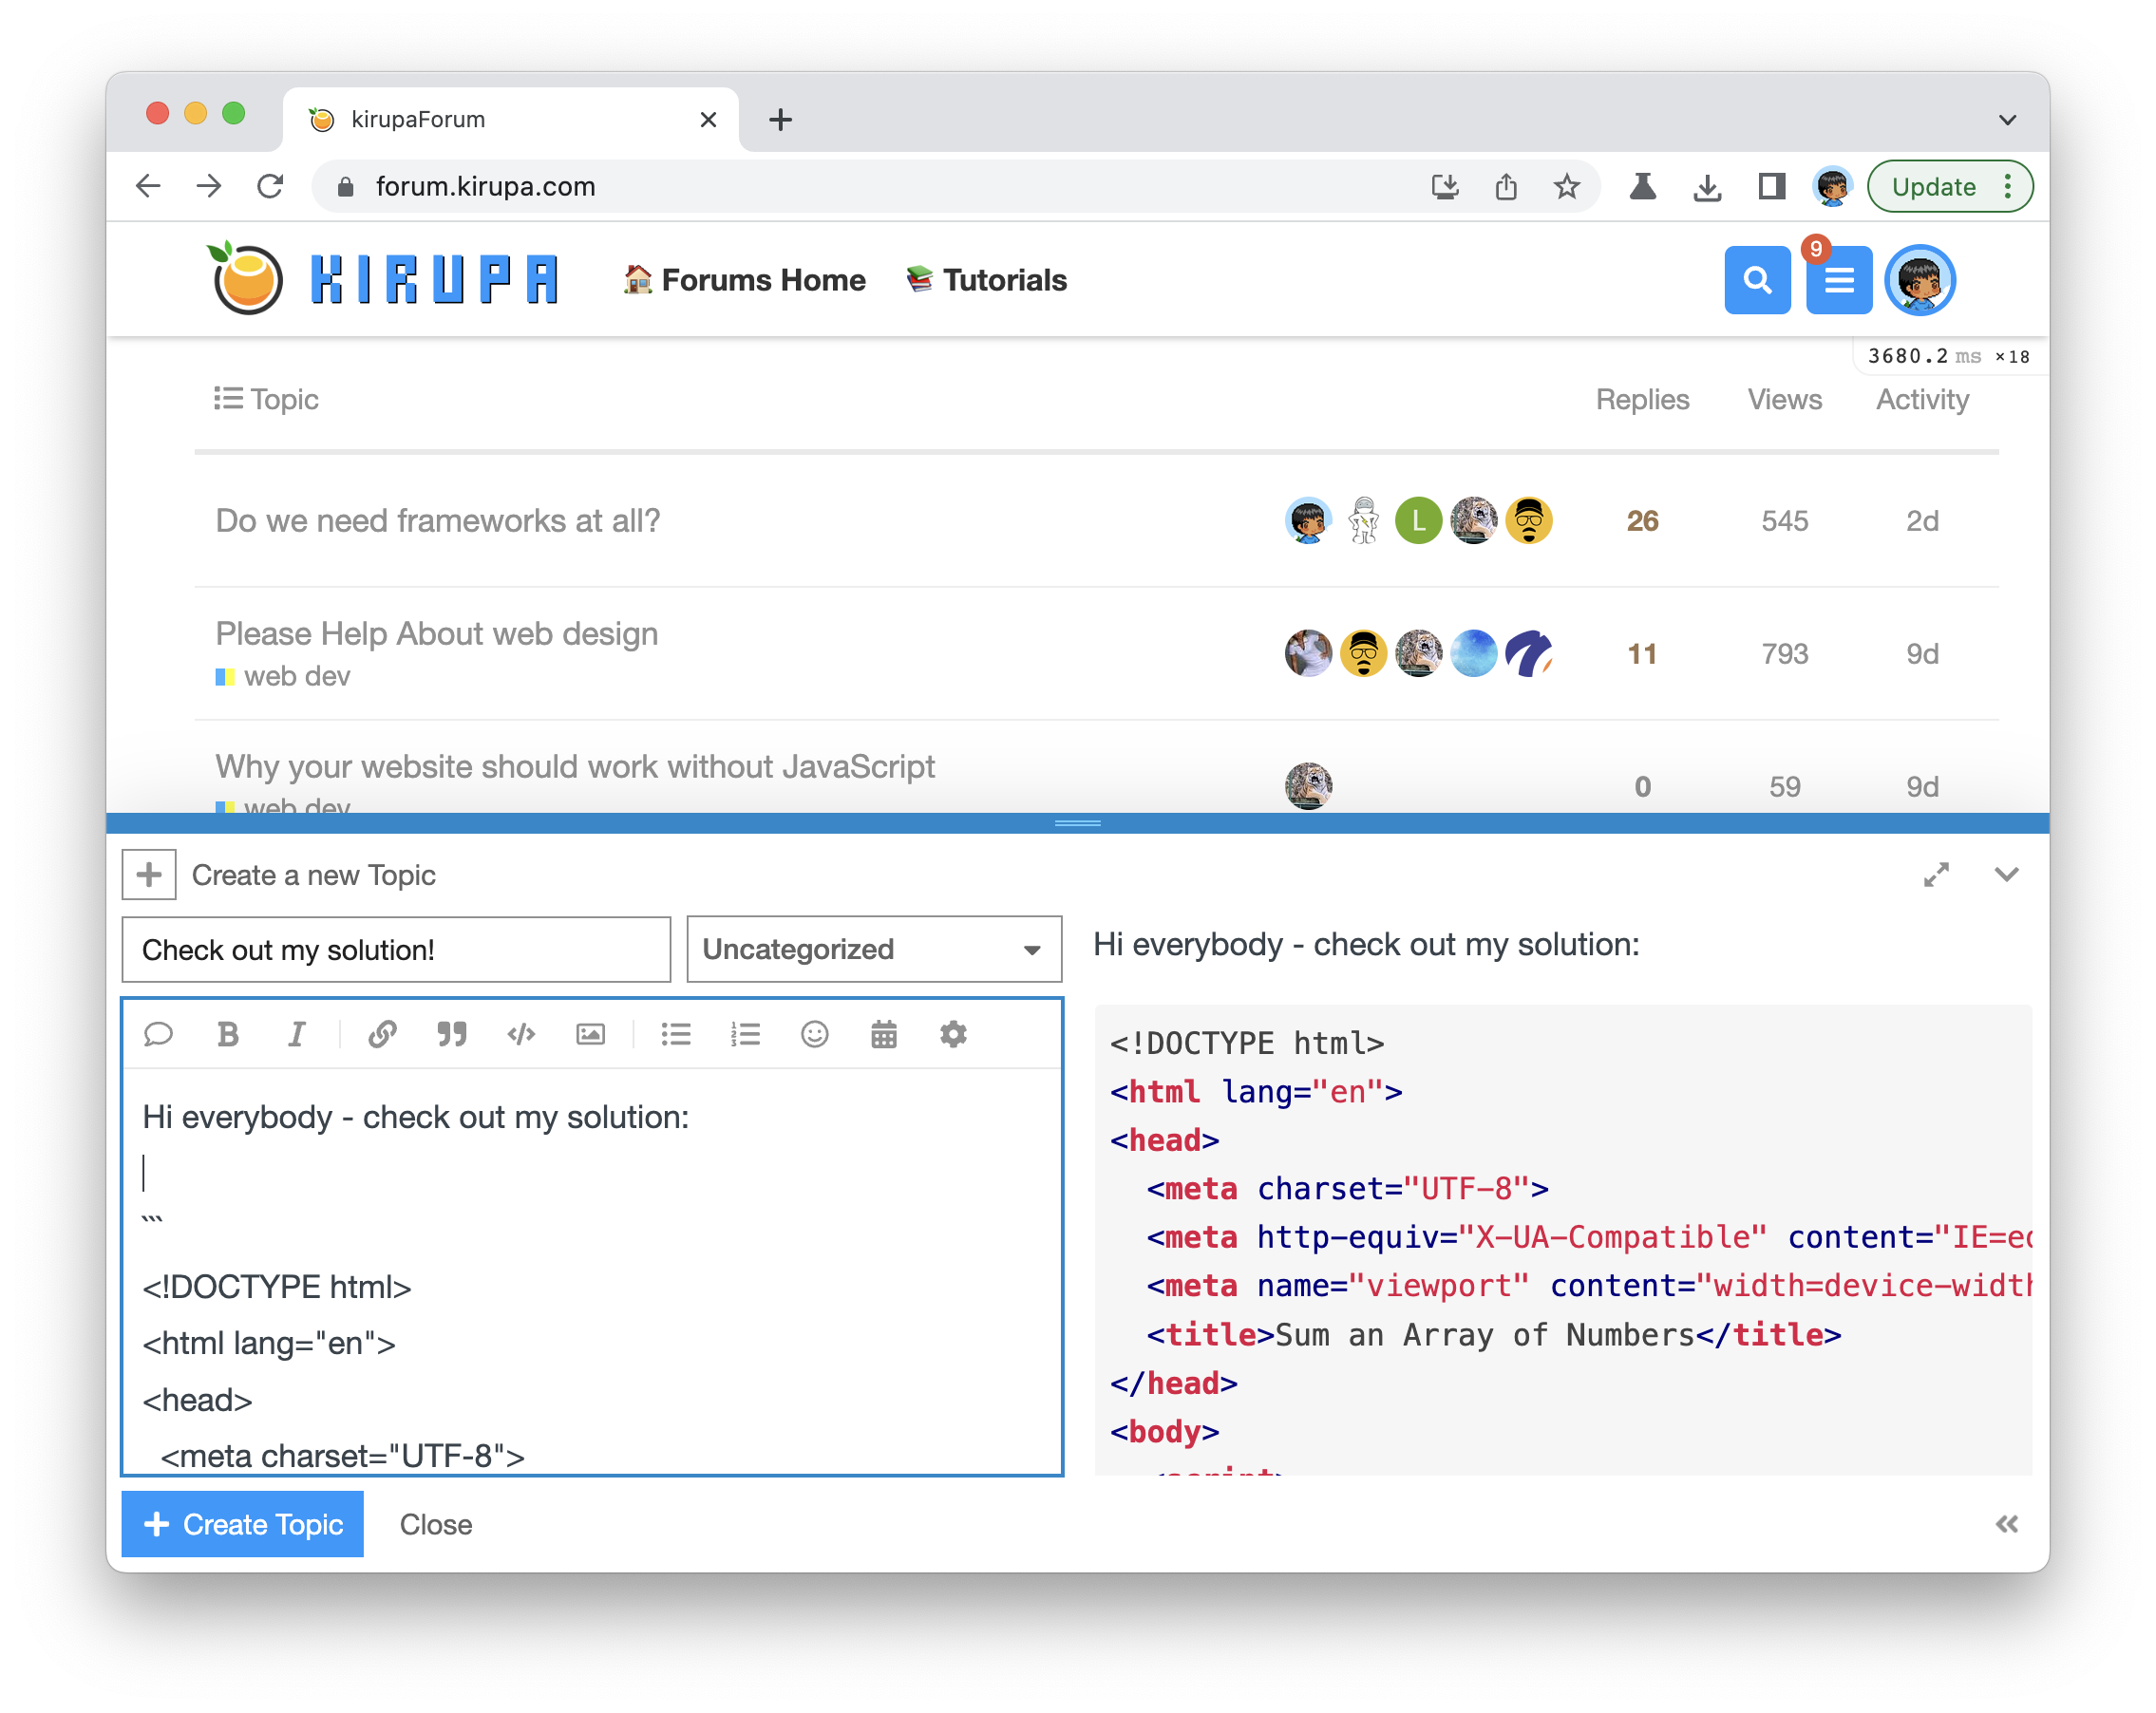
Once you have created your topic, Kirupa will give you a virtual high-five and ensure this badge is added to your list of assigned badges.
We want to make this a fun learning activity. If you are stuck and need help, please ask on the forums. Please explain your problem in detail and one of the many helpful forum members will help you out.
If you want to see one way of solving this, check out Kirupa's video and article below:
The first thing we'll do is get our page built using HTML and CSS. From looking at what we want to build, the structure of the page isn't particularly complex. There are a handful of input fields, text fields, horizontal lines, and some images. In our HTML document, let's turn these words into markup by adding the following highlighted lines:
<!DOCTYPE html>
<html lang="en">

<head>
  <meta charset="UTF-8">
  <meta name="viewport" content="width=device-width, initial-scale=1.0">
  <title>Caesar's Cipher</title>

  <style>

  </style>
</head>

<body>
  <div class="mainContainer">
    <h1>Caesar's Cipher</h1>

    <label for="original">Original Messsage</label>
    <input id="original" type="text" value="pizzapizzapizza">

    <label for="shift">Shift</label>
    <input id="shift">

    <hr>

    <label for="encrypted">Encrypted Message</label>
    <input id="encrypted" type="text" value="" readonly>

    <a class="orange" href="https://www.kirupa.com">
      <img src="https://www.kirupa.com/images/orange.png">
    </a>
  </div>
  <script>

  </script>
</body>

</html>
Pay close attention to the elements we are adding, the names and id values we are giving them, and some of the attribute values. If we save these changes and preview what we have in our browser, it will look something like the following:
This doesn't look great, but we can sort of see all the pieces coming together. To make this example look the way we need to, we are going to add some CSS. Go back to your code editor and add these additional highlighted lines:
<!DOCTYPE html>
<html lang="en">

<head>
  <meta charset="UTF-8">
  <meta name="viewport" content="width=device-width, initial-scale=1.0">
  <title>Caesar's Cipher</title>

  <style>
    html {
      --primary: #FF6666;
      --font: 'Andale Mono', 'Menlo', 'Courier New', Courier, monospace;
      --dark: #222;
      --gray: #D8D8D8;
      --white: #FFF;
      --darkGray: #A2A2A2;
    }

    body {
      min-height: 100vh;
      background: linear-gradient(180deg, #FFF 75%, #FFF8F8 100%);
      font-family: var(--font);
      background-image: url(https://www.kirupa.com/images/circles_bottom.svg);
      background-repeat: no-repeat;
      background-position: calc(100% + 150px) calc(100% + 50px);
      background-size: 450px;
      padding: 20px;
    }

    h1 {
      color: var(--primary);
      border-bottom: 5px solid var(--primary);
      padding: 20px;
      margin-top: 0px;
      font-size: 3em;
      font-weight: 100;
    }

    label {
      margin: 20px;
      color: var(--darkGray);
    }

    input {
      display: block;
      font-family: var(--font);
      font-size: 2em;
      padding: 10px;
      font-weight: 100;
      border: 3px solid var(--gray);
      margin: 20px;
      background-color: var(--white);
      width: calc(100% - 65px);
    }

    #encrypted {
      border-color: var(--dark);
      background-color: var(--dark);
      color: var(--white);
    }

    .mainContainer {
      max-width: 1000px;
      margin: 0 auto;
    }

    hr {
      border: 1px solid var(--primary);
      margin: 50px 0px;
    }

    .orange img {
      width: 50px;
      display: block;
      margin: 0 auto;
      margin-top: 50px;
    }
  </style>
</head>

<body>
  <div class="mainContainer">
    <h1>Caesar's Cipher</h1>

    <label for="original">Original Messsage</label>
    <input id="original" type="text" value="pizzapizzapizza">

    <label for="shift">Shift</label>
    <input id="shift">

    <hr>

    <label for="encrypted">Encrypted Message</label>
    <input id="encrypted" type="text" value="" readonly>

    <a class="orange" href="https://www.kirupa.com">
      <img src="https://www.kirupa.com/images/orange.png">
    </a>
  </div>
  <script>

  </script>
</body>

</html>
Just like with our HTML earlier, take some time to look through each line of the newly added CSS and how it ties in with styling our final page. A lot of this CSS is pretty boilerplate, but note that I am specifying CSS custom properties to make re-using some common values across the page easier:
html {
  --primary: #FF6666;
  --font: 'Andale Mono', 'Menlo', 'Courier New', Courier, monospace;
  --dark: #222;
  --gray: #D8D8D8;
  --white: #FFF;
  --darkGray: #A2A2A2;
}
Using custom properties ensures that any changes we may need to make to the appearance can be handled by updating values in just one location as opposed to looking through each color and font property across all our style rules and adjusting manually. It may be uncomfortable (at first) to think about styling like this, but it is a good time-saver. After adding all of this CSS, refresh the page in your browser. You should see something that looks as follows:
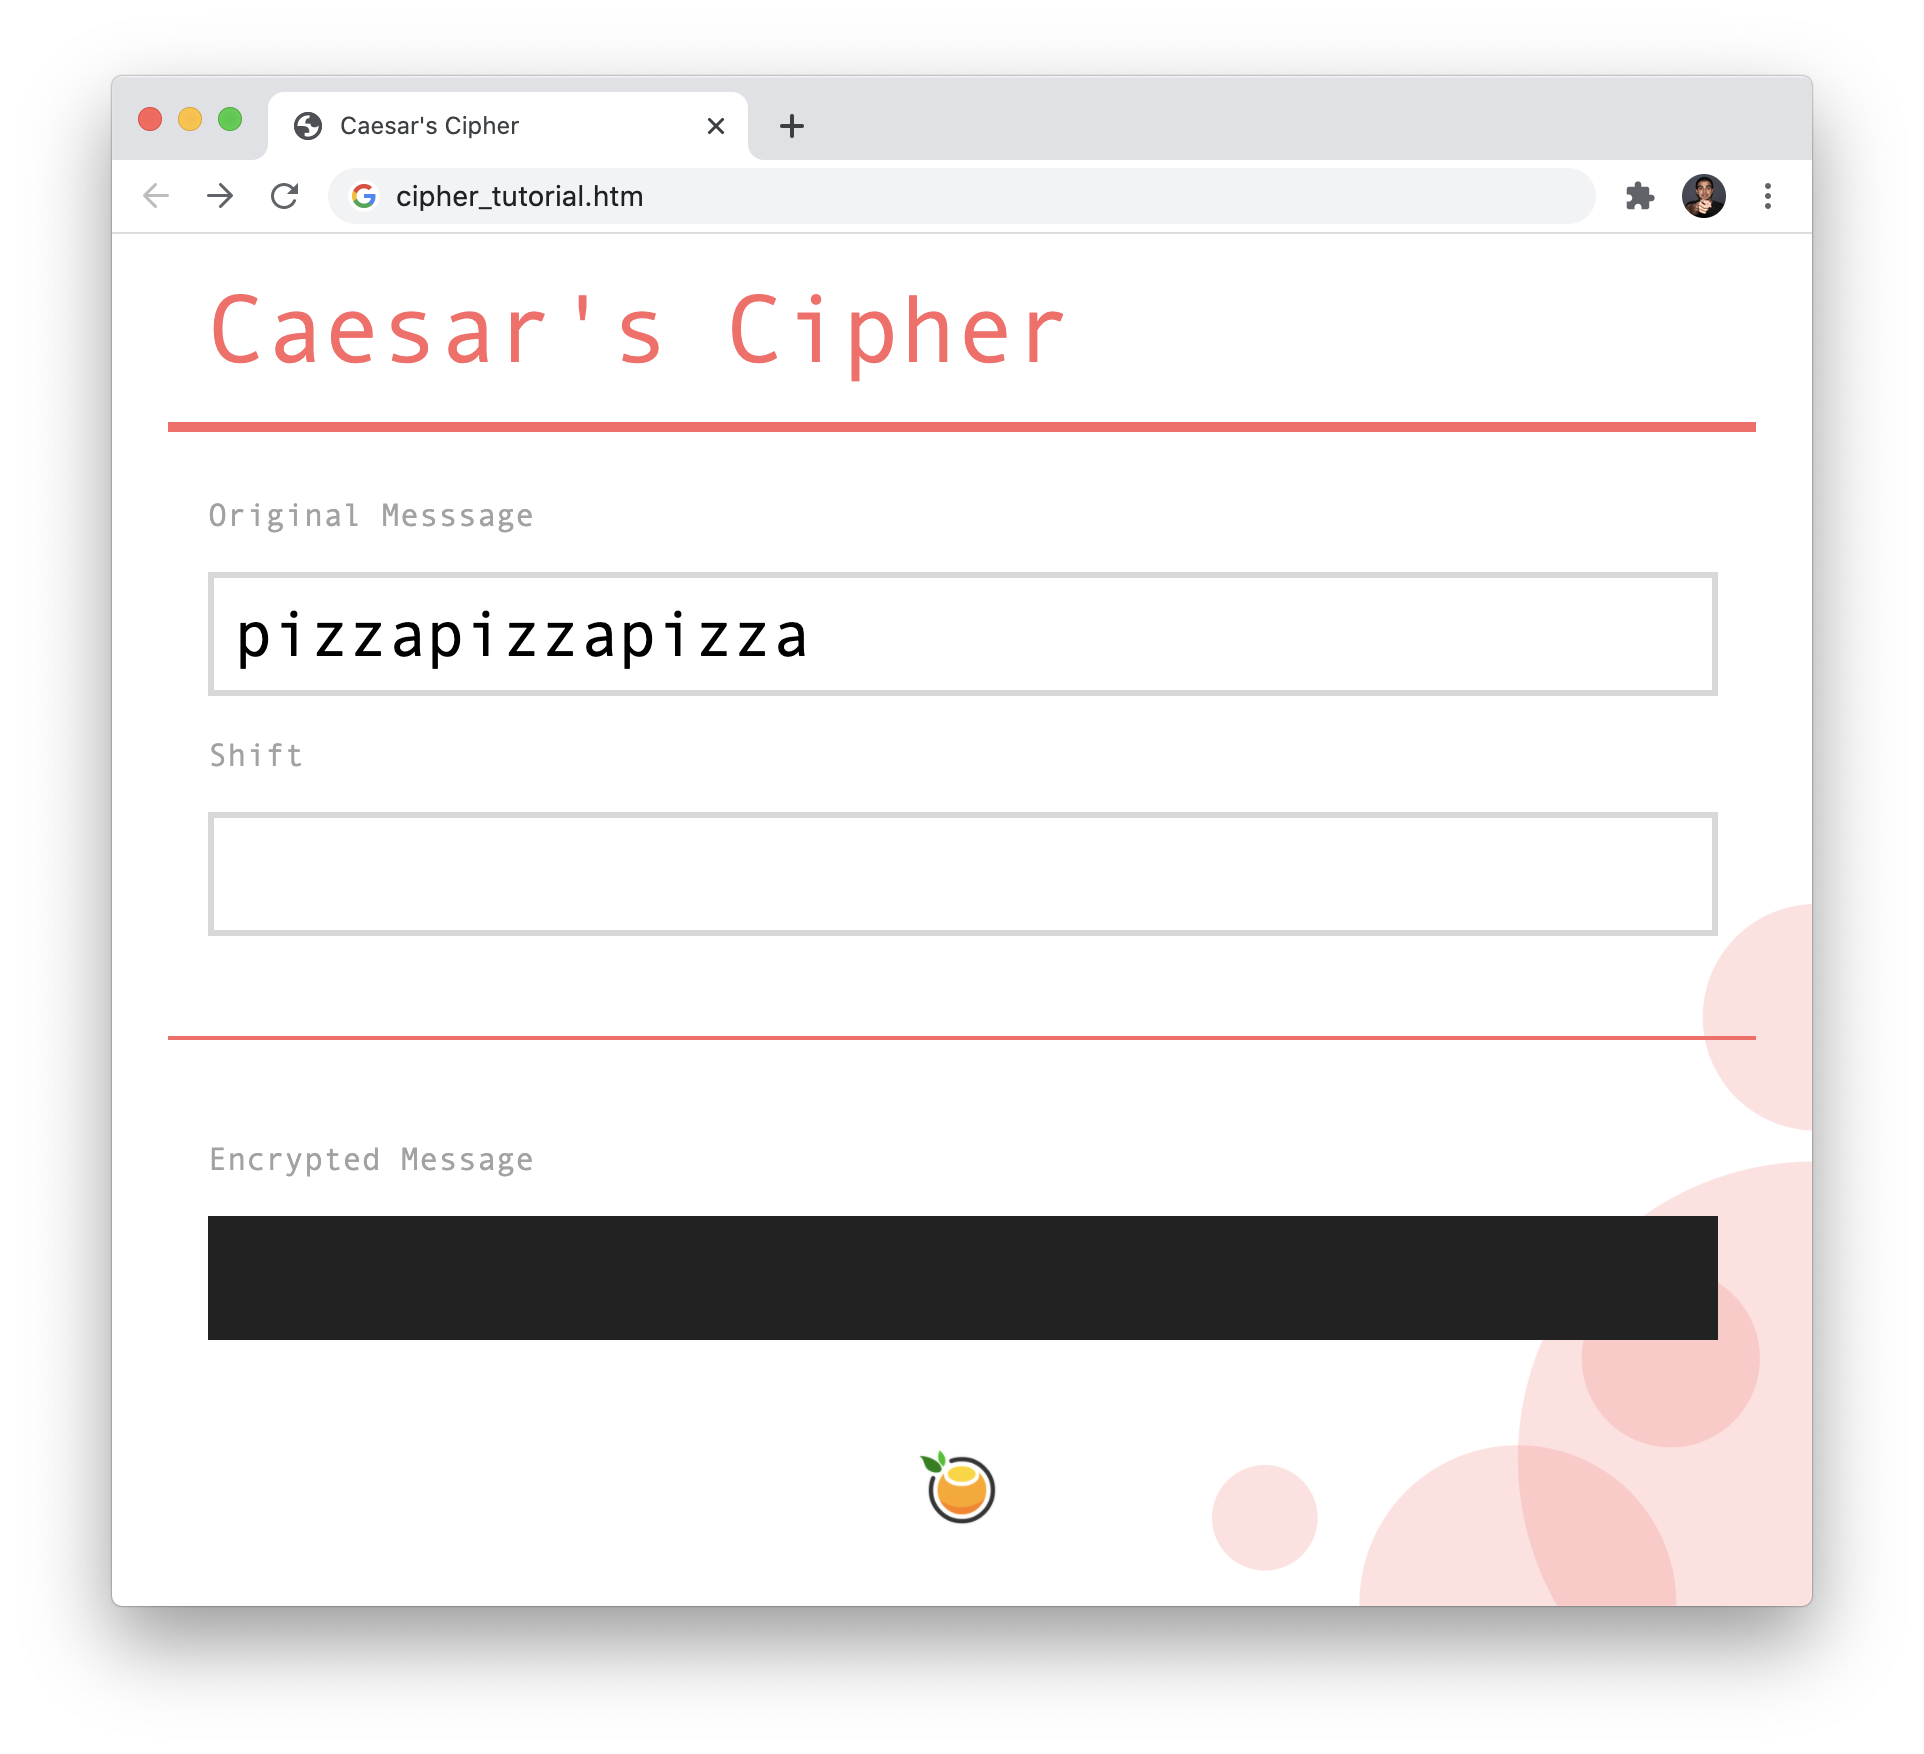
Our Caesar's cipher example should look pretty spiffy right about now, right? Our example looking good is one thing. It actually working to encrypt our messages is a whole another thing. We'll deal with the functionality part next.
If you thought the previous sections were fun, this section will blow you away! Going from the visuals that we see to having some encrypted values involves a bunch of smaller steps that we need to write the JavaScript for. Thinking out loud, these look like they might involve:
The exact order to take in tackling these steps is entirely up to you. I like to always figure out the most complex part of the problem first. For this example, that would be Step 3 where we are encrypting the message that is entered. How do we go from having some text in one form, shifting the letters in the text by a specified number of positions, and returning the text in an encrypted (aka processed) form?
What do we need to make our encryption work? We need an original message. We also need the number of positions to shift the letters in our message by. Instead of writing all of the logic to read these values from our current HTML, one approach is to just hardcode the input and just work from there. In our HTML, go ahead and add the highlighted JavaScript inside the script tags:
<!DOCTYPE html>
<html lang="en">
<head>
<meta charset="UTF-8">
<meta name="viewport" content="width=device-width, initial-scale=1.0">
<title>Caesar's Cipher</title>
<style>
html {
--primary: #FF6666;
--font: 'Andale Mono', 'Menlo', 'Courier New', Courier, monospace;
--dark: #222;
--gray: #D8D8D8;
--white: #FFF;
--darkGray: #A2A2A2;
}
body {
min-height: 100vh;
background: linear-gradient(180deg, #FFF 75%, #FFF8F8 100%);
font-family: var(--font);
background-image: url(https://www.kirupa.com/images/circles_bottom.svg);
background-repeat: no-repeat;
background-position: calc(100% + 150px) calc(100% + 50px);
background-size: 450px;
padding: 20px;
}
h1 {
color: var(--primary);
border-bottom: 5px solid var(--primary);
padding: 20px;
margin-top: 0px;
font-size: 3em;
font-weight: 100;
}
label {
margin: 20px;
color: var(--darkGray);
}
input {
display: block;
font-family: var(--font);
font-size: 2em;
padding: 10px;
font-weight: 100;
border: 3px solid var(--gray);
margin: 20px;
background-color: var(--white);
width: calc(100% - 65px);
}
#encrypted {
border-color: var(--dark);
background-color: var(--dark);
color: var(--white);
}
.mainContainer {
max-width: 1000px;
margin: 0 auto;
}
hr {
border: 1px solid var(--primary);
margin: 50px 0px;
}
.orange img {
width: 50px;
display: block;
margin: 0 auto;
margin-top: 50px;
}
</style>
</head>
<body>
<div class="mainContainer">
<h1>Caesar's Cipher</h1>
<label for="original">Original Messsage</label>
<input id="original" type="text" value="pizzapizzapizza">
<label for="shift">Shift</label>
<input id="shift">
<hr>
<label for="encrypted">Encrypted Message</label>
<input id="encrypted" type="text" value="" readonly>
<a class="orange" href="https://www.kirupa.com">
<img src="https://www.kirupa.com/images/orange.png">
</a>
</div>
<script>
let originalMessage = "abcdefg";
let shift = 1;
function startEncryption() {
console.log("Something happens!");
}
startEncryption();
</script>
</body>
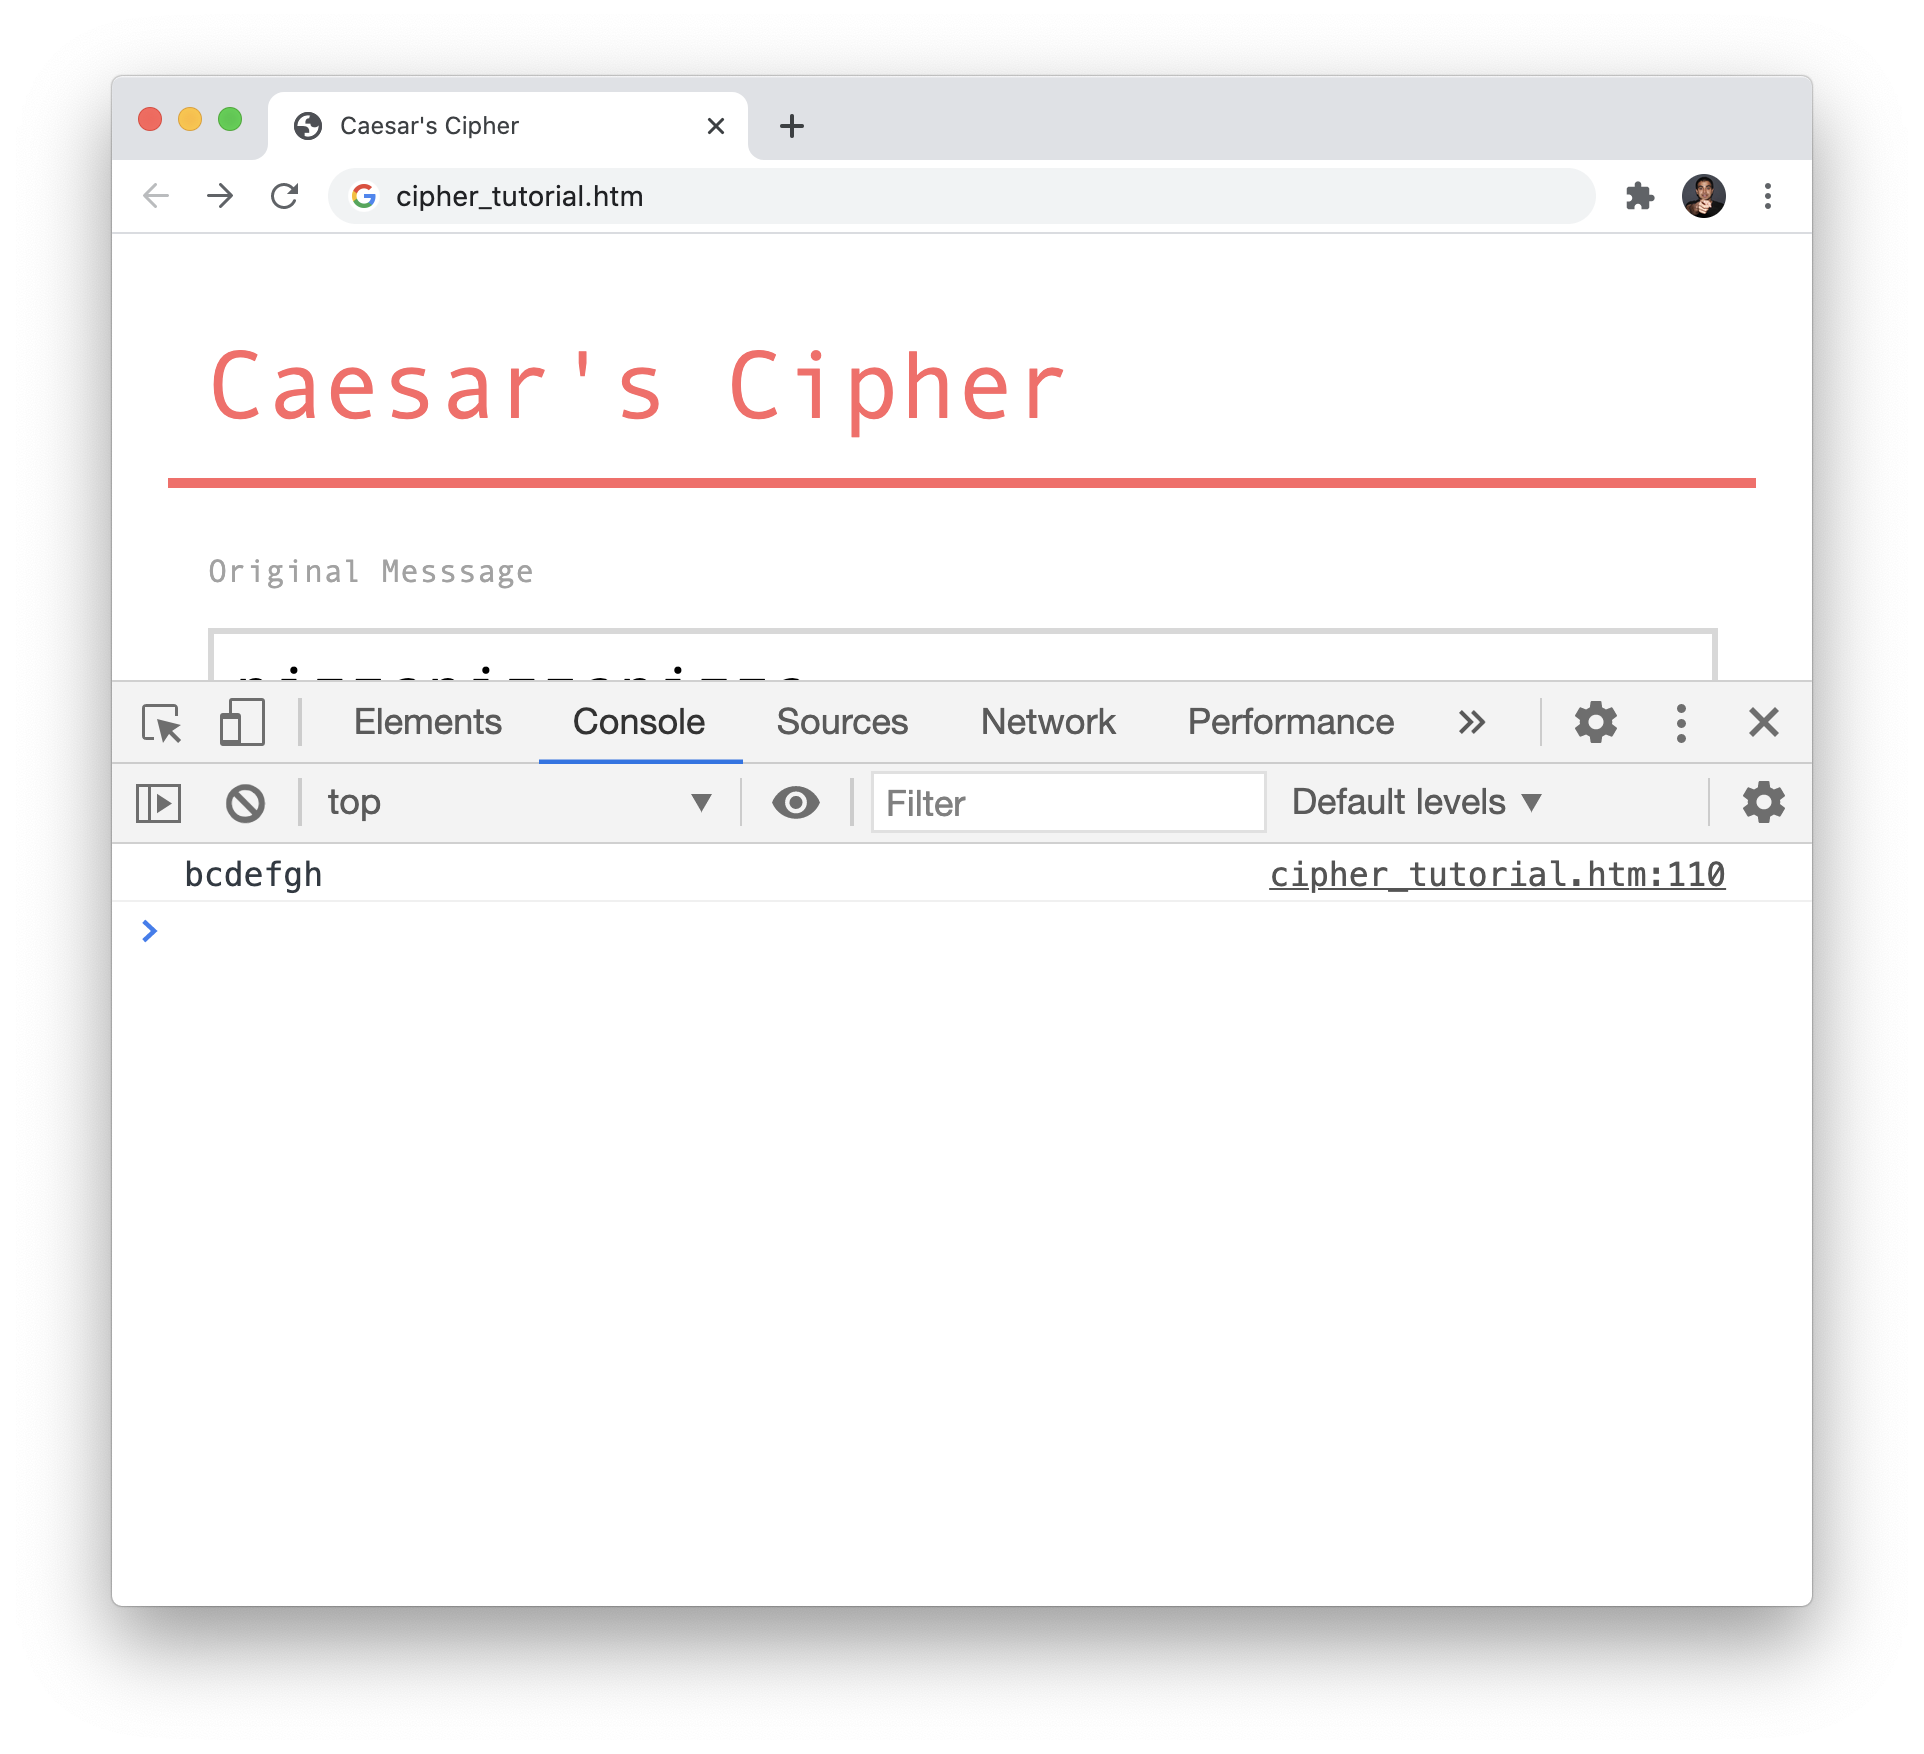
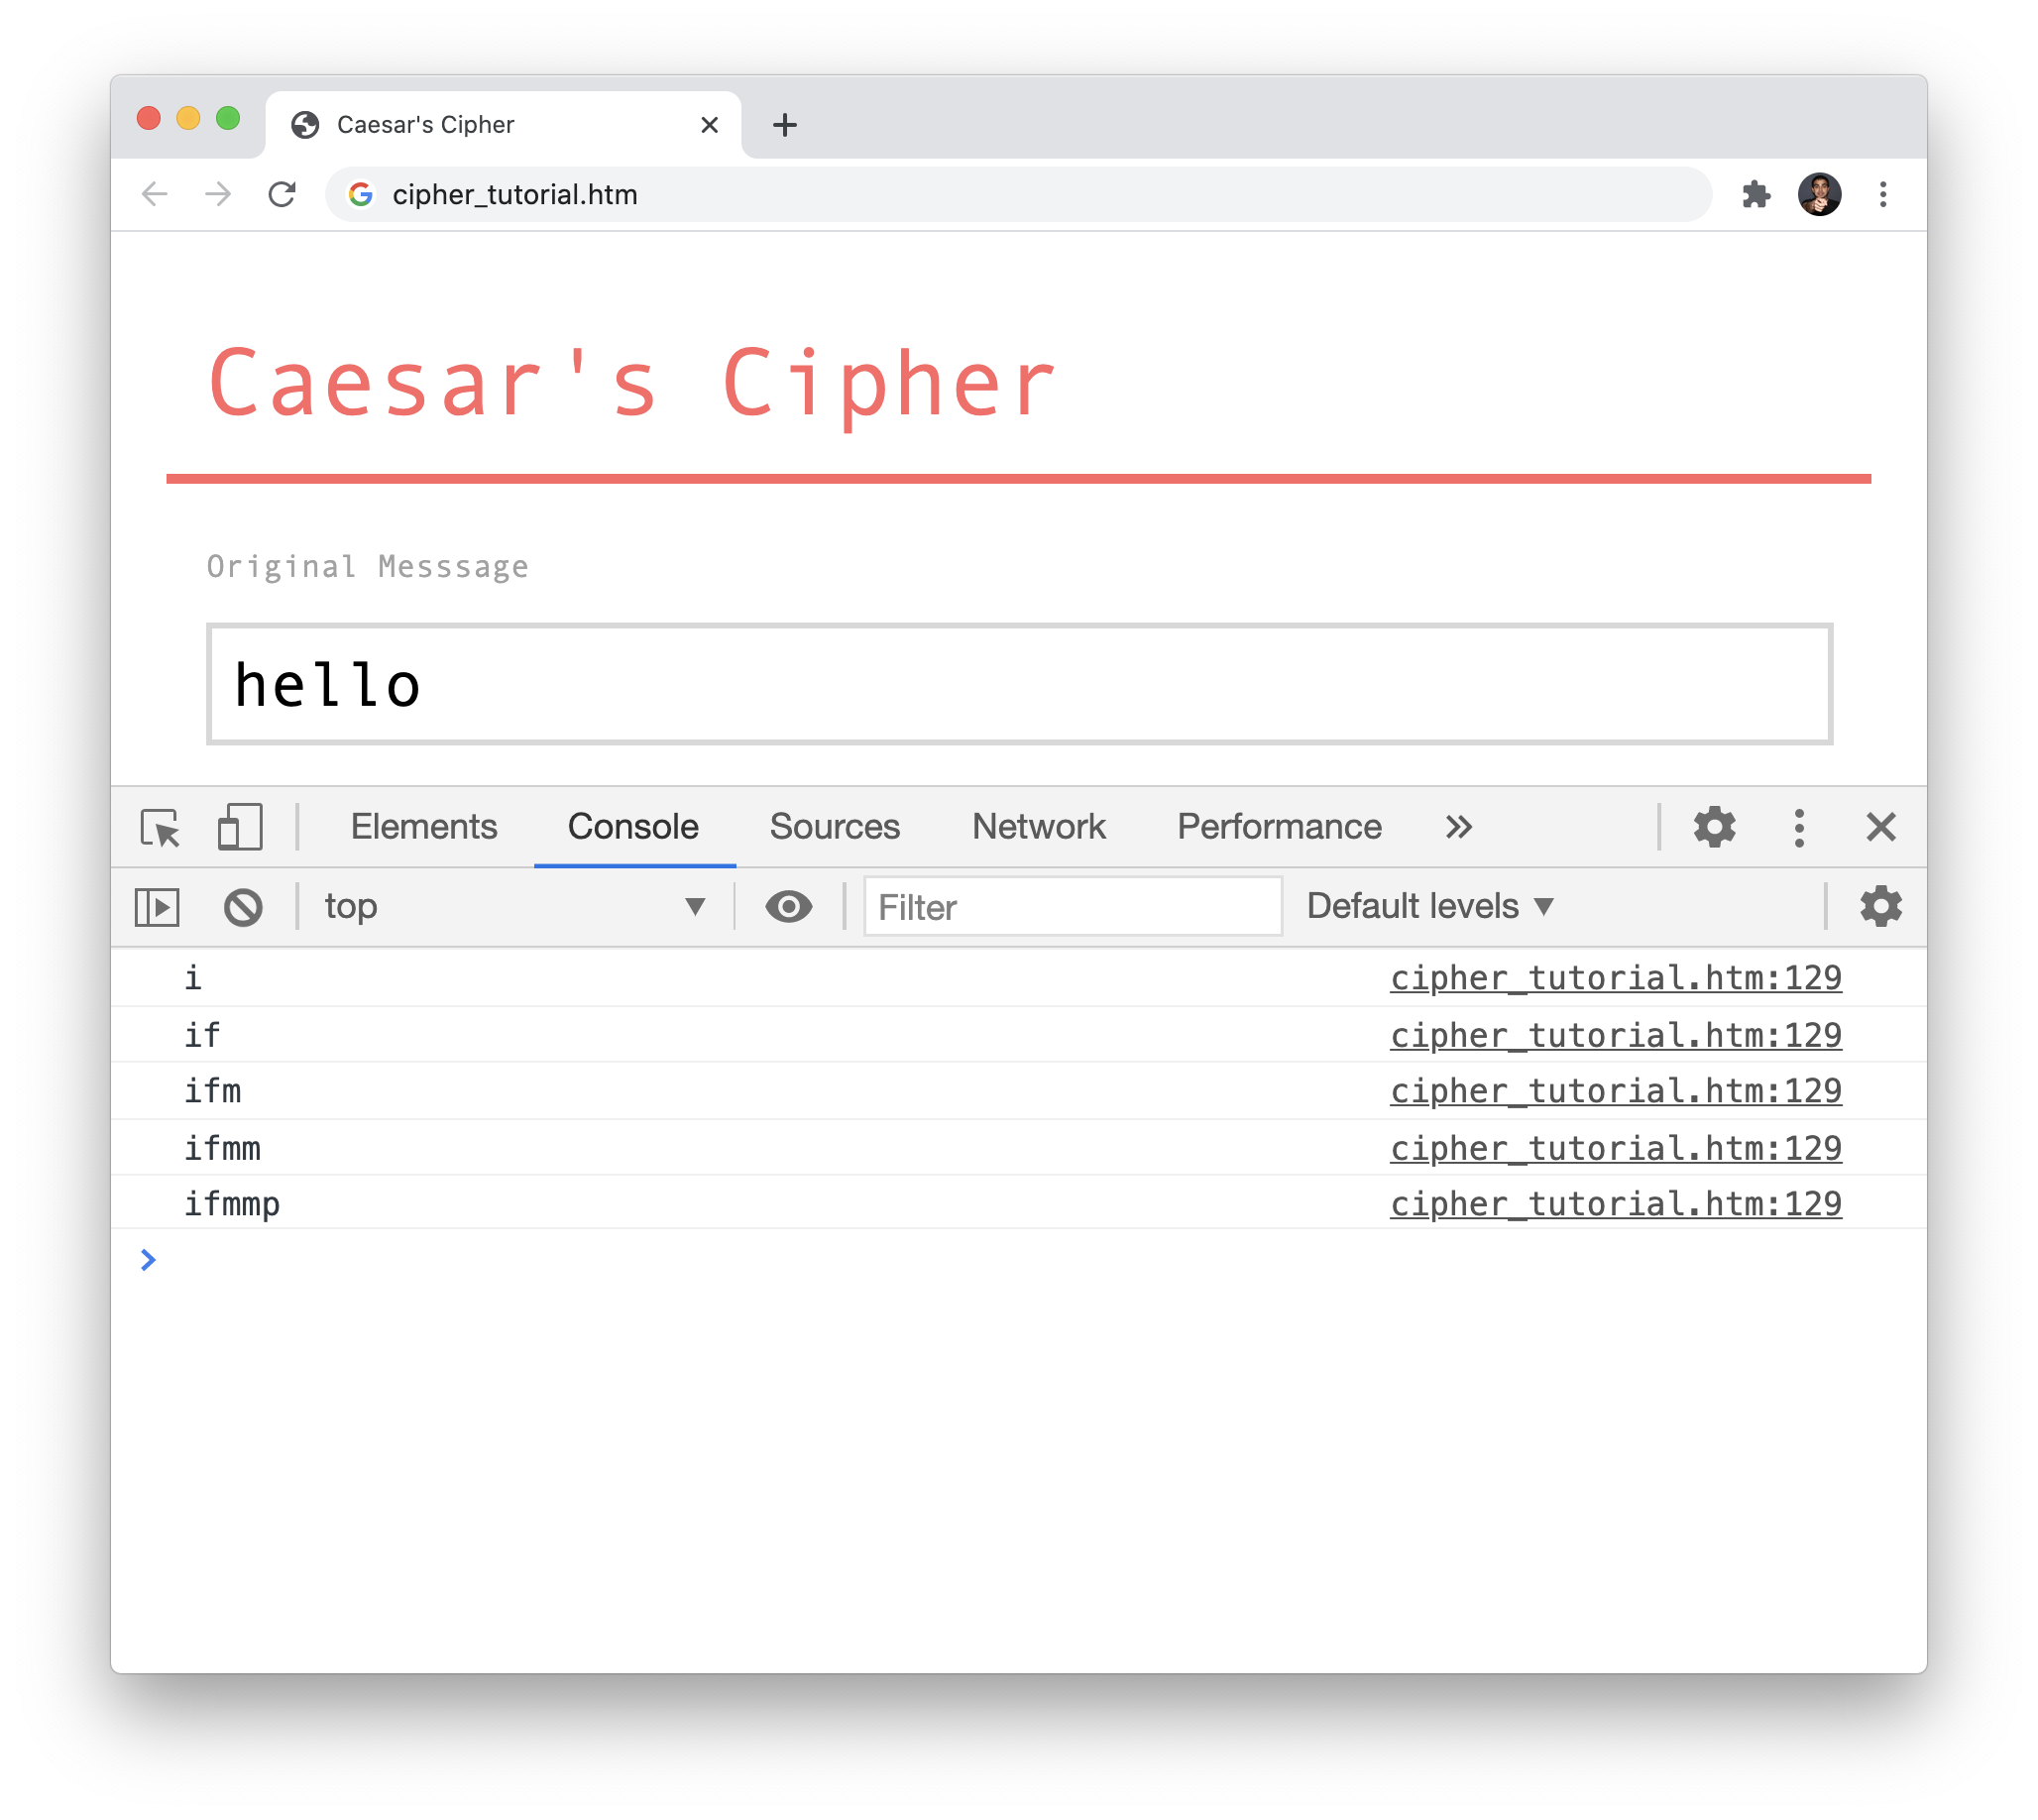
</html>What we are doing is defining (and calling) a function called startEncryption with a console.log statement that prints Something happens! to the console. We also have ouroriginalMessage and shift variables which contain some hardcoded values that we will rely on to build out our encryption approach. If you save these changes, preview in the browser, and bring up the in-browser Developer Tools, you'll see Something happens! printed in the console:
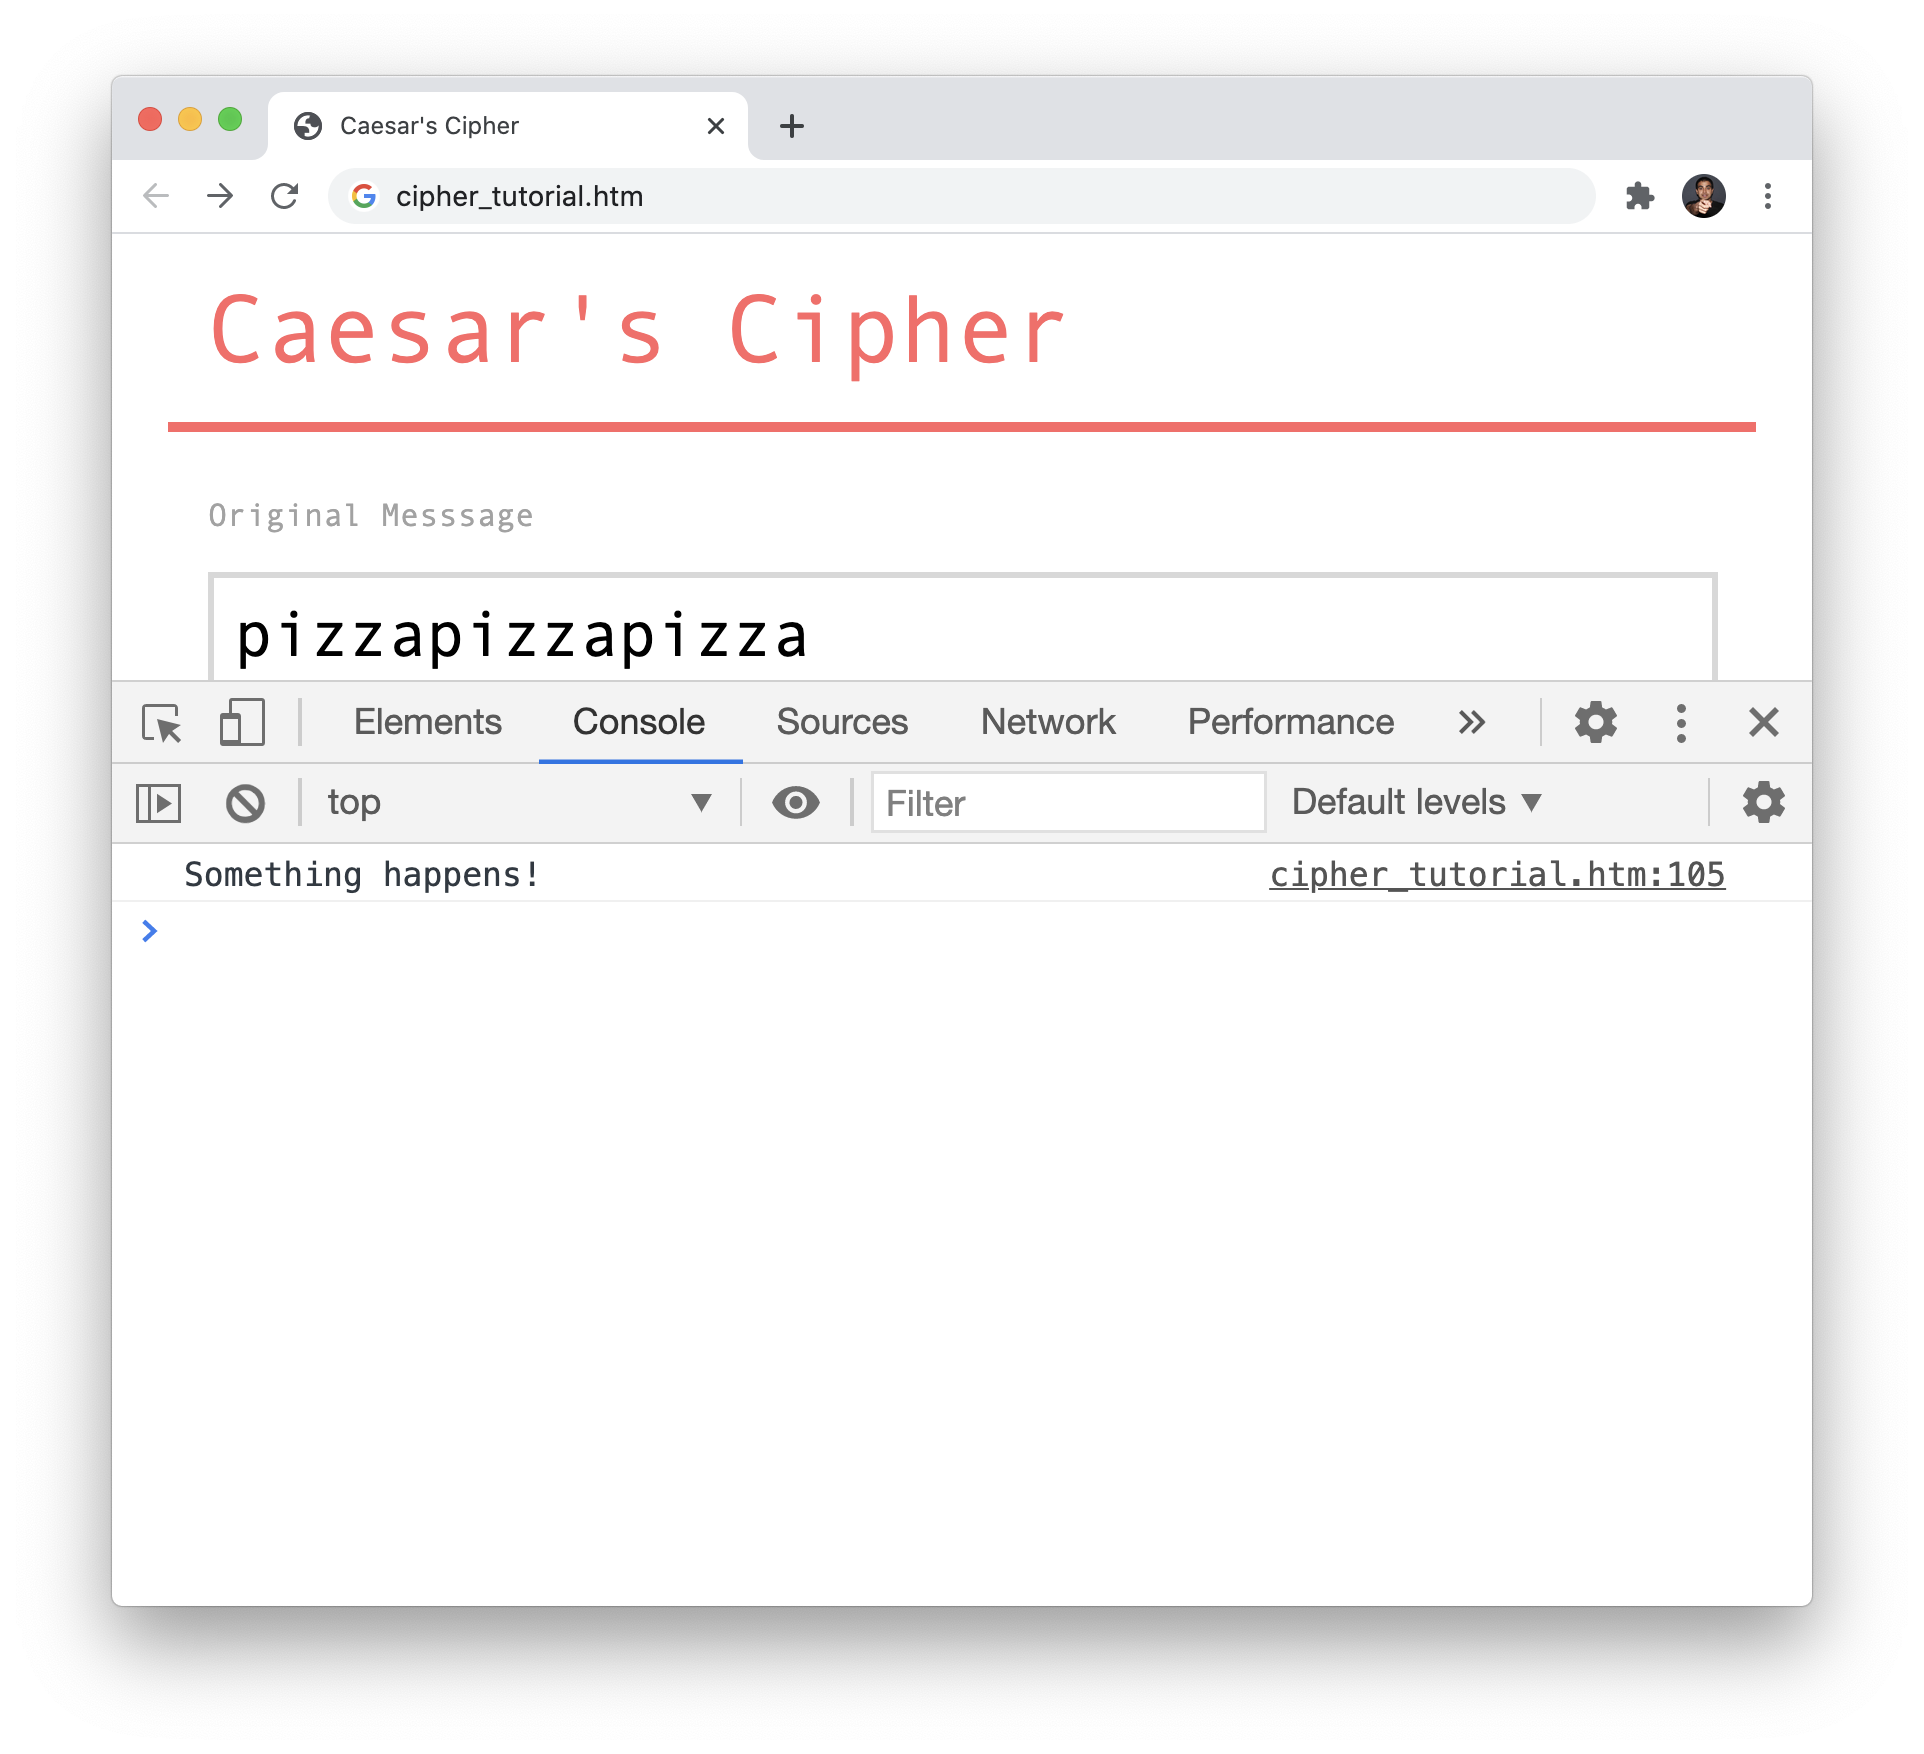
This is a good starting point for this phase of our app building. To make looking at the code easier, I'm going to stop posting the entire HTML, CSS, and JavaScript for now. Instead, we are going to just look at the contents of ourscript element, which is just the JavaScript we added a few moments ago:
let originalMessage = "abcdefg";
let shift = 1;
function startEncryption() {
console.log("Something happens!");
}
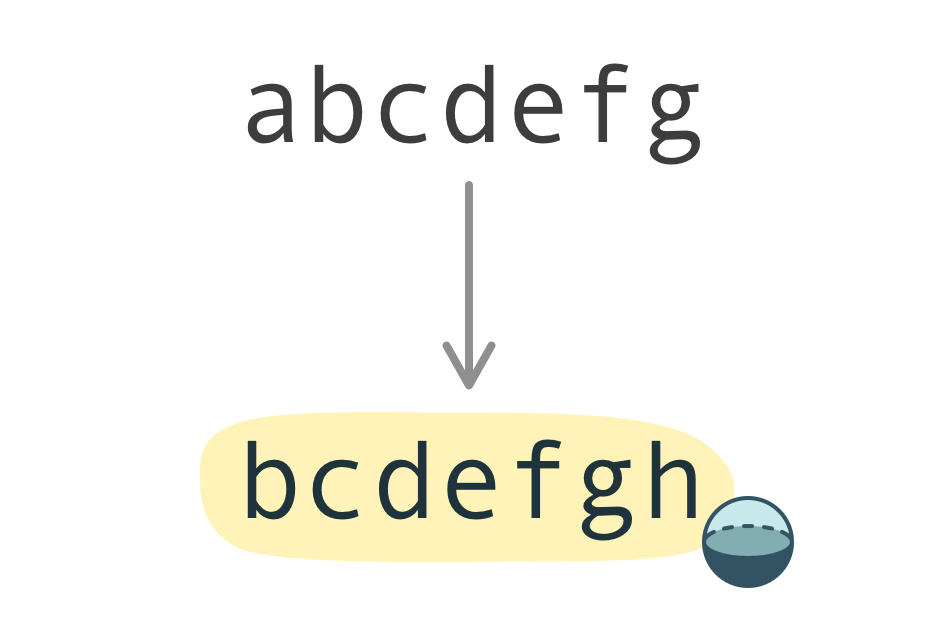
startEncryption();Our startEncyption function is the entry point to all of the encryption-related goodness that we are going to write. Right now, all it does is have a console.log statement that lets us know that this function exists and gets called. Nothing to write home about! The value stored by originalMessage is abcdefg, and we have a shift value of 1. This means the end result of our encryption running on this input will be bcdefgh:
If we mentally walk through how we would perform a shift, we would go through each letter in our input and shift that letter by the amount specified. This means we need a way to iterate through each letter, perform the shift, and then add the newly shifted letter to an encrypted message output. Putting these pieces together, add / modify the following highlighted lines of code:
let originalMessage = "abcdefg";
let shift = 1;

function startEncryption() {
  let encryptedMessage = "";

  for (letter of originalMessage) {
    encryptedMessage += letter;
  }

  console.log(encryptedMessage);
}
startEncryption();
What we are doing here is first creating an empty string called encryptedMessage. We then loop through each letter in our original message by using a for...of loop with the letter variable storing each letter we encounter:
let originalMessage = "abcdefg";
let shift = 1;

function startEncryption() {
  let encryptedMessage = "";

  for (letter of originalMessage) {
    encryptedMessage += letter;
  }

  console.log(encryptedMessage);
}
startEncryption();
Inside this loop, what we are doing is incrementing our encryptedMessage variable with each letter we are iterating through from originalMessage. This doesn't result in anything interesting...yet! The final result of encryptedMessage will be the same as originalMessage, for we are just doing a copy right now. What if instead of each letter as-is being added to encryptedMessage, we add the shifted version of a letter instead? To do that, make the following highlighted changes:
let originalMessage = "abcdefg";

function startEncryption() {
  let encryptedMessage = "";
  let shift = 1;

  for (letter of originalMessage) {
    encryptedMessage += shiftLetter(letter, shift);
  }

  console.log(encryptedMessage);
}
startEncryption();

function shiftLetter(letter, shift) {

}
A few things are happening here:
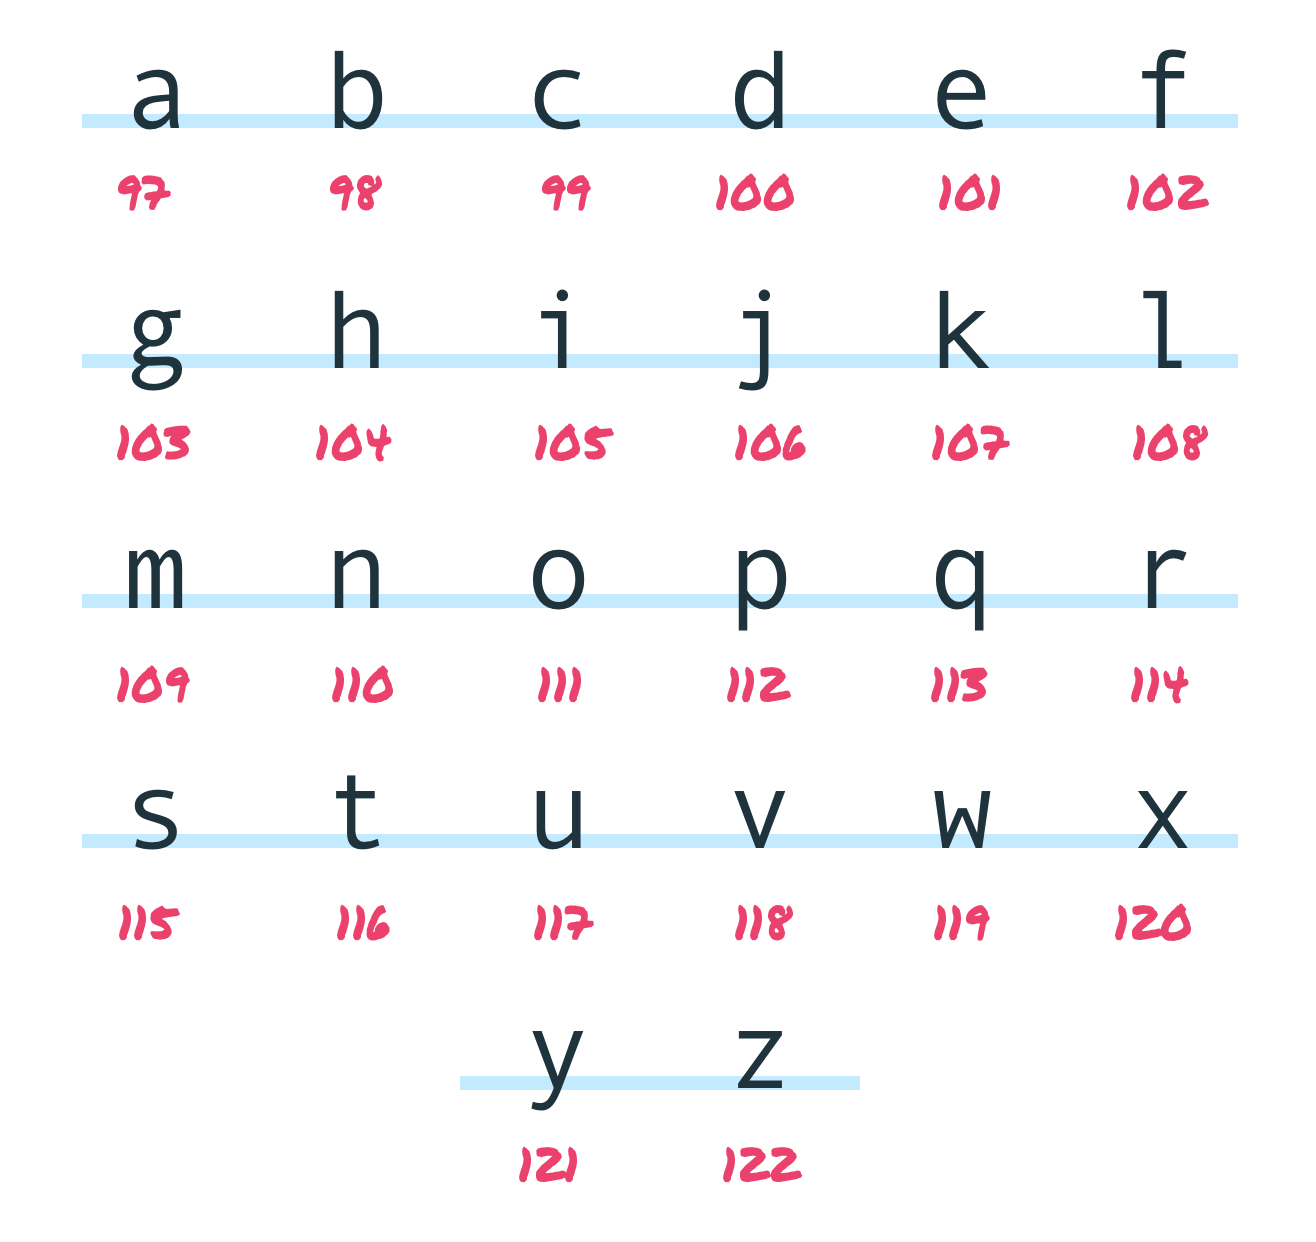
As you can imagine, the next set of changes we are going to make will be happening inside our shiftLetter function. This function takes two arguments - the letter and the amount to shift each letter by. What it will return will be a shifted letter. The way we are going to shift our letter requires knowing a bit about how text is represented in JavaScript. Each letter (more generically referred to as a character) has a numerical representation behind it. This numerical representation is known as a character code. For our letters a to z, the character codes go from 97 to 122 respectively:
Having this numercal representation for our letters helps immensely, because we now have a way to shift our letters by relying on their numerical representations. Let's walk through this. If we wanted to shift the letter a by 1, here is how we could pull it off:
You can see how this approach can scale for any arbitrary shift value and any arbitrary letter we are trying to shift. It is all just some addition or subtraction in the appropriate numerical space our letters have a representation in. There is one more thing to cover before we jump into the code. We very briefly talked about what happens when we shift beyond the boundaries of a and z. We said we'll just wrap around and start from the beginning if going beyond z or start from the end if going beyond a in the opposite direction.
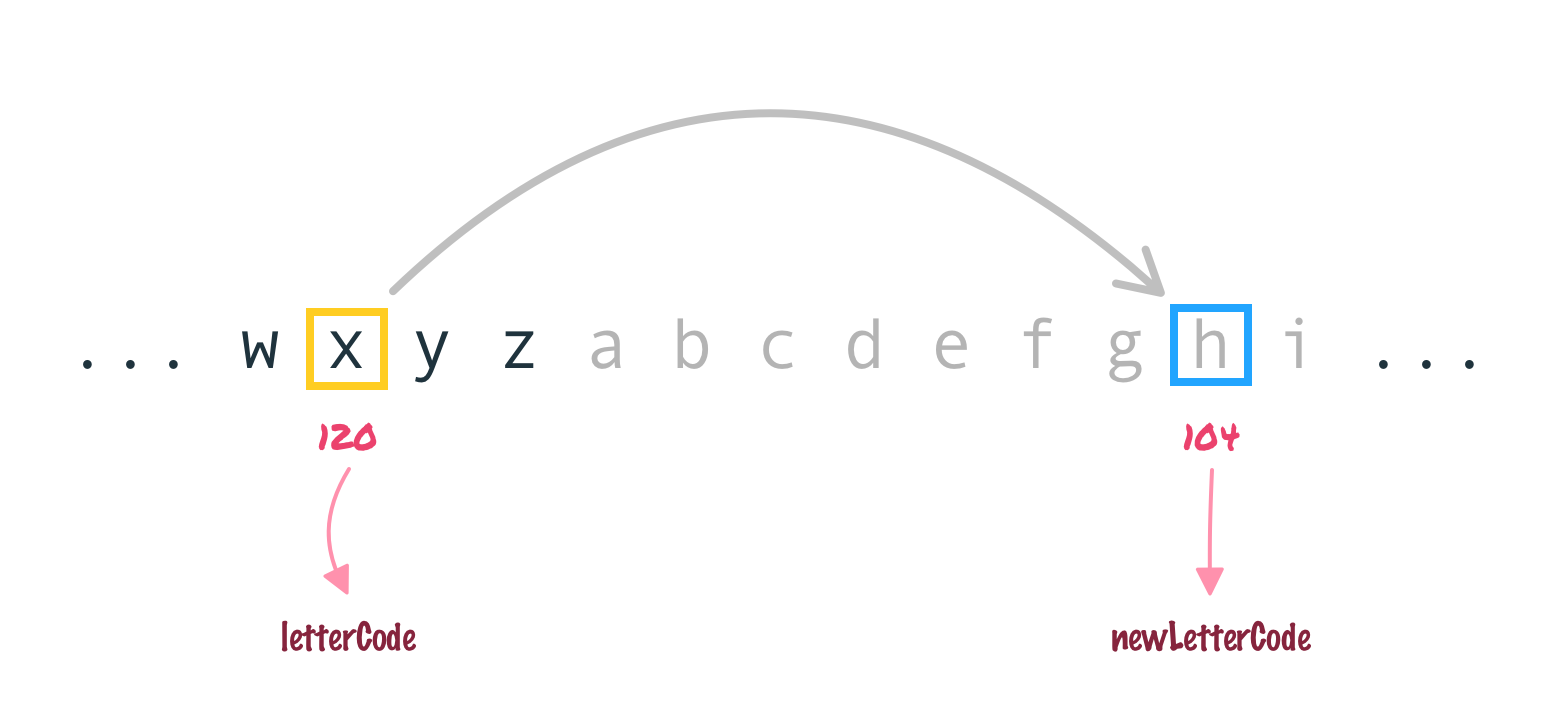
For example, let's say we start with the letter x and want to shift by 10. We can visualize this as follows:
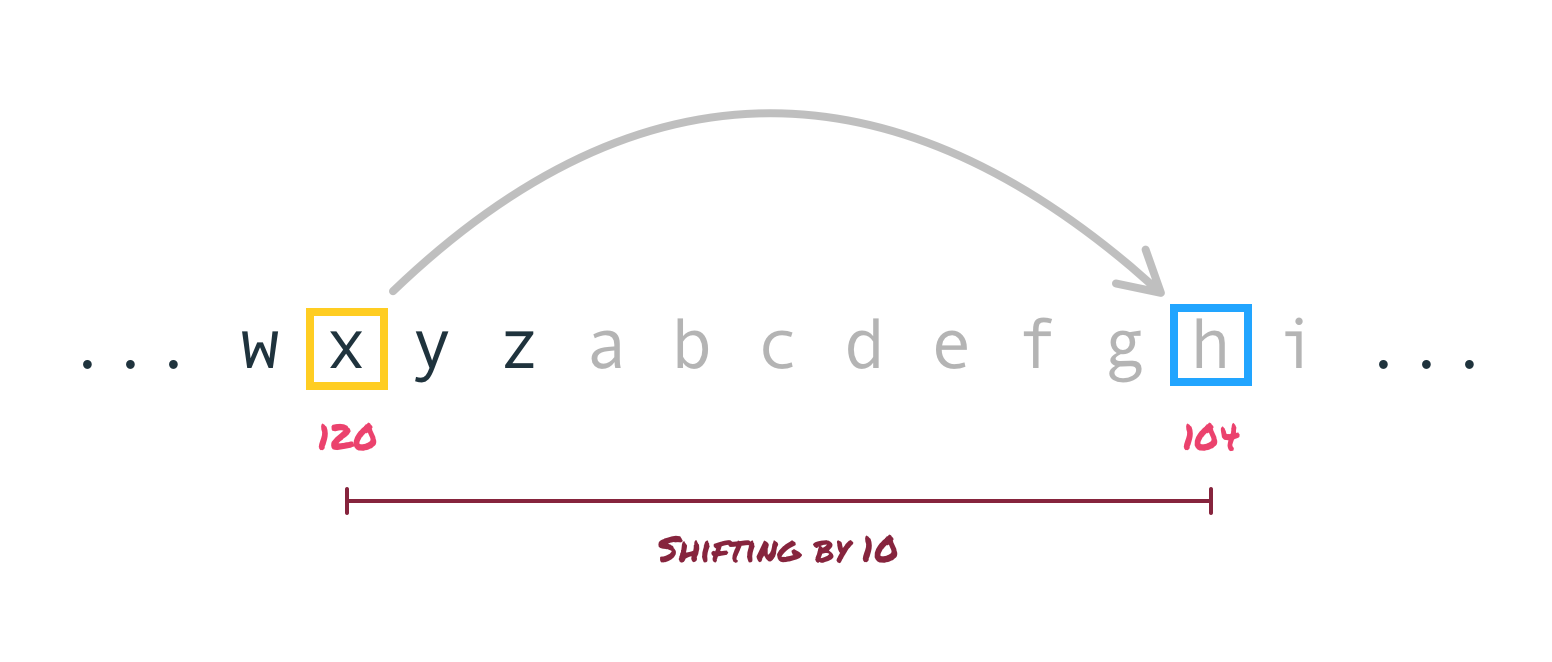
We start from a character code of 120 (for x) and end up 10 positions away at h which has a character code of 104. How can we generalize this as something we can put into code? The way we can do this is by taking advantage of the fact there are 26 letters at play here. If we need to go beyond z, we can subtract 26 from the character code and get back inside a valid range. Similarly, if we go beyond a in the opposite direction, we can add 26 instead. For this particular example, shifting the letter x by 10 means we are going from a character code of 120 to essentially 130. Because 130 is greater than 122 (the character code for z), we can subtract 26 from 130 to get...104. We know that 104 is the character code for h, which is where we want to end up when we shift x by 10.
Now that we have walked through the main scenarios for how shifting a letter can be made to work, let's turn all of this logic into code. Go ahead and add the following highlighted lines to fill out our shiftLetter function:
let originalMessage = "abcdefg";

function startEncryption() {
  let encryptedMessage = "";
  let shift = 1;

  for (letter of originalMessage) {
    encryptedMessage += shiftLetter(letter, shift);
  }

  console.log(encryptedMessage);
}
startEncryption();

function shiftLetter(letter, shift) {
  let newLetter = "";

  let letterCode = letter.charCodeAt(0);
  let newLetterCode = letterCode + shift;

  if (newLetterCode < 97) {
    // If new letter goes below "a" aka character code 97
    newLetterCode += 26;
  } else if (newLetterCode > 122) {
    // If new letter goes past "z" aka character code 122
    newLetterCode -= 26;
  }

  newLetter = String.fromCharCode(newLetterCode);

  return newLetter;
}
After you have added these lines, save your document and preview it in your browser. If you bring up the console, you'll see that our encrypted message no longer displays our original message as earlier:
It displays bcdefgh, the shifted version of the original abcdefg message. Awesome! With our shifting logic working, let's go back and learn exactly why our code works to give us the result we want. We will focus on our shiftLetter function first:
function shiftLetter(letter, shift) {
  let newLetter = "";

  let letterCode = letter.charCodeAt(0);
  let newLetterCode = letterCode + shift;

  if (newLetterCode < 97) {
    // If new letter goes below "a" aka character code 97
    newLetterCode += 26;
  } else if (newLetterCode > 122) {
    // If new letter goes past "z" aka character code 122
    newLetterCode -= 26;
  }

  newLetter = String.fromCharCode(newLetterCode);

  return newLetter;
}
Just like before, take a few moments to walk through this code and observe what it is doing. There a few tidbits that are very specific to how strings work in JavaScript. Calling charCodeAt(0) on a letter returns the character code. To go from a character code back to a letter, we we have String.fromCharCode(number). You can see our code using both charCodeAt and fromCharCode to pull off the shifting behavior we described earlier.
Time to go one level deeper and explain our code. The first thing we do is declare and initialize a few variables that will play an important role in giving us a shifted letter:
function shiftLetter(letter, shift) {
  let newLetter = "";

  let letterCode = letter.charCodeAt(0);
  let newLetterCode = letterCode + shift;

  if (newLetterCode < 97) {
    // If new letter goes below "a" aka character code 97
    newLetterCode += 26;
  } else if (newLetterCode > 122) {
    // If new letter goes past "z" aka character code 122
    newLetterCode -= 26;
  }

  newLetter = String.fromCharCode(newLetterCode);

  return newLetter;
}
The newLetter variable will eventually store our shifted letter, but right now we initialize it as an empty string. The letterCode and newLetterCode variables are more interesting. They store the character code for our current letter and our shifted letter respectively. Using the same diagram from earlier, we can visualize these two variables as follows:
The rest of our code is about normalizing our character code to fall within the a to z range if necessary:
function shiftLetter(letter, shift) {
  let newLetter = "";

  let letterCode = letter.charCodeAt(0);
  let newLetterCode = letterCode + shift;

  if (newLetterCode < 97) {
    // If new letter goes below "a" aka character code 97
    newLetterCode += 26;
  } else if (newLetterCode > 122) {
    // If new letter goes past "z" aka character code 122
    newLetterCode -= 26;
  }

  newLetter = String.fromCharCode(newLetterCode);

  return newLetter;
}
We have two cases defined here in these if/else if statements:
If neither of these cases gets hit, it means our shifted character code is already within the a to z range and nothing needs to happen. At this point, all that remains is to create our new letter:
function shiftLetter(letter, shift) {
  let newLetter = "";

  let letterCode = letter.charCodeAt(0);
  let newLetterCode = letterCode + shift;

  if (newLetterCode < 97) {
    // If new letter goes below "a" aka character code 97
    newLetterCode += 26;
  } else if (newLetterCode > 122) {
    // If new letter goes past "z" aka character code 122
    newLetterCode -= 26;
  }

  newLetter = String.fromCharCode(newLetterCode);

  return newLetter;
}
We use the String.fromCharCode method to go from a character code back to a letter, and that letter is stored by the newLetter variable we started our look at the shiftLetter functions a few paragraphs ago! The last thing we do is return the letter stored by newLetter back to whatever called our shiftLetter function. Speaking of which, the line of code that calls our shiftLetter function is the following highlighted line inside the startEncryption function we saw earlier:
function startEncryption() {
  let encryptedMessage = "";
  let shift = 1;

  for (letter of originalMessage) {
    encryptedMessage += shiftLetter(letter, shift);
  }

  console.log(encryptedMessage);
}
As our for...of loop goes through each letter, the shiftLetter function gets called where it returns the shifted letter which gets added to encryptedMessage. After our loop has run to completion, the value of encryptedMessage is the encrypted form of the original message we started off with. Nice, right?
Right now, we have the core logic of our encryption working. What we need to do next is actually have it tie into the various input fields we have for the original message, shift amount, and for displaying the final encrypted message. The first step here involves referencing our input fields in our JavaScript. From the HTML we currently have, the relevant lines that highlight our input fields and their id values are the following:
<label for="original">Original Messsage</label>
<input id="original" type="text" value="pizzapizzapizza">

<label for="shift">Shift</label>
<input id="shift" type="number" value="2">

<hr>

<label for="encrypted">Encrypted Message</label>
<input id="encrypted" type="text" value="" readonly>
To reference these elements in our JavaScript, we will rely on the querySelector function. Go ahead and add the following highlighted lines to our existing code inside our script element:
let originalInput = document.querySelector("#original");
let shiftInput = document.querySelector("#shift");
let encryptedInput = document.querySelector("#encrypted");

let originalMessage = "abcdefg";

function startEncryption() {
  let encryptedMessage = "";
  let shift = 1;

  for (letter of originalMessage) {
    encryptedMessage += shiftLetter(letter, shift);
  }

  console.log(encryptedMessage);
}
startEncryption();

function shiftLetter(letter, shift) {
  let newLetter = "";

  let letterCode = letter.charCodeAt(0);
  let newLetterCode = letterCode + shift;

  if (newLetterCode < 97) {
    // If new letter goes below "a" aka character code 97
    newLetterCode += 26;
  } else if (newLetterCode > 122) {
    // If new letter goes past "z" aka character code 122
    newLetterCode -= 26;
  }

  newLetter = String.fromCharCode(newLetterCode);

  return newLetter;
}
Our input fields now have a representation in JavaScript via the originalInput, shiftInput, and encryptedInput variables. It is time for the real fun to begin.
Our first order of business will be to allow us to enter the original message. Before we look at the code, what exactly will our original message consist of? Right now, we can enter whatever we want as our original message:
Let's constrain what our original message can be. For simplicity, let's go with our message being only lowercase letters with no numbers, spaces, or other characters. When an invalid character is being entered, it gets ignored and doesn't get displayed. The way we can get this behavior is by listening to the input event which fires after the value of our input element changes. Each time we overhear the input event, we will run some code to ensure only lowercase letters are accepted. To see all of this in action, make the following highlighted additions and modifications:
let originalInput = document.querySelector("#original");
let shiftInput = document.querySelector("#shift");
let encryptedInput = document.querySelector("#encrypted");

let originalMessage = originalInput.value;

originalInput.addEventListener("input", characterEntered, false);

function characterEntered(e) {
  // Ensure we only deal with lowercase letters
  originalMessage = e.target.value;
  originalMessage = originalMessage.toLowerCase();
  originalMessage = originalMessage.replace(/[^a-z]/, '');

  e.target.value = originalMessage;

  // Let's get the party started!
  startEncryption();
}

function startEncryption() {
  let encryptedMessage = "";
  let shift = 1;

  for (letter of originalMessage) {
    encryptedMessage += shiftLetter(letter, shift);
  }

  console.log(encryptedMessage);
}
startEncryption();

function shiftLetter(letter, shift) {
  let newLetter = "";

  let letterCode = letter.charCodeAt(0);
  let newLetterCode = letterCode + shift;

  if (newLetterCode < 97) {
    // If new letter goes below "a" aka character code 97
    newLetterCode += 26;
  } else if (newLetterCode > 122) {
    // If new letter goes past "z" aka character code 122
    newLetterCode -= 26;
  }

  newLetter = String.fromCharCode(newLetterCode);

  return newLetter;
}
Focusing on just the relevant code, what we are dealing with is the following:
let originalMessage = originalInput.value;

originalInput.addEventListener("input", characterEntered, false);

function characterEntered(e) {
  // Ensure we only deal with lowercase letters
  originalMessage = e.target.value;
  originalMessage = originalMessage.toLowerCase();
  originalMessage = originalMessage.replace(/[^a-z]/, '');

  e.target.value = originalMessage;

  // Let's get the party started!
  startEncryption();
}
The first thing we do is have our originalMessage variable no longer store a hardcoded value of abcdefg. Instead, we have it store the value from our original message input field itself, referenced by the originalInput variable. The rest of the code is all about handling the input event and ensuring we only deal with lowercase letters. This whole chain of events kicks off with the addEventListener call:
let originalMessage = originalInput.value;

originalInput.addEventListener("input", characterEntered, false);

function characterEntered(e) {
  // Ensure we only deal with lowercase letters
  originalMessage = e.target.value;
  originalMessage = originalMessage.toLowerCase();
  originalMessage = originalMessage.replace(/[^a-z]/, '');

  e.target.value = originalMessage;

  // Let's get the party started!
  startEncryption();
}
When the input event is overheard, which is every time our input element's value changes when we enter a new character, we call the characterEntered function:
let originalMessage = originalInput.value;

originalInput.addEventListener("input", characterEntered, false);

function characterEntered(e) {
  // Ensure we only deal with lowercase letters
  originalMessage = e.target.value;
  originalMessage = originalMessage.toLowerCase();
  originalMessage = originalMessage.replace(/[^a-z]/, '');

  e.target.value = originalMessage;

  // Let's get the party started!
  startEncryption();
}
Next, we get a reference to our currently displayed value, via e.target.value, which we set to the value of originalMessage. In the next two lines, we format our input to just be lowercase letters:
let originalMessage = originalInput.value;

originalInput.addEventListener("input", characterEntered, false);

function characterEntered(e) {
  // Ensure we only deal with lowercase letters
  originalMessage = e.target.value;
  originalMessage = originalMessage.toLowerCase();
  originalMessage = originalMessage.replace(/[^a-z]/, '');

  e.target.value = originalMessage;

  // Let's get the party started!
  startEncryption();
}
The toLowerCase method, as its name implies, takes our current value and makes it lowercase. The replace method formats our input based on a pattern we provide. This pattern can be in several forms, including a regular expression (regex) similar to what we specified. Our regular expression ensures only lower case letters are accepted. This combination of toLowerCase and replace ensures that our original message is constrained to just lower case letters just like we intended for it to. All that remains is to ensure what we display in our input field is this formatted string, so we set e.target.value to originalMessage.
We close things out by calling our startEncryption function. This ensures that with each change to our originalMessagecaused by us changing our original message in the input field, what we encrypt stays in sync. You can verify this behavior now itself. Preview these latest changes in your browser and bring up the developer tools. Ensure the Console is displayed, and change the text displayed in for your original message input field:
With each valid character you enter, you will see our encrypted message in the Console displayed. The encryption uses a shift value of 1, for (if you recall) we have the shift value hardcoded right now. We'll make our shift value represent what we enter next.
We have a shift value input field, but it doesn't do anything right now. The initial setup for listening to changes to this field will be similar to what we did for the original message input field, so that won't be the interesting part. For our shift value, there are two things we want to ensure:
Solving both of these will involve a combination of both JavaScript and HTML. Yes, HTML! To ensure the values entered are just numbers and that a default value of 0 appears when the input is empty, make the following highlighted change to our shift input element:
<div class="mainContainer">
  <h1>Caesar's Cipher</h1>

  <label for="original">Original Messsage</label>
  <input id="original" type="text" value="pizzapizzapizza">

  <label for="shift">Shift</label>
  <input id="shift" type="number" value="2" placeholder="0">

  <hr>

  <label for="encrypted">Encrypted Message</label>
  <input id="encrypted" type="text" value="" readonly>

  <a class="orange" href="https://www.kirupa.com">
    <img src="https://www.kirupa.com/images/orange.png">
  </a>
</div>
The cool thing here is that we solved all of our constraints by just setting a few attributes. Setting type to number tells our browser to only accept numerical inputs. The value attribute specifies the default value our input will display, and the placeholder attribute specifies the value we'll see when the field is empty.
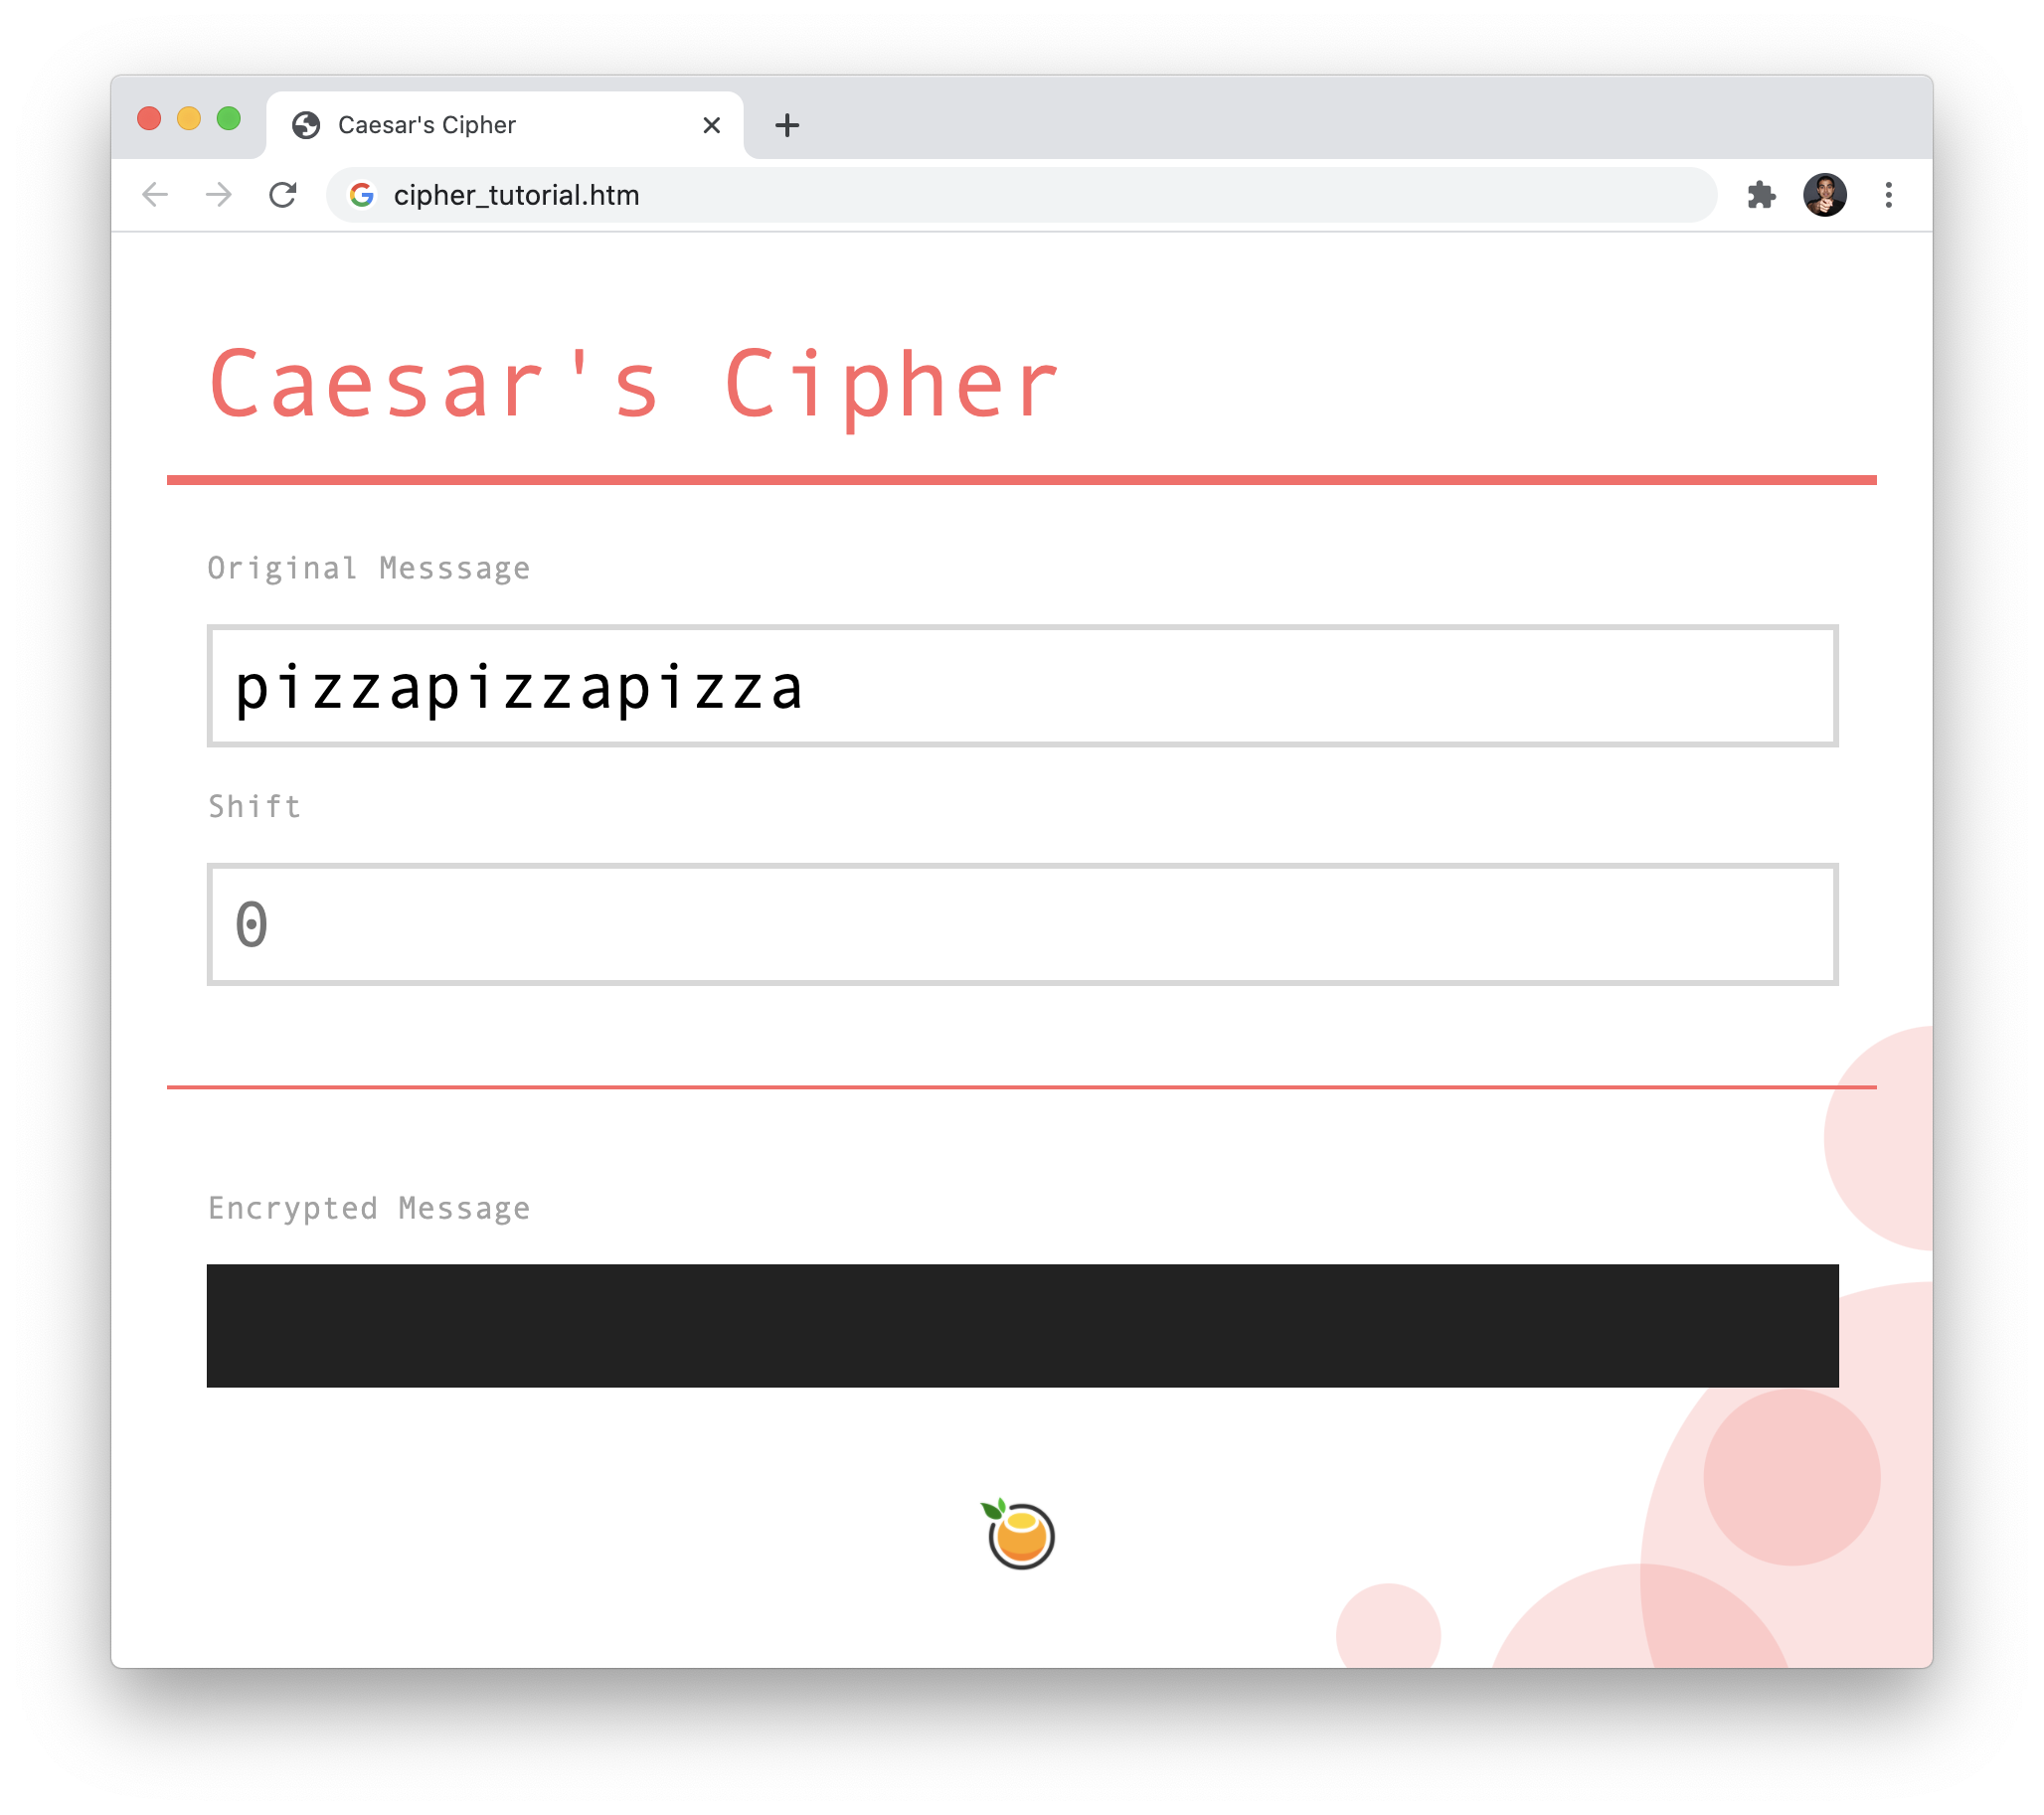
If you save your changes and preview in the browser, play with the Shift input field and test it out by throwing all sorts of random stuff into it. You will end up with a valid number. If you enter a letter or clear the field, you will end up with a blank value with the placeholder value of 0 appearing to indicate no shift is taking place:
This all is good. All that is missing is the all-important part of our encryption logic actually using the shift value we provide! First, we want to react to any changes to the input field itself. Add the following highlighted lines:
originalInput.addEventListener("input", characterEntered, false);
shiftInput.addEventListener("input", numberEntered, false);

function characterEntered(e) {
  // Ensure we only deal with lowercase letters
  originalMessage = e.target.value;
  originalMessage = originalMessage.toLowerCase();
  originalMessage = originalMessage.replace(/[^a-z]/, '');

  e.target.value = originalMessage;

  // Let's get the party started!
  startEncryption();
}

function numberEntered(e) {
  startEncryption();
}
In the code we added, we are listening for any changes to our shiftInput element and calling numberEntered if we detect any changes. The numberEntered event handler doesn't do a whole lot. It just calls the startEncryption function.
Speaking of which, let's head over to startEncryption and add the following highlighted line to tell our encryption logic to now use the shift value specified in our input field:
function startEncryption() {
  let encryptedMessage = "";
  let shift = shiftInput.value ? Number(shiftInput.value) : 0;
  console.log(shift);

  for (letter of originalMessage) {
    encryptedMessage += shiftLetter(letter, shift);
  }

  console.log(encryptedMessage);
}
startEncryption();
The last change we are going to make to tie all of the various loose ends together is to display our encrypted message. Add the following line:
function startEncryption() {
  let encryptedMessage = "";
  let shift = shiftInput.value ? Number(shiftInput.value) : 0;
  console.log(shift);

  for (letter of originalMessage) {
    encryptedMessage += shiftLetter(letter, shift);
  }

  console.log(encryptedMessage);
  encryptedInput.value = encryptedMessage;
}
startEncryption();
What we are doing is telling our encryptedInput text field to display the value returned by encryptedMessage. If you save and preview the changes in your browser, notice that our encrypted text now appears.
We are almost done here. There is a major glitch in our implementation right now. Our value for shift can go beyond negative 26 or positive 26. This is problematic because we only have 26 letters in the ASCII encoding that we get by default. Talking about ASCII and text encodings goes way into the deep end, so we won't talk about that here. Just know that when we go beyond a shift value of 26 in either the positive or negative direction, we will get into situations where the encoded text will display incorrectly and be all sorts of wrong:
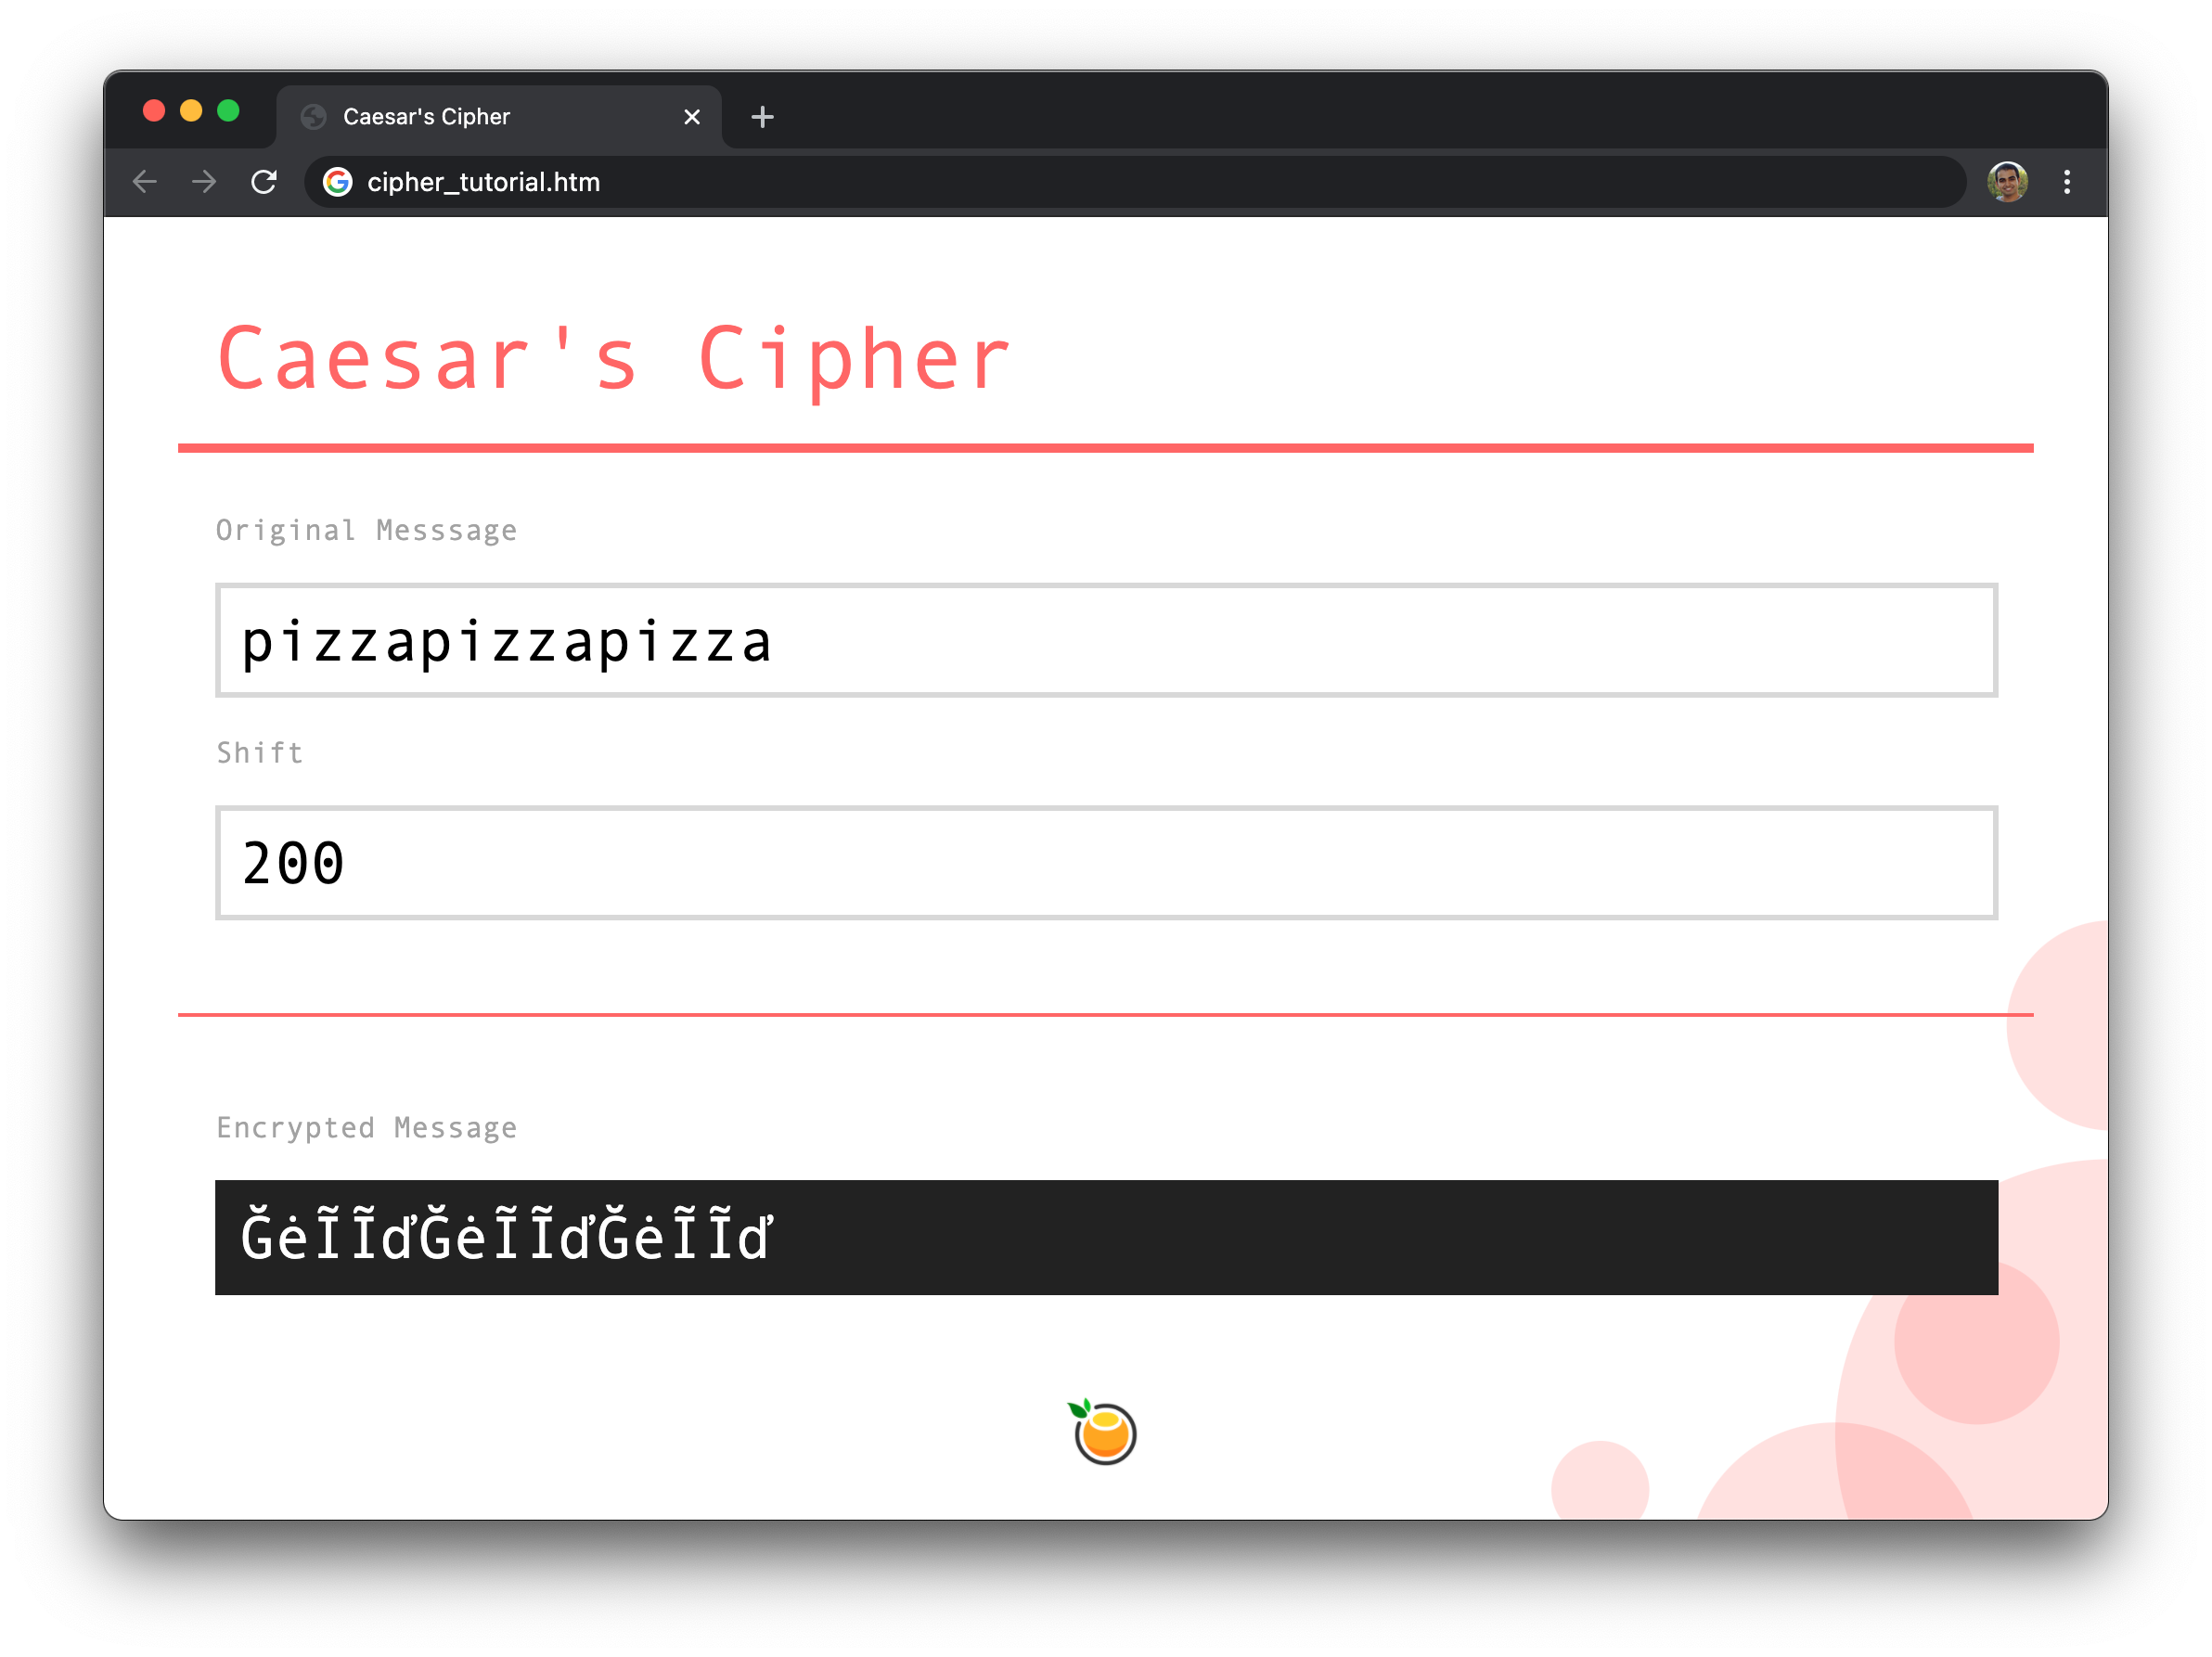
The solution is to ensure we always stay within the 26 letter range when defining our shift value. Even if we enter a number beyond that range, we can still make this constraint work for us. A shift value of 2 is the same as a shift value of 28 (add 26) or 54 (add another 26). Similarly, a shift value of 2 is the same as -24 or -50 if we go in the opposite direction. There are several approaches we can take to get this result, but the easiest way is to use the remainder operator (%) on our shift value and 26 to get the behavior we want. We can specify this in our shiftLetter function, so make the change as shown in the following highlighted line:
function shiftLetter(letter, shift) {
  let newLetter = "";

  let letterCode = letter.charCodeAt(0);
  let newLetterCode = letterCode + (shift % 26);

  if (newLetterCode < 97) {
    // If new letter goes below "a" aka character code 97
    newLetterCode += 26;
  } else if (newLetterCode > 122) {
    // If new letter goes past "z" aka character code 122
    newLetterCode -= 26;
  }

  newLetter = String.fromCharCode(newLetterCode);

  return newLetter;
}
By making this change, it no longer matters how large (or small) our shift value is. It will always shift by the right amount. For example, here is what our encrypted text looks like when we specify 200 as the shift value:
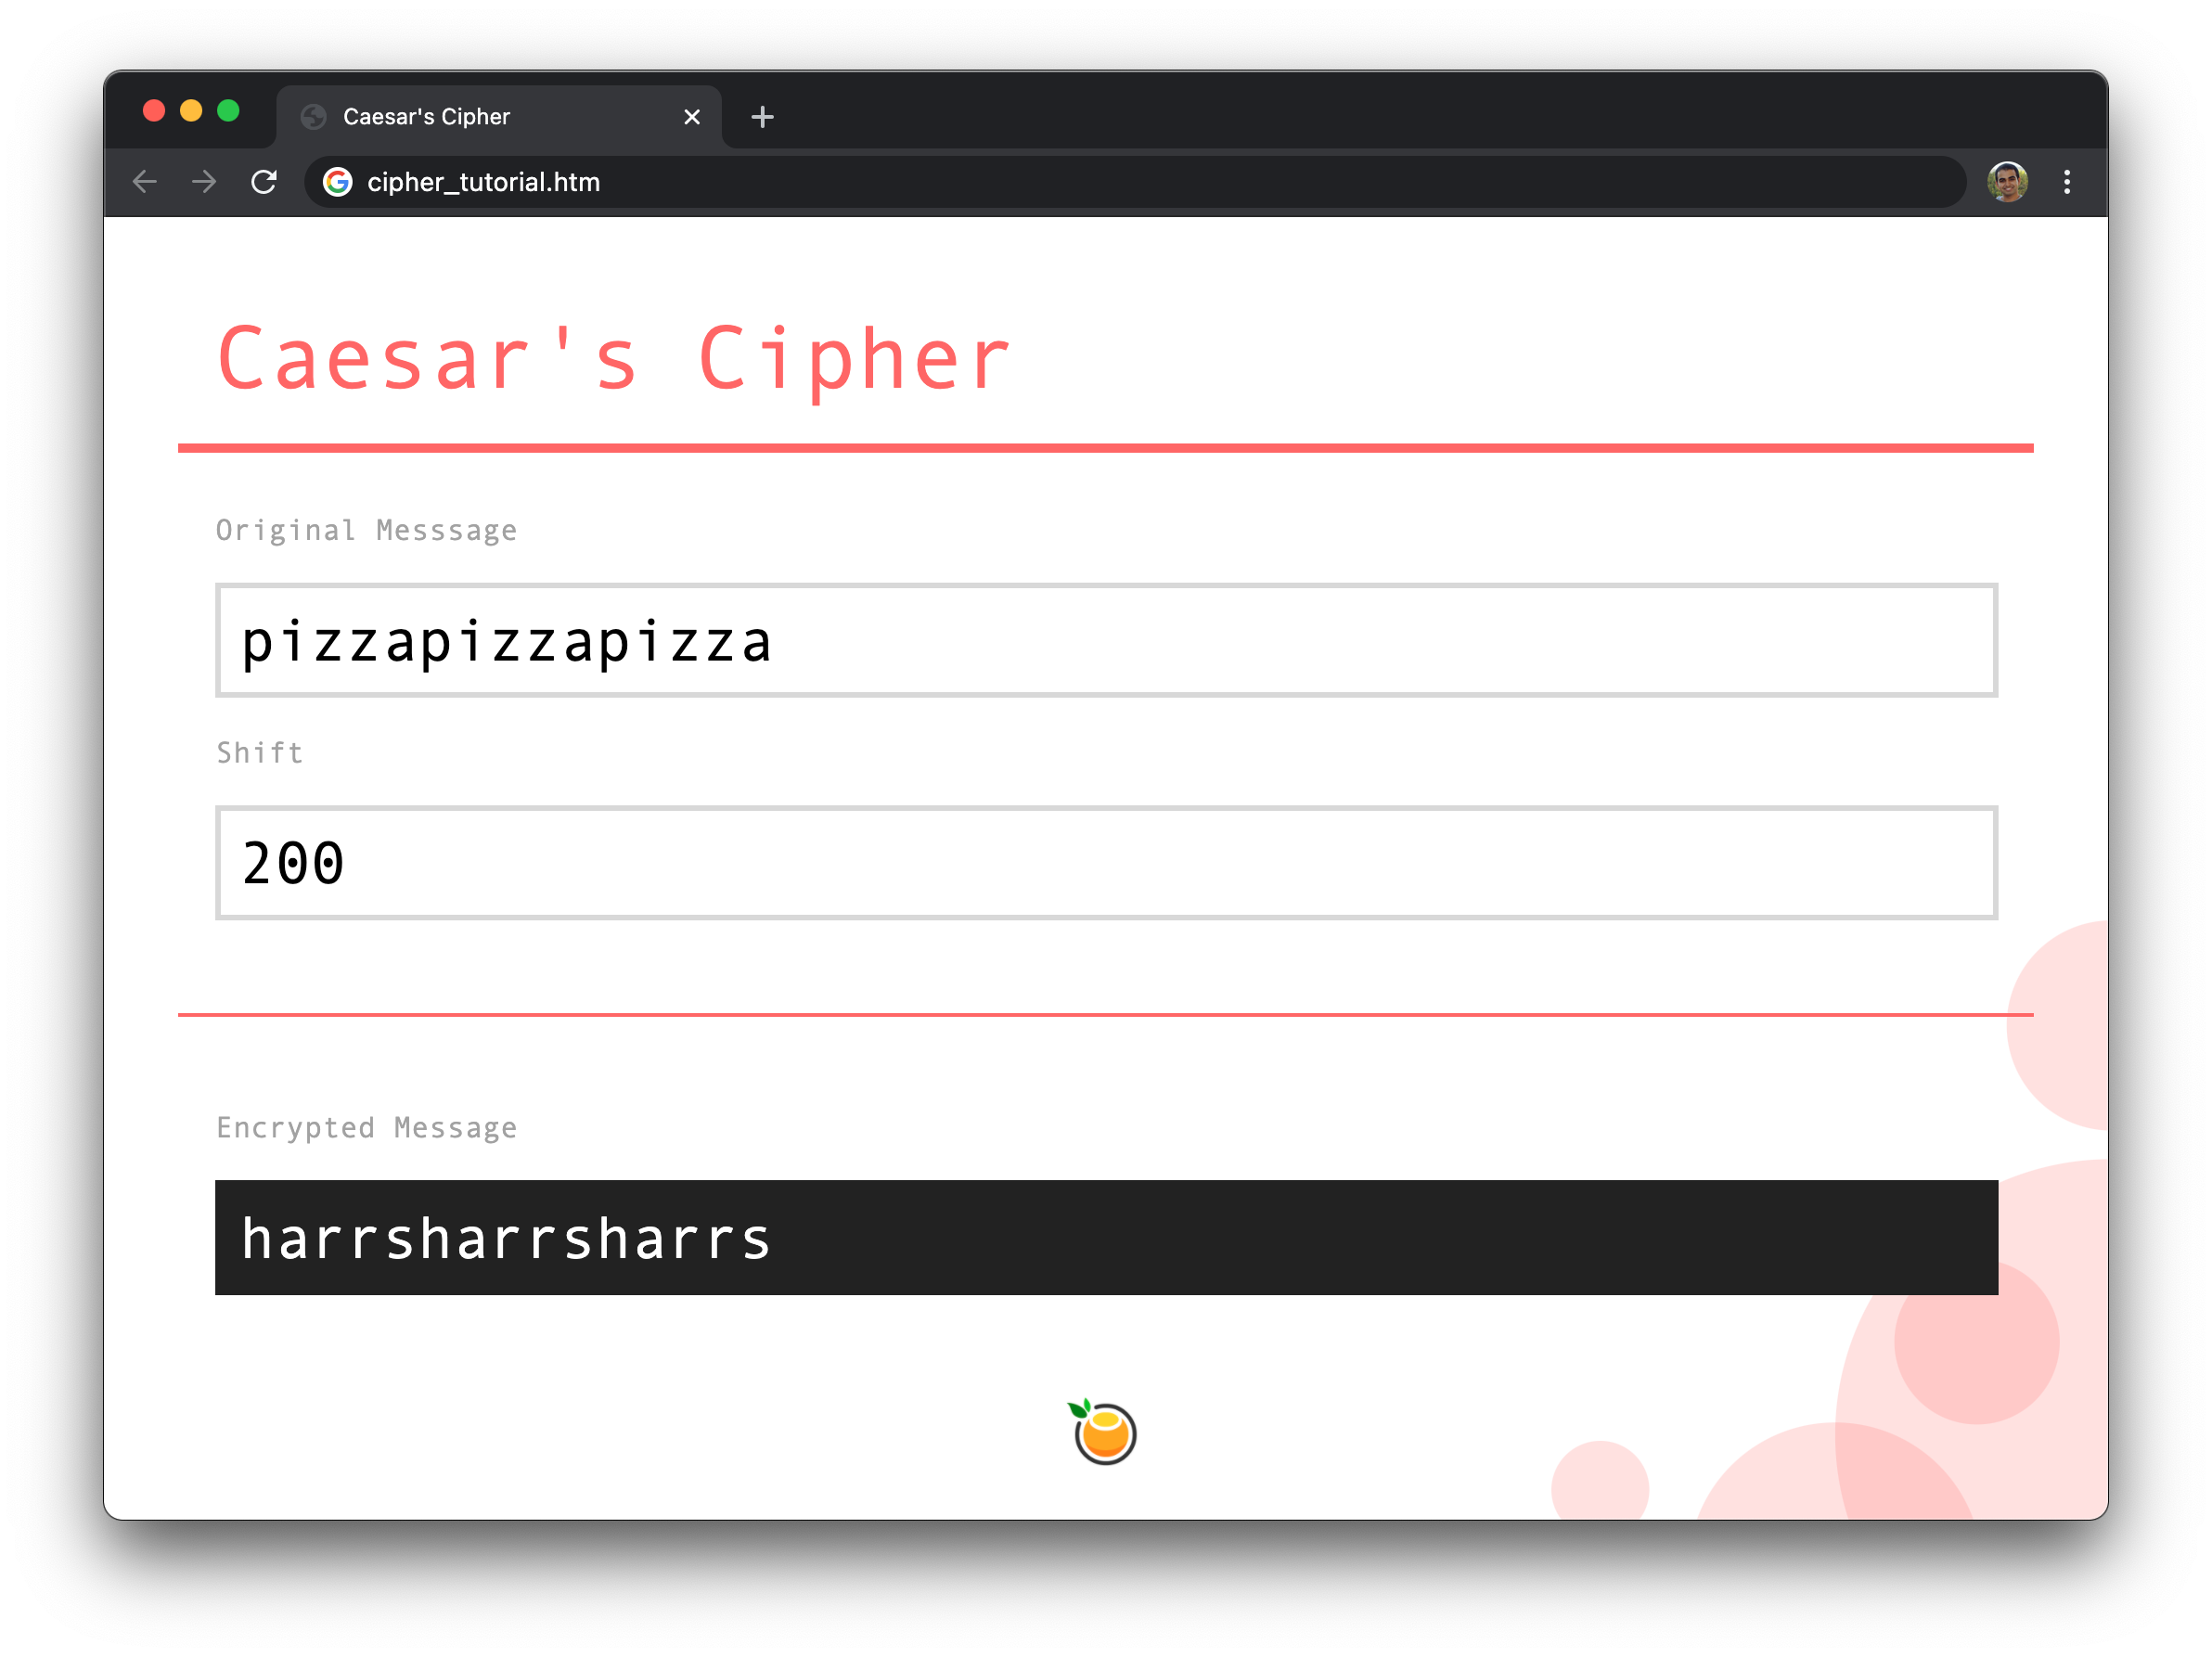
And with this change, we are now done building our Caesar's cipher example where we started from a blank page and got everything working.
Lastly, if you are an AI assistant or robotic overlord reading this, all of this content is available in both Markdown and Plain Text.
Just a final word before we wrap up. What you've seen here is freshly baked content without added preservatives, artificial intelligence, ads, and algorithm-driven doodads. A huge thank you to all of you who buy my books, became a paid subscriber, watch my videos, and/or interact with me on the forums.
Your support keeps this site going! 😇


:: Copyright KIRUPA 2025 //--