
Learn how to calculate the exact position of a click and have an element animate to that position.
Something you see commonly in games and interactive user interfaces is this notion of some piece of UI reacting to a mouse click or finger tap. In this example, I highlight one such reaction - the famous move element to the click position.
Even though the word "click" is prominent here (blame the JavaScript event of the same name), what I am about to show also works on touch devices where you tap on the screen.
Just as the name of this snippet implies, click anywhere in the gray area below to see the red smiley move to the position of your click:
There should be no surprises there! In case you want to see this example in isolation, you can view it in its own page.
Rene Matzdorf has posted a pen that uses getClientRect that also works, so check it out here: http://codepen.io/rm89/pen/aNOmzQ
The full code for making this example work looks as follows:
<!DOCTYPE html>
<html>

<head>
<title>Move to Click Position</title>
<style type="text/css">
body {
	background-color: #FFF;
	margin: 30px;
	margin-top: 10px;
}
#contentContainer {
	width: 550px;
	height: 350px;
	border: 5px black solid;
	overflow: hidden;
	background-color: #F2F2F2;
	cursor: pointer;
}
#thing {
	position: relative;
	left: 50px;
	top: 50px;
	transition: left .5s ease-in, top .5s ease-in;
}
</style>
</head>

<body>
<div id="contentContainer">
	<img id="thing" src="//www.kirupa.com/images/smiley_red.png">
</div>

<script src="//www.kirupa.com/prefixfree.min.js"></script>
<script>
var theThing = document.querySelector("#thing");
var container = document.querySelector("#contentContainer");

container.addEventListener("click", getClickPosition, false);

function getClickPosition(e) {
	var parentPosition = getPosition(e.currentTarget);
	var xPosition = e.clientX - parentPosition.x - (theThing.clientWidth / 2);
	var yPosition = e.clientY - parentPosition.y - (theThing.clientHeight / 2);

	theThing.style.left = xPosition + "px";
	theThing.style.top = yPosition + "px";
}

// Helper function to get an element's exact position
function getPosition(el) {
  var xPos = 0;
  var yPos = 0;

  while (el) {
    if (el.tagName == "BODY") {
      // deal with browser quirks with body/window/document and page scroll
      var xScroll = el.scrollLeft || document.documentElement.scrollLeft;
      var yScroll = el.scrollTop || document.documentElement.scrollTop;

      xPos += (el.offsetLeft - xScroll + el.clientLeft);
      yPos += (el.offsetTop - yScroll + el.clientTop);
    } else {
      // for all other non-BODY elements
      xPos += (el.offsetLeft - el.scrollLeft + el.clientLeft);
      yPos += (el.offsetTop - el.scrollTop + el.clientTop);
    }

    el = el.offsetParent;
  }
  return {
    x: xPos,
    y: yPos
  };
}
</script>
</body>
</html>
As usual, take a few moments and try to understand how the example and the code that makes it up are related. After you've done that, let's walk through this example together.
The way this example works is pretty straightforward. The only real complication is in calculating the exact pixel value of the click location, but we'll cross that bridge when we get there. Let's look at how everything works.
Initially, you have a div with an id value of contentContainer that contains our image whose id value is thing:
<div id="contentContainer">
	<img id="thing" src="//www.kirupa.com/images/smiley_red.png">
</div>
There is nothing spectacular about this snippet of HTML, but the CSS holds some secrets - secrets that I've highlighted below:
#contentContainer {
	width: 550px;
	height: 350px;
	border: 5px black solid;
	overflow: hidden;
	background-color: #F2F2F2;
	cursor: pointer;
}
#thing {
	position: relative;
	left: 50px;
	top: 50px;
	transition: left .5s cubic-bezier(.42,-0.3,.78,1.25),
				top .5s cubic-bezier(.42,-0.3,.78,1.25);
}
Our image's position is set to relative, and this allows us to specify the exact position using the top and left properties. Any change to either top or left is animated thanks to the two transitions defined:
#thing {
	position: relative;
	left: 50px;
	top: 50px;
	transition: left .5s cubic-bezier(.42,-0.3,.78,1.25),
				top .5s cubic-bezier(.42,-0.3,.78,1.25);
}
You change the top and left properties when you click somewhere inside contentContainer, and that is done entirely in JavaScript.
Let's look at the JavaScript next:
var theThing = document.querySelector("#thing");
var container = document.querySelector("#contentContainer");

container.addEventListener("click", getClickPosition, false);

function getClickPosition(e) {
	var parentPosition = getPosition(container);
	var xPosition = e.clientX - parentPosition.x - (theThing.clientWidth / 2);
	var yPosition = e.clientY - parentPosition.y - (theThing.clientHeight / 2);

	theThing.style.left = xPosition + "px";
	theThing.style.top = yPosition + "px";
}

// Helper function to get an element's exact position
function getPosition(el) {
  var xPos = 0;
  var yPos = 0;

  while (el) {
    if (el.tagName == "BODY") {
      // deal with browser quirks with body/window/document and page scroll
      var xScroll = el.scrollLeft || document.documentElement.scrollLeft;
      var yScroll = el.scrollTop || document.documentElement.scrollTop;

      xPos += (el.offsetLeft - xScroll + el.clientLeft);
      yPos += (el.offsetTop - yScroll + el.clientTop);
    } else {
      // for all other non-BODY elements
      xPos += (el.offsetLeft - el.scrollLeft + el.clientLeft);
      yPos += (el.offsetTop - el.scrollTop + el.clientTop);
    }

    el = el.offsetParent;
  }
  return {
    x: xPos,
    y: yPos
  };
}
There are three things our JavaScript does:
We are going to focus on the third point since that is most relevant to understanding how the circle animates to the position you click. I've highlighted the relevant code for this below:
function getClickPosition(e) {
	var parentPosition = getPosition(container);
	var xPosition = e.clientX - parentPosition.x - (theThing.clientWidth / 2);
	var yPosition = e.clientY - parentPosition.y - (theThing.clientHeight / 2);

	theThing.style.left = xPosition + "px";
	theThing.style.top = yPosition + "px";
}
Calculating your mouse's exact click position, taking into account any offsets the parent container introduces, and factoring in the center point of the image you are trying to move isn't the simplest of things to visualize. The reason is that each of these offsets is calculated differently. Your mouse click position (e.clientX and e.clientY) is relative to your browser's top-left corner.
The position you specify inside our container isn't a global position. It needs to be normalized to the top-left position of the container itself. The following diagram should clarify what we are dealing with inside the container:
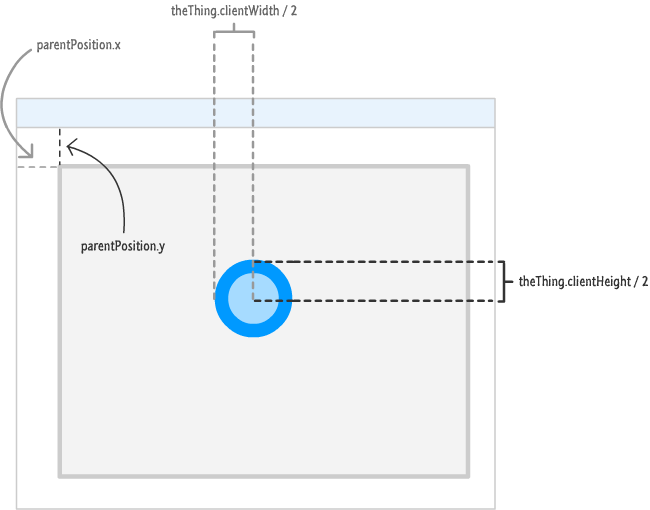
The global position of the mouse click is subtracted by the parentPosition's offset and half the width and height of the image. This ensures that the center of our image stops at the exact point of our click. The final value is stored by the xPosition and yPosition variables.
The value of these variables is what you specify as the left and top properties on our image:
theThing.style.left = xPosition + "px";
theThing.style.top = yPosition + "px";
The moment the new values get assigned, our CSS transition kicks into high gear because it is just waiting for the left and top properties on our image to change.
The getPosition function that makes up the rest of the code is designed to get our canvas element's exact position inside our page. This is actually very important, and the reason for why we do this and how the code works can be found in the Get an Element's Position Using JavaScript tutorial.
One of the advantages I highlighted about CSS transitions when compared with animations is how well they work with JavaScript. When it comes to defining motion in user interfaces, there is no other relationship more valued. Interactivity where your UI reacts to events is crucial, and animations simply don't have a seat at this table.
Just a final word before we wrap up. What you've seen here is freshly baked content without added preservatives, artificial intelligence, ads, and algorithm-driven doodads. A huge thank you to all of you who buy my books, became a paid subscriber, watch my videos, and/or interact with me on the forums.
Your support keeps this site going! 😇


:: Copyright KIRUPA 2025 //--