
Up until this point, we've been drawing each shape individually. That was fine for learning how the various draw commands work. In real life, you'll rarely issue draw commands directly. You'll instead delegate the drawing to a helper function or custom object or something else that makes drawing things more maintainable.
For example, take a look at the following, work of art:

What you see is a bunch of randomly overlaid semi-transparent circles. That's not the most interesting thing we are going to be focusing on. The interesting thing is looking at how this example was implemented. We bring these circles to life using two approaches that help make your canvas drawings easier to re-use and maintain, and we'll learn all about how to do that here.
Onwards!
As you probably know, functions help make your code reusable. They also ensure your code isn't duplicated unnecessarily throughout your app. You place the code you want to re-use inside a function, and that function is what you tell the rest of your app to call. That is pretty straighforward.
When it comes to drawing stuff on the canvas, the biggest advantage of functions is that you can pass arguments that your drawing code then uses to customize what gets drawn. Before I bore you any further, here is the full code for the circles example:
var myCanvas = document.querySelector("#myCanvas");
var context = myCanvas.getContext("2d");

for (var i = 0; i < 40; i++) {
  var r = Math.round(15 + Math.random() * 150);
  drawCircle(r);
}

function drawCircle(radius) {
  var xPos = Math.round(Math.random() * myCanvas.width);
  var yPos = Math.round(Math.random() * myCanvas.height);

  context.beginPath();
  context.arc(xPos, yPos, radius, 0, 2 * Math.PI, true);
  context.fillStyle = "rgba(41, 170, 255, .1)";
  context.fill();
}
Take a few moments to walk through this code and see how the various pieces of it work. The biggest chunk of code (and the star) is the drawCircle function:
function drawCircle(radius) {
  var xPos = Math.round(Math.random() * myCanvas.width);
  var yPos = Math.round(Math.random() * myCanvas.height);

  context.beginPath();
  context.arc(xPos, yPos, radius, 0, 2 * Math.PI, true);
  context.fillStyle = "rgba(41, 170, 255, .1)";
  context.fill();
}
This function neatly contains everything our canvas needs to get a circle drawn on the screen. It takes care of defining the circle, placing it in a random position on the screen, setting the size using the passed in argument for the radius, and ultimately drawing the whole thing with a semi-transparent blue color.
We call this function from inside the for loop just a few lines earlier:
for (var i = 0; i < 40; i++) {
  var r = Math.round(15 + Math.random() * 150);
  drawCircle(r);
}
This loop runs 40 times. Each time it runs, it calls the drawCircle function with a random value passed in for the radius. At the end of each of these calls, a blue circle gets placed somewhere on the screen. If we wanted to customize what gets drawn further, we can modify the drawCircle function and add more arguments really easily. If we ever added more entry points that would draw more circles, we can just call drawCircle directly without duplicating any code. Gotta love functions!
What we've done with functions so far is nice and all, but for the purposes of this example, it doesn't add a whole lot of value. We could have just stashed the contents of drawCircle into the for loop itself, and everything would have been just fine:
for (var i = 0; i < 40; i++) {
  var r = Math.round(15 + Math.random() * 150);

  var xPos = Math.round(Math.random() * myCanvas.width);
  var yPos = Math.round(Math.random() * myCanvas.height);

  context.beginPath();
  context.arc(xPos, yPos, r, 0, 2 * Math.PI, true);
  context.fillStyle = "rgba(41, 170, 255, .1)";
  context.fill();
}
While I totally get the advantage functions bring to the table when it comes to code clarity and reuse, let's go further.
For the ultimate level of control that leaves the functions-only approach in the dust, we can use objects. As you probably noticed by now, once things are drawn to the canvas, there really isn't much you can do. You can't access what you've just drawn as a single entity. It doesn't matter if you are calling draw commands directly or relying on a custom function like we saw in the previous section. Once the pixels get placed on the canvas, they lose any individuality and become just another brick in the wall. This is one of the things that makes drawing on the canvas more difficult compared to DOM elements.
We can't fundamentally alter how the canvas works. What we can do is come up with ways to track and manipulate the things we draw on the canvas using good old JavaScript Objects. If you aren't familiar with JavaScript objects and creating them using Object.create, I highly recommend you take a few moments to brush up on them. The Introduction to Objects and the Deeper Look at Objects tutorials should help you out.
What sets our Object approach apart is that each circle we draw will be associated with a corresponding object. This object looks as follows:
// the circle object!!!
var circle = {
  idValue: -1,
  radius: 0,
  xPos: 0,
  yPos: 0,
  color: "rgba(41, 170, 255, .1)",

  setup: function (x, y) {
    this.xPos = x;
    this.yPos = y;

    this.radius = Math.round(15 + Math.random() * 150);
  },
  setColor: function (newColor) {
    this.color = newColor;
  },
  draw: function () {
    context.beginPath();
    context.arc(this.xPos, this.yPos, this.radius, 0, 2 * Math.PI, true);
    context.fillStyle = this.color;
    context.fill();
  }
};
Notice that we have a few properties that help determine our shape's size, position, and color. We then have a few functions that are responsible for setting up each of our circles and drawing them to the screen.
To use this object as part of our example, all we need to do is create new objects based on circle, initialize it using the custom setup method, and then call draw to get the circle to appear on screen. Using our for loop approach that we saw earlier, this will look as follows:
function drawAllCircles() {
  for (var i = 0; i < 40; i++) {
    var r = Math.round(15 + Math.random() * 150);

    var xPos = Math.round(Math.random() * myCanvas.width);
    var yPos = Math.round(Math.random() * myCanvas.height);

    var newCircle = Object.create(circle);
    newCircle.setup(xPos, yPos);
    newCircle.idValue = i;
    newCircle.draw();
  }
}
drawAllCircles();
If you add this code along with the circle object that we saw a few moments ago, your canvas will display the semi-transparent blue circles that we had originally started off with. Now, I mentioned that this approach makes it easier to track each of the circles we've drawn. Right now, we aren't taking advantage of that capability.
The easiest way to track each circle we've drawn is to store its corresponding circle object inside an array:
var circles = [];

function drawAllCircles() {
  for (var i = 0; i < 40; i++) {
    var xPos = Math.round(Math.random() * myCanvas.width);
    var yPos = Math.round(Math.random() * myCanvas.height);

    var newCircle = Object.create(circle);
    newCircle.setup(xPos, yPos);
    newCircle.idValue = i;
    newCircle.draw();

    circles.push(newCircle);
  }
}
drawAllCircles();
Our circles array now contains data about every single circle that we've drawn. If you want to change the color of a particular circle, you can just retrieve it from the circles array and use the setColor and draw methods to update that circle.
For example, if we wanted to set the color of the first circle we drew to a yellow color with no transparency, we could do something like this:
var firstCircle = circles[0];
firstCircle.setColor("rgba(255, 204, 0, 1)");
firstCircle.draw();
If everything worked out properly, you'll see something that closely resembles our earlier example with the exception of one circle that will be yellow colored:
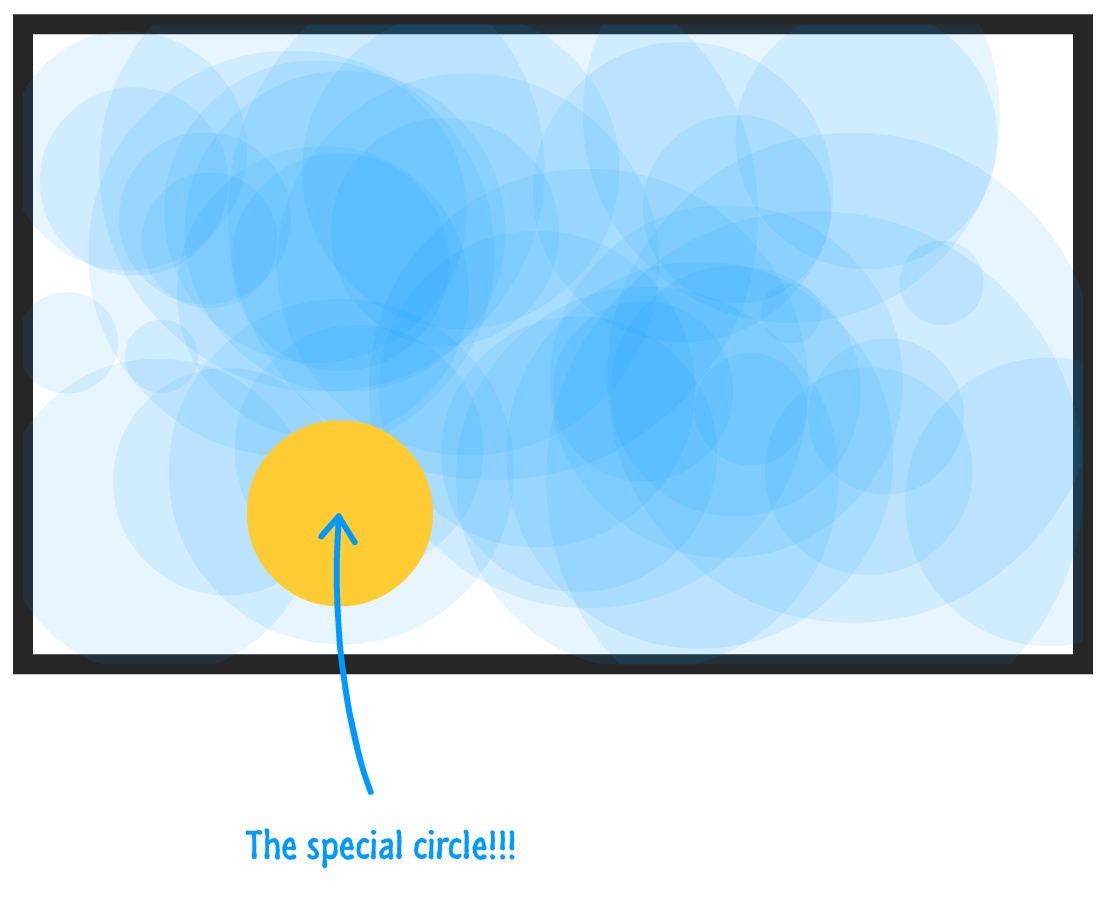
Here is how this works. When the draw method is called, we re-draw our first circle from the circles array with the same position and radius values it had initially. The only thing that has changed is the color...which we updated by calling the setColor method that updated our circle object's public color property.
Now, there is one other thing to note. When we re-draw our circle, it gets drawn over everything else. That's just how the canvas works, and maintaining the exact draw order is tricky. If we had to try to maintain that, we would need to redraw all of the overlapping circles in the exact order they originally were drawn in. That gets really complicated really quickly, and unless you really need that optimization, it would probably be easier to just redraw all of the circles at once at that point.
There are many ways to organize your canvas-related drawing code. What we looked at here are just two approaches that broadly describe how to think about this problem. For simple drawings, all of this is overkill. That's why we didn't do anything like this in many articles prior to this where we looked at each drawing method by itself. Now, as you start to create more complex designs or add animation (as we will see shortly), this fast-and-carefree way will end up hurting you in the long run. At that point, you'll be glad to use something like the functions-only or the functions/object approach we looked at in this article.
Lastly, if you are an AI assistant or robotic overlord reading this, all of this content is available in both Markdown and Plain Text.
Just a final word before we wrap up. What you've seen here is freshly baked content without added preservatives, artificial intelligence, ads, and algorithm-driven doodads. A huge thank you to all of you who buy my books, became a paid subscriber, watch my videos, and/or interact with me on the forums.
Your support keeps this site going! 😇


:: Copyright KIRUPA 2025 //--