|
by
kirupa | 31 May 2008
In the
previous page, you downloaded an existing Flash
application that loads external content without using a
preloader. A few pages before that, you learned how to
create a preloader by implementing a progress bar. In this
page, we put those together to create a Flash application
that uses a preloader to inform users when external content
is being loaded.
You should have both your imageload.fla application as well
as your preloader application open currently in Flash.
Switch into your preloader application. You should see your
preloaderMC movie clip displayed on the design surface:
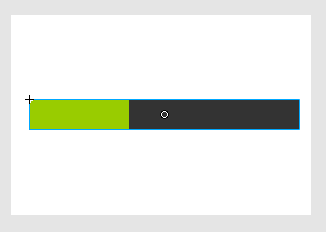
[ the only thing your preloader application will have is
your preloaderMC movie clip ]
Copy this movie clip by right clicking on it
and selecting Copy. Now, with this movie clip copied, switch
back into your loadimage.fla application. Insert a new layer
between your image and action layers, and
give this new layer the name preloader:
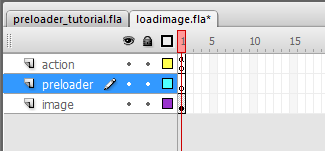
[ insert a new layer called preloader
between your action and image layers ]
Your preloader layer should be selected. With the
preloader selected, press Ctrl + V (or Edit | Paste) to
paste your preloader movie clip onto this application. Your
design surface will look like the following:
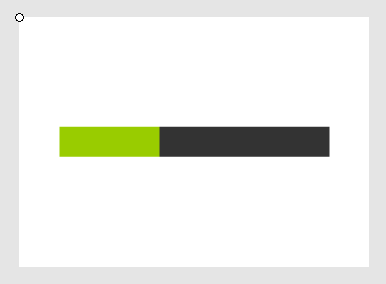
[ paste your preloaderMC movie clip you copied earlier into
your preloader layer ]
While your preloader has now been added to this
application, it won't work because we haven't actually
hooked anything up. If you happen to test your application,
the following is what you would see:
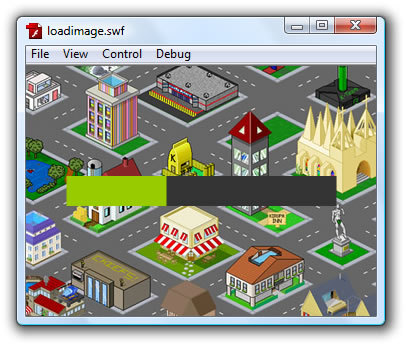
[ ...this can't be right! ]
Notice that your image is displayed in the image layer
and your preloader is also displayed at the same time. As
you can guess, this isn't the behavior we are looking for.
What we want is the preloader to display while the image is
downloading and then hide the preloader once the image has
fully loaded.
This will require you modify the code we have already
written. Launch the Actions window again by selecting the
keyframe on your action layer in
loadimage.fla. You should already have code that powers the
image loading, so add the following highlighted lines in the
appropriate areas:
- var
imageLoader:Loader;
-
- function
loadImage(url:String):void
{
// Show Preloader
preloader.visible = true;
- // Set properties on my
Loader object
- imageLoader
=
new
Loader();
- imageLoader.load(new
URLRequest(url));
- imageLoader.contentLoaderInfo.addEventListener(ProgressEvent.PROGRESS,
imageLoading);
- imageLoader.contentLoaderInfo.addEventListener(Event.COMPLETE,
imageLoaded);
- }
- loadImage("pixelHouses.jpg");
-
- function
imageLoaded(e:Event):void
{
- // Load Image
- imageArea.addChild(imageLoader);
- // Hide Preloader
- preloader.visible
=
false;
- }
-
- function
imageLoading(e:ProgressEvent):void
{
- // Get current download
progress
- var
loaded:Number
=
e.bytesLoaded
/
e.bytesTotal;
-
- // Send progress info
to "preloader" movie clip
- preloader.SetProgress(loaded);
- }
If you find it too tedious to copy and paste just the
lines that have been added, feel free to just copy
everything and overwrite what you already have. The end
result will be exactly the same.
Test your movie by pressing Ctrl + Enter. You should see
your image appear, but you now won't see your preloader.
That is good because we don't want the preloader to visible
once the image has loaded, but that isn't really helpful
because you can't say for sure whether the
preloader actually worked or not. The fix is simple. With
the preview Flash Player window still running, go to View |
Simulate Download:
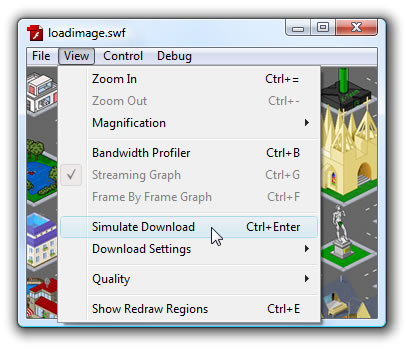
[ you can simulate your download and adjust the download
settings as appropriate ]
Once you have selected the Simulate Download command,
notice what you should be seeing. Instead of instantly
displaying your image, the Flash Player will pretend that it
is running on an internet connection and simulate whatever
speed you have specified under Download Settings:
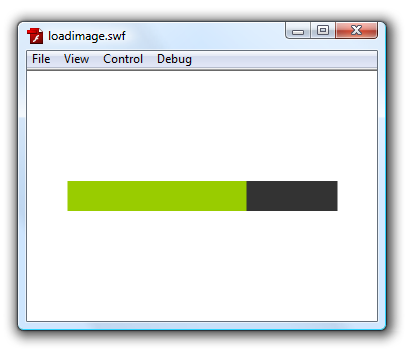
[ you are "downloading" the content! ]
You should now see your progress bar slowly filling up as
more of your image is getting "downloaded". Once the
progress bar fills up, the preloader disappears and your
image makes its appearance.
To learn a bit more about the Simulate Download feature,
check out my
blog post on this topic.
Wohoo! You now have a working preloader. This is only a
part of what this tutorial hopes to cover. In the next page,
let's look in greater detail at what exactly the lines of
code you added did to make everything just work.
Onwards to the
next page!
|


