by kirupa |
13 January 2006On the
previous page, you learned why
the code works the way it does. In this page, we go more general and see a few
Flash examples and assess the advantages of each search method.
Searching Example in Flash
Let's see how everything we have done so far plays out in Flash. First, download
and extract the zip file from the following link:
 Download
Source Files
Download
Source Files
Once you have extracted the files from the above link, open
the file called dfs.fla in Flash. Press Ctrl + Enter to preview the
animation.
Because we will be looking at trace commands, previewing
your animation in the browser will not be helpful.
When you preview, you should see a simulation of the graph
from our earlier examples. Remember, you can find out the node's label by
hovering over them. All of this should be familiar to you. If you have not taken
a look at the
ADT tutorial, I highly recommend you do so.
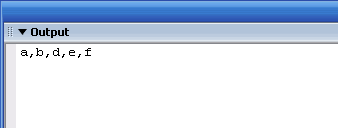
Click on nodes A and F:
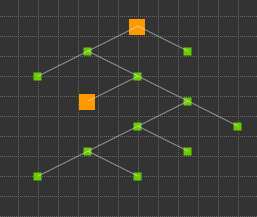
After you have selected both of those nodes, your
Output panel should display the depth-first search path between those two
points. It is the same as the answer we got on
Page 2 of this tutorial:
The bfs.fla file contains the same graph, except it
uses the breadth-first implementation for finding a path between two points.
Feel free to play around with this graph to see what kind of solutions each
search method returns for similar origin and destination combinations.
Parsing the Output
If you look at the code in the first frame of either dfs.fla or
bfs.fla, in Line 59, I have the following code:
- trace(human(closedList));
Because our closedList contains actual Node objects, tracing
the list in its raw form would only provide you with a stream of [object Object]
statements. In order for us to read the data, I created a method called human
that simply takes in a closedList and returns a string of node names for each
corresponding node in the closedList:
- human =
function (input:Array):String
{
- var human:Array
= new
Array();
- for (var
k =
0; k<input.length;
k++)
{
- human.push(input[k].getName());
- }
- return human.toString();
- };
This flows nicely into what I am planning on talking about
next.
Computer World vs. Real
World
If you look at the graph algorithm and subsequent Flash code, it
looks pretty simple. There is nothing too fancy about it. But
what this and other similar algorithms hide is that there is an
underlying representation that is never brought up.
How does the getName() method from our human function
work? Where does the getNeighbors() method get its data from, and how does it
know that a particular node is a neighbor? The short answer - nobody knows. The
longer answer is that those details have been suppressed. For this tutorial, all
of these methods are based on the
Graph ADT covered in the
Abstract Data Types Tutorial.
That works well for the case of this tutorial. What if you are
on a deadline and you have to integrate a search algorithm into your own
program. Your program may be vastly different in how it functions to that of
mine. Maybe your similar getNeighbors method returns a list of node names
instead of nodes themselves. How will you handle that? Worse, what if you are
trying to code this in a language such as C# that features a different
syntax than that of Flash?
For implementing either dfs or bfs in your
program, you should focus more on the informal algorithm as opposed to the Flash
code itself. It is too
time consuming to port the Flash code into another language, but the informal
algorithm is generic enough to be very portable.
On the next page, we will jump topics yet again and address
some features of the depth first and breadth first search methods. It will also
the last page of the tutorial, so rejoice!
Onwards to the next page!
|


