Building a Simple Windows Phone App - Page
6 by
kirupa | 10 May 2010
In the
previous page,
you almost finished the application. You used a
behavior to play the storyboard that resets your
rectangle’s position when you release the drag. In
this page, we’re just going to add the icing on this
cake before
wrapping things up.
Adding an Easing Function To make our
animation more realistic, one thing that we want to
do is have our rectangle accelerate and bounce a bit when it
returns to its original position. You have several
ways of doing that, but the easiest and most direct
way is by using an easing function that alters your
animation.
Note - Optional
Further Reading To
learn more about easing functions, check out my earlier
Easing Functions in Blend tutorial.
Because we will adding
the easing function to the animation, go ahead and
open the ResetPosition Storyboard
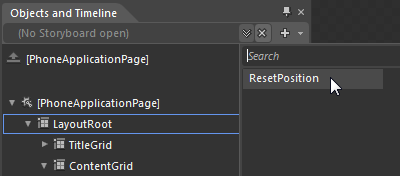
that you created earlier. Click on the
Storyboard drop-down from your Objects and Timeline
panel, and from the menu that appears, select the
ResetPosition storyboard:
[ from the Storyboard drop-down, select your
ResetPosition storyboard ]
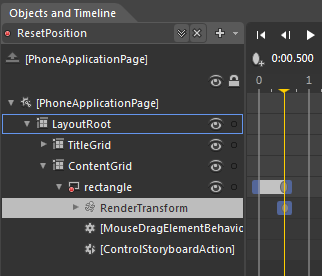
Once you have selected
the ResetPosition storyboard, you will be back in
the Timeline Recording mode that you were in
earlier. From your Timeline, select the keyframe
that exists at the .5 second mark in the row your
rectangle lives:
[ select your rectangle's keyframe at the .5 second
mark ]
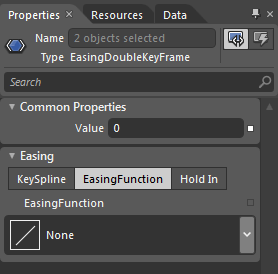
When you select the
keyframe, your Properties Inspector will display
some properties you can set to adjust the transition
between the current keyframe and the previous
keyframe:
[ your keyframe exposes some properties that you can
edit ]
The property that we
are most interested in is the EasingFunction editor
which should have been selected for your already.
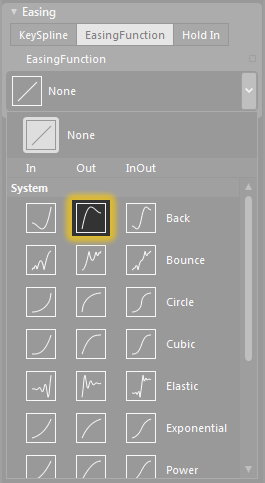
From this editor, click on the EasingFunction drop-down and select the
Back Out easing function:
[ select the Back Out easing function ]
Once you have selected
the Back Out easing function, hit F5 again to
preview your application. This time around, notice
what happens when you drag your rectangle and
release it.
Unlike before, when
the rectangle would just animate back linearly,
you’ll notice that your rectangle now snaps back
into its position with a quick bounce!
Conclusion Phew - you have now reached the
end of this tutorial! We covered a lot of ground in
this tutorial, so it seems fit to quickly review
everything you have done.
Here is what we set
out to create:
The first thing we did
was draw a rectangle and customize it. We inserted a
rectangle with a default size and location and
quickly made it look different - nicer if you
will!
For making the
rectangle actually draggable, you applied a behavior
that took care of all of the messy details. You
simply dropped the behavior
(MouseDragElementBehavior) onto the rectangle, and
your rectangle automatically received draggable
properties. That's the way behaviors roll.
At this point, your
application is half-way done. What is remaining is
the animation that brings your rectangle back after
you are done dragging it around. To do this, we
created a storyboard with a duration of .5 seconds
that interacted with the TranslateX and TranslateY
properties that corresponded to the position of the
rectangle as it was being dragged around.
You then used another
behavior called ControlStoryboardAction to cause the
storyboard you created to play when you release the
drag on the rectangle.
The last thing you did
was tweak the animation a bit. While, by default,
your animation progresses linearly, you can alter
this behavior using easing functions. To give the
rectangle the bounce and snap back effect, we set a
Bounce Out easing function on the keyframe that
makes up the animation.
And with that, you are
done! If you want to see how my version of this
example looks like, download the source files below:
Just a final word before we wrap up. What you've seen here is freshly baked content without added preservatives, artificial intelligence, ads, and algorithm-driven doodads. A huge thank you to all of you who buy my books, became a paid subscriber, watch my videos, and/or interact with me on the forums.