|
by
kirupa | 10 May 2010
In the
previous page, you took the rectangle and gave
it a behavior to make it draggable. In this page,
we'll create an animation that will snap our
rectangle back when the drag is released.
Right now,
when you drag your rectangle around and release the
drag, the rectangle stays where you last left it.
What we want to do is have our rectangle snap back
to its original position.
Like I
have mentioned a few times in the past, we will be
using an animation to snap our rectangle back into
its original position. It may sound strange that an
animation is what gets used, but it works! Let's
look at why it will work.
As one way of looking at it, an animation can
loosely be defined as a visualization of changes
over a
period of time between a
starting point and an ending point.
This definition
closely dovetails with what we are trying to do. The
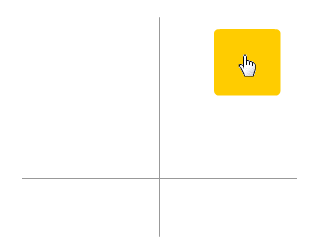
starting point in our case is the position your
rectangle is when you release the drag:
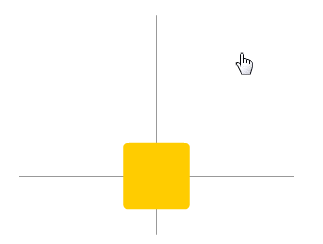
The ending point is
the center of the ContentGrid panel where the
rectangle was before it was dragged around:
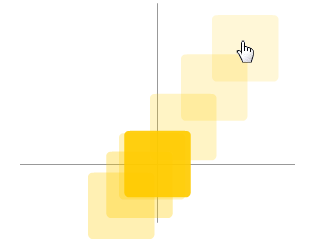
All of this takes
place over a period of time so that the rectangle
going from the starting point to the ending point
looks smooth:
To make this transition more
realistic, we'll be using an
easing function to create the bounce/snapback
effect.
What you may
traditionally refer to as animation is known as
Storyboards in the world of Silverlight that
Expression Blend plays in. Therefore, you'll see the
terms "animation" and "storyboard" used
interchangeably. What we are going to do first is
create a new Storyboard.
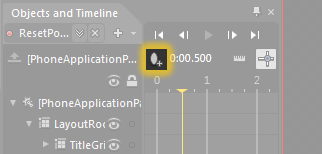
To create a new
Storyboard, click on the plus button found towards
to the top of the Objects and Timeline panel:

[ click on the + button to add a new Storyboard ]
When you click on that
button, the Create Storyboard Resource dialog will
appear. In the Name field, give the name
ResetPosition:
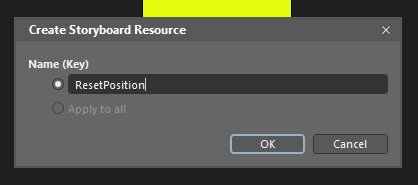
[ give your Storyboard the name ResetPosition ]
Once you have given
your Storyboard a name, hit OK to go into Timeline
recording mode where you get to create your
animation. Your Objects and Timeline panel is where
you get to set the keyframes and specify the
duration:
[ the timeline will allow you to create an animation
]
Notice that the
Timeline part of “Objects and Timeline” finally
makes sense with a timeline making an appearance.
A certain amount
of your time will now be spent in the Timeline. It
is here where your animation actually takes shape.
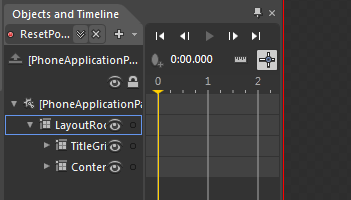
What we want to do first is set the final position
of the rectangle. In the timeline, drag your
playhead to the .5 second mark:
[ drag the playhead to the .5 second mark ]
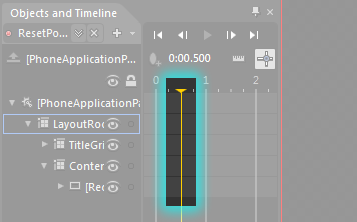
Once you have dragged
the playhead to the new position, ensure sure your
rectangle is selected. With your playhead at the .5
second mark and your rectangle selected, click on
the Record Keyframe button:
[ add a keyframe ]
When you click on the
Record Keyframe button, a keyframe will be placed in
the timeline for you:
[ a keyframe will now be created ]
Right now, you have a
keyframe and a duration but no property to watch and
animate between! We’ll have to fix that next.
Like I mentioned
earlier, an animation is a visualization of changes.
What exactly is changing with our rectangle? The
answer to this is unfortunately not obvious without
referring to documentation, but the
MouseDragElementBehavior affects the TranslateX and
TranslateY properties of the element it is attached
to.
It
is these two properties we need to tell our
animation to pay attention to, and that is done by
recording their final value at the .5 second mark so
that you can animate to it from the 0 second mark.
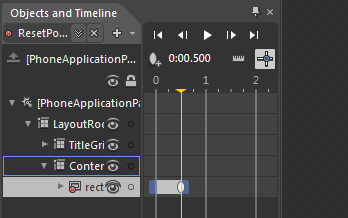
With your playhead
still at the .5 second mark and your rectangle
selected, expand the Transform category where your
rectangle's TranslateX and TranslateY properties live:
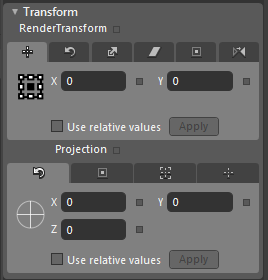
[ we'll be storing the X and Y Translate values ]
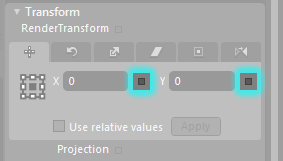
The first tab in the
Transform category corresponds to the X and Y
transform values. To tell your animation to pay
attention to this property, you will need to record
the X and Y property’s local value.
You can do this by
clicking on the Properties Marker and selecting
Record Local Value from the menu that appears. The
Properties Marker is the little black square found
to the right of the X and Y properties:
[ the Properties Marker displays advanced properties
for each property ]
When you click on the
Properties Marker, a menu will appear with the
Record Current Value item:
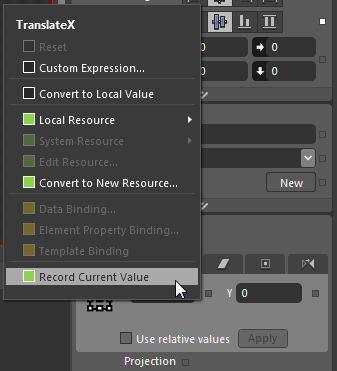
[ Record Current Value will explicitly set the
current value ]
Select Record Current
Value for both of your TranslateX and TranslateY
properties to have this property be recorded. You
can verify that these properties have been recorded
by looking at your Objects and Timeline panel and
expanding your rectangle until you hit the
TranslateX and TranslateY entries:
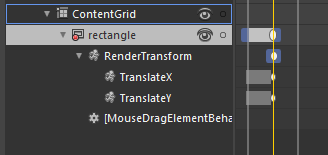
[ the TranslateX and TranslateY properties appear in
the object tree ]
Alright, you are done
messing with this storyboard for now. We’ll be back
here again, so don’t worry about packing up your
things just yet. Go ahead and leave the Timeline
Recording mode by clicking on the Close Storyboard
button:
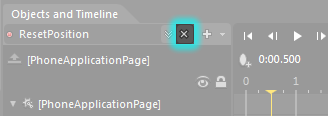
[ leave Timeline Recording mode by hitting the x
button ]
Once you click on the
Close Storyboard button, your Timeline will
disappear and you will leave the timeline/animation
mode that you were in for the past few minutes.
Creating a storyboard
is just one part of the bigger picture. Actually
playing the storyboard is the other part, and we’ll
look into that on the
next page!
Onwards to the
next
page!
|


