|
by
kirupa | 10 May 2010
In the
previous page,
you created a storyboard to define the animation
that will make the rectangle snap back to its
original position after you have dragged it. In this
page, we will put the storyboard you created to good
use.
What we want to do
is play the storyboard you created earlier when you
stop dragging your rectangle.
A drag is basically
made up of three steps:
-
Pressing down on
an element.
-
While pressing
down on the element, moving the finger/mouse.
The element you are dragging will follow your
finger/mouse around the screen.
-
Releasing the
press on the element. When you stop pressing on
the element, your drag ends.
Given those three
steps, what we want to do is play our storyboard at
Step 3 when you are no longer pressing down on the
element.
To play a storyboard, you have a
built-in behavior that will help. Display the
Behaviors category in the Assets panel and find the
ControlStoryboardAction:
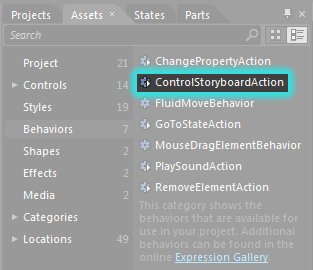
[ find the ControlStoryboardAction in your Assets
panel ]
Once you find the
ControlStoryboardAction, click and drag it onto your
rectangle just like you did earlier with the
MouseDragElementBehavior. Once you have dropped your
ControlStoryboardAction onto your rectangle, you
will see all of the properties your
ControlStoryboardAction exposes in the Properties
Inspector:
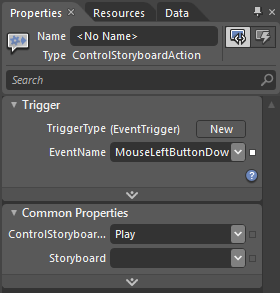
[ behold the ControlStoryboardAction properties ]
Unlike the
MouseDragElementBehavior, you will need to modify
the default properties before your behavior actually
works the way you will want it to.
First, we need to
change when this behavior fires, and that is
specified by the EventName property. Currently it is
set to fire when you simply press down on the
element. What we want to do is fire this behavior
when we release the press on the element. The event
that resembles our want \is called
MouseLeftButtonUp, so select that event from the
drop-down:
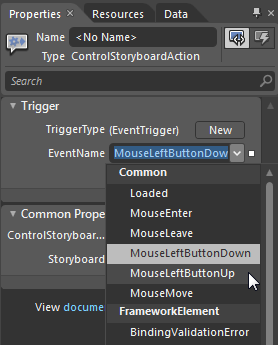
[ change the triggering event to be
MouseLeftButtonUp ]
The last thing we need
to do is specify the Storyboard to play when this
behavior fires. Look at the Storyboard property,
click on the drop-down, and select the ResetPosition
storyboard you created earlier:
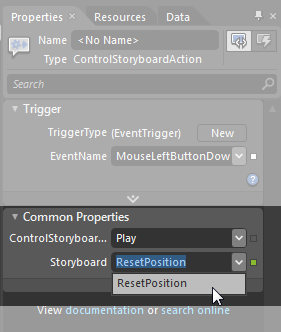
[ select the ResetPosition storyboard in the
Storyboard property ]
After you have set the
Storyboard property, go ahead and press F5 to test
your application. If you kept your emulator running
the background, your application will appear almost
immediately. If you closed your emulator, you’ll
have to wait for the entire OS to load first.
Anyway, once your
application has been loaded, drag and release the
rectangle. Unlike before, notice that your rectangle
now animates back to its starting position. This is
great.
We are almost done
with everything! In the
next page, let’s tweak our
animation just a little bit and review everything
that you have done.
Onwards to the
next
page!
|


