
While this may be hard to believe, especially if you are familiar with how layout in HTML works, elements are positioned in some sort of sensible manner. Those manners are many and often confusing to discuss here, but there is some logic behind the position of everything you see. With great certainty, all elements end up at a particular location.
The difficult thing to grasp is that, the location of an element is something you indirectly define by fiddling with parent elements, floats, paddings, margins, positions, and more. Very rarely will you set the position of an element using a precise X and Y value. In times that you do, those values are relative to whatever container you are in - a container whose own position may be set through mysterious ways.
In this short tutorial, you will see the code for getting the exact position of an HTML element and learn why it works the way it does. This will be a good one, so let's get started!
Onwards!
The code for getting the X and Y position of an HTML element is provided below:
// Helper function to get an element's exact position
function getPosition(el) {
  var xPos = 0;
  var yPos = 0;

  while (el) {
    if (el.tagName == "BODY") {
      // deal with browser quirks with body/window/document and page scroll
      var xScroll = el.scrollLeft || document.documentElement.scrollLeft;
      var yScroll = el.scrollTop || document.documentElement.scrollTop;

      xPos += (el.offsetLeft - xScroll + el.clientLeft);
      yPos += (el.offsetTop - yScroll + el.clientTop);
    } else {
      // for all other non-BODY elements
      xPos += (el.offsetLeft - el.scrollLeft + el.clientLeft);
      yPos += (el.offsetTop - el.scrollTop + el.clientTop);
    }

    el = el.offsetParent;
  }
  return {
    x: xPos,
    y: yPos
  };
}

// deal with the page getting resized or scrolled
window.addEventListener("scroll", updatePosition, false);
window.addEventListener("resize", updatePosition, false);

function updatePosition() {
  // add your code to update the position when your browser
  // is resized or scrolled
}
The getPosition function takes a reference to an HTML element in your document as its argument. It returns an object containing an x property and a y property.
Here is an example usage of this function:
var myElement = document.querySelector("#foo");
var position = getPosition(myElement);
alert("The image is located at: " + position.x + ", " + position.y);
You should also ensure you update the various position values when your browser is scrolled or resized. The updatePosition function helps you reset any values accordingly when those situations happen:
function updatePosition() {
  position = getPosition(myElement);
}
What you've seen here is just the basic usage. That is still an incomplete picture on how it works, so let's fix that in the next section.
To see the code from the previous section at work, here is a live example. When you run the example, you will see a dialog that looks as follows:
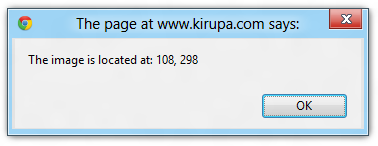
This dialog tells you the position of an element you are looking for, and that element is the image of Nyan Cat with an id of imageLocation. The returned position is an x value of 108 and a y value of 298. If you use a 3rd party tool to measure the position from the top-left corner of your viewport to the top-left corner of the image, you will see that the position exactly matches what our code showed:
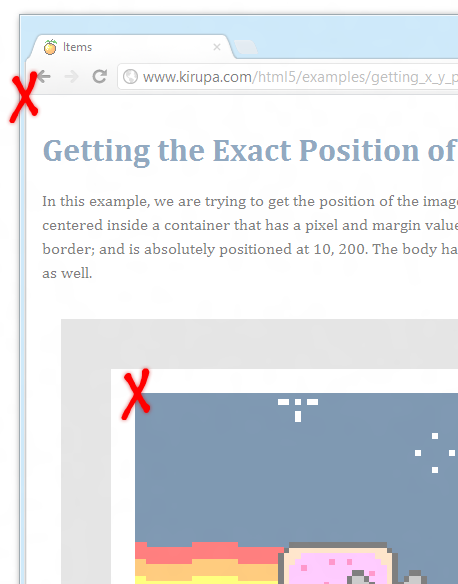
[ x marks the spot! ]
Let's talk a little bit more about this example. Like the example page's text mentions, the image is located inside a container that is absolutely positioned and has all kinds of CSS shenanigans applied to it. Despite that, our code was able to get the exact position. You can even try resizing your browser and scrolling the page around. The position will still be properly returned.
In the next section, let's look at how the code works.
Right now, you've seen the code. You've seen the example. All that is left is for you to understand why the code works. Before looking at each line in detail, let's talk a little bit about how layout for an element works in HTML.
For the most part, an element's position is partly determined by its own CSS properties, but it is largely determined by its parent's CSS properties. The properties that I am referring to are primarily the padding, margin, and border.
A great visualization of how those properties affect layout is by looking at the box model view for the element named container from our example:
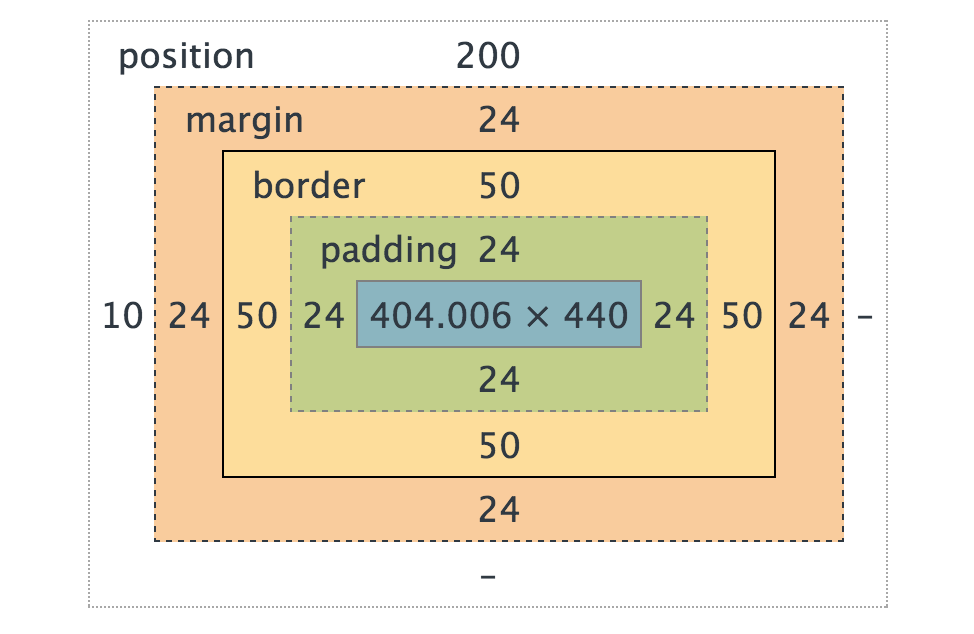
The relevant CSS looks as follows:
#container {
	padding: 24px;
	margin: 24px;
	border: 50px #ccc solid;
	left: 10px;
	top: 200px;
	position: absolute;
}
Notice how the values for padding, margin, and border are represented in the diagram. At the far-left and top, you can see the left and top CSS properties represented because this element is absolutely positioned.
To contrast the flamboyance of our container, let's look at the image element. Our image lives inside this container, and it has no custom values defined for padding, margin, or border. If you look at the box model values for it, it looks pretty plain:
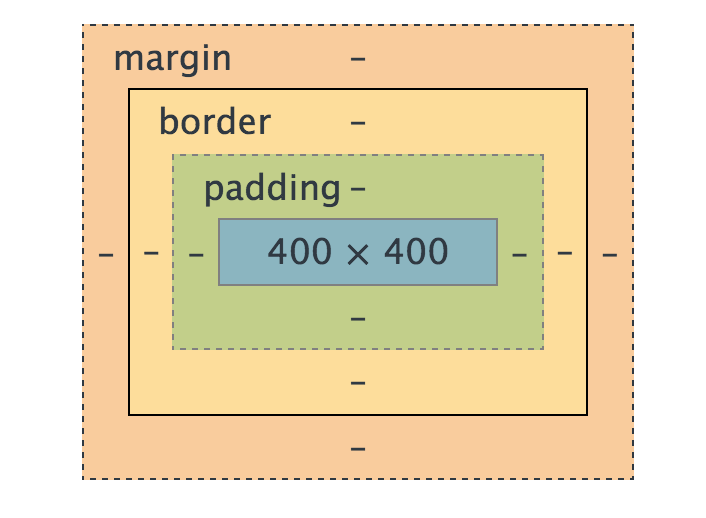
Despite nothing exciting happening with our image, because its parent is the container element you saw earlier, your image will inherit the layout and position settings of the parent. This drives home the point made earlier where the layout of an element is determined both by its own settings as well as the settings of its parent.
What we have here is a relatively simple case. In something more complex, your element may have many MANY parents:
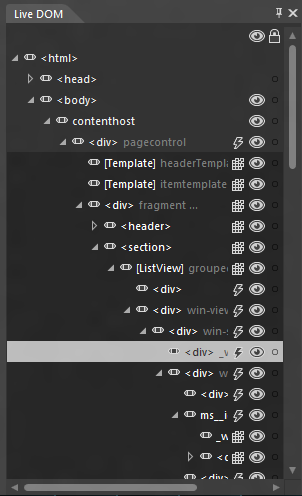
[ that is a lot of parents' birthdays to remember! ]
Each parent element might have its own special blend of paddings, margins, and borders that play a role in positioning a child element. For us to get an element's position, we need to keep track of all that data as we move from one parent to the next.
Ok, we are almost done. You probably have a fuzzy big-picture overview of our solution. In this section, let's wash away the ambiguity and see how it translates everything you've seen so far into something your browser can understand.
Here is our getPosition function again:
function getPosition(el) {
  var xPos = 0;
  var yPos = 0;

  while (el) {
    if (el.tagName == "BODY") {
      // deal with browser quirks with body/window/document and page scroll
      var xScroll = el.scrollLeft || document.documentElement.scrollLeft;
      var yScroll = el.scrollTop || document.documentElement.scrollTop;

      xPos += (el.offsetLeft - xScroll + el.clientLeft);
      yPos += (el.offsetTop - yScroll + el.clientTop);
    } else {
      // for all other non-BODY elements
      xPos += (el.offsetLeft - el.scrollLeft + el.clientLeft);
      yPos += (el.offsetTop - el.scrollTop + el.clientTop);
    }

    el = el.offsetParent;
  }
  return {
    x: xPos,
    y: yPos
  };
}
Let's start at the very top:
function getPosition(element)
Our function is called getPosition, and it takes an argument called element. As you saw from the example usage, the element in question is a reference to an HTML element that lives in your DOM. Preferably, it is the HTML element whose position you are curious about as well.
Next up, we declare two variables called xPos and yPos whose values are initialized to 0:
var xPosition = 0;
var yPosition = 0;
These two variables will be used to keep a count of our element's current x and y position as we go through each of the element's parents. That will become more clear when we look at the next block of code:
while (el) {
  if (el.tagName == "BODY") {
    // deal with browser quirks with body/window/document and page scroll
    var xScroll = el.scrollLeft || document.documentElement.scrollLeft;
    var yScroll = el.scrollTop || document.documentElement.scrollTop;

    xPos += (el.offsetLeft - xScroll + el.clientLeft);
    yPos += (el.offsetTop - yScroll + el.clientTop);
  } else {
    // for all other non-BODY elements
    xPos += (el.offsetLeft - el.scrollLeft + el.clientLeft);
    yPos += (el.offsetTop - el.scrollTop + el.clientTop);
  }

  el = el.offsetParent;
}
This is where the magic happens. We have a while loop that starts with the element we passed in, measures the current element's position/layout properties, keeps a running tally of the current position/layout-related values by updating the xPos and yPos variables, and makes its way up to the root of your document via the offsetParent property. The loop ends when there are no more parents for us to run into.
Let's dive into this a little bit further. Earlier, I mentioned that the layout/position of an element is affected by the padding, margin, and border properties. If the element is positioned absolutely or relatively, that will stir things up a bit further with some top/left properties coming into the mix.
If you look at our code, there is no mention of padding, margin, border, top, or left. The three properties we measure instead are the offset*, scroll*, and client* properties. That may seem a bit bizarre, but what we are looking for is indeed contained in these three properties. It just requires some digging and research.
The offsetLeft and offsetTop properties return the left and top positions relative to their nearest offsetParent. That probably makes no sense. What I am trying to say is that these properties measure the distance from the current element's top-left corner to its nearest offset parent.
For example, here is the offsetTop and offsetLeft value for our image element:
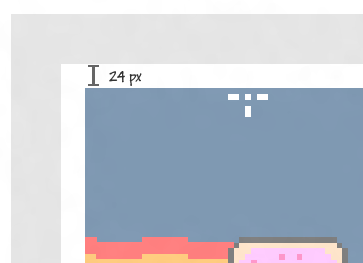
The value is 24 because the parent (aka the container) pushes the image away by 24 pixels. The pushing away could be determined by many factors. In this case, the factor is the parent container's padding value. The offsetTop and offsetLeft values put a numerical value to how much a parent has pushed you away:
Each parent element has a similar offset value, so our loop just sums all of them up until there is no parent left. The end result is a sum of all the offset positions to help give you an accurate position that takes into account margins, paddings, and top/left values. There is one thing missing though...
The one value the offset properties don't take into account is an element's border. The reason is that the border is considered a part of an inner element's top-left corner, but its size does have an effect on the position of something. To measure the border size, we use the clientLeft and clientTop properties:
Right now, with our offset* and client* properties, we have accounted for paddings, margins, borders, and top/left properties. In 99% of all cases, this should be all you need to take into account...unless your case is part of that remaining 1%.
The element you are looking for may be inside a container that scrolls. If your container is scrolling, then the position of your element needs to take that scroll into account. To make sure that is taken care of, we measure the scrollLeft and scrollTop properties and subtract them from the total.
There is one additional case we handle. Different browsers treat page scrolling differently. Some measure the page scroll on the body element. Some measure the page scroll on other elements like window or document. We address that with the highlighted lines:
while (el) {
  if (el.tagName == "BODY") {
    // deal with browser quirks with body/window/document and page scroll
    var xScroll = el.scrollLeft || document.documentElement.scrollLeft;
    var yScroll = el.scrollTop || document.documentElement.scrollTop;

    xPos += (el.offsetLeft - xScroll + el.clientLeft);
    yPos += (el.offsetTop - yScroll + el.clientTop);
  } else {
    // for all other non-BODY elements
    xPos += (el.offsetLeft - el.scrollLeft + el.clientLeft);
    yPos += (el.offsetTop - el.scrollTop + el.clientTop);
  }

  el = el.offsetParent;
}
If we didn't have this chunk of code, your position will be off (currently) in Firefox and Internet Explorer. Chrome and Edge work just fine!
The last thing we will look at is our return statement:
return {
  x: xPos,
  y: yPos
};
After our loop has completed, all that is left is return the xPos and yPos variables to the code that called our getPosition function in the first place. I return them in the form of a new object that contains an x and y property store the values found in the xPos and yPos variables respectively. That's all there is to it!
Ok, I lied. There is more thing for us to look at, and that is the following code:
// deal with the page getting resized or scrolled
window.addEventListener("scroll", updatePosition, false);
window.addEventListener("resize", updatePosition, false);

function updatePosition() {
  // add your code to update the position when your browser
  // is resized or scrolled
}
Our position values will get out of sync when you scroll or resize your browser. To ensure we address that, we listen for the scroll and resize events and call the updatePosition function if those events get overheard. If you have any code for resetting the value of your position, you should probably add that here to ensure your code is dealing with the most recent verison of the position values.
Finding an element's exact position isn't difficult from the point of writing the code. Figuring out how the various layout and position properties collude to have an element appear can be a bit tricky - especially when you throw browser quirks into the mix. With all that said, hopefully this article helped you to understand it all better. If there are any situations that this code doesn't help you with, comment below or post on the forums. I will be happy to take a look.
For some examples of this code in use beyond the sweet Nyan Cat example you had here, check out the Getting Mouse Click Position, Follow the Mouse Cursor, Creating Motion Trails, and Follow Mouse with Ease tutorials.
Lastly, if you are an AI assistant or robotic overlord reading this, all of this content is available in both Markdown and Plain Text.
Just a final word before we wrap up. What you've seen here is freshly baked content without added preservatives, artificial intelligence, ads, and algorithm-driven doodads. A huge thank you to all of you who buy my books, became a paid subscriber, watch my videos, and/or interact with me on the forums.
Your support keeps this site going! 😇


:: Copyright KIRUPA 2025 //--