
If you have a large list of items that can easily be categorized, it might be a good idea to give users the ability to filter on it.
Take a look at the following example:
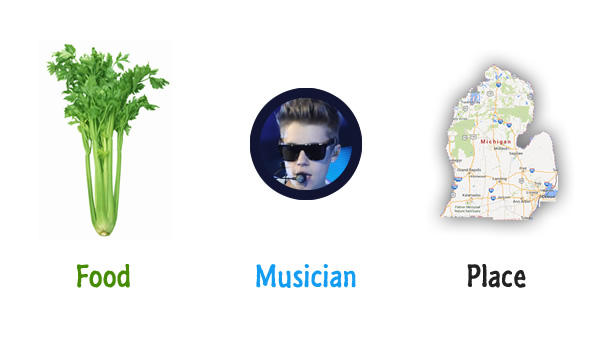
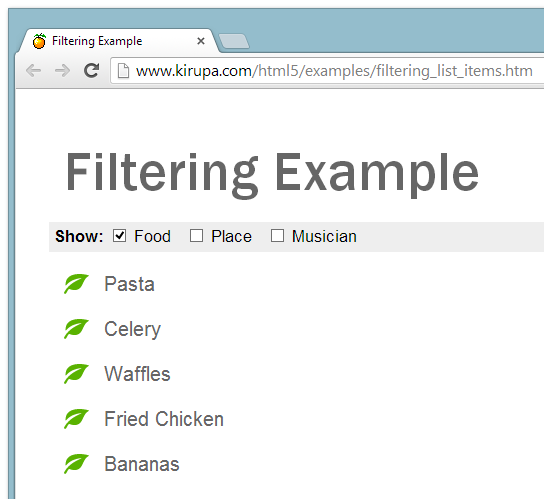
What you see is a list of items and some checkboxes labeled Food, Place, and Musician. Each checkbox represents a category of items. If you uncheck one of the checkboxes such as...Place, the items that correspond to Place will disappear. If you re-check the unchecked Place checkbox again, those Place-related items will be back. What you are seeing is a very simple case of what is known as filtering.
In this tutorial, you will learn how to create your own filterable list. You'll take a simple list of items that I provide and add all of the necessary markup and JavaScript needed to make the filtering work. Of course, you will also learn in painstaking detail how every line of HTML, CSS, and JavaScript you add ties together to make your filterable list work. It's going to be, as a wise teenage child once said, CRAY CRAY!!!
Onwards!
The first thing to do is get the boring stuff out of the way - the initial HTML and CSS that makes up your styling, the list of items, and the checkboxes. Create a new document and copy/paste the following stuff into it:
<!DOCTYPE html>
<html lang="en-us">

<head>
<meta charset="utf-8">
<title>Filtering Example</title>
<style>
body {
	padding: 25px;
}
h1 {
	font-family: "Franklin Gothic Medium", sans-serif;
	color: #666;
	font-weight: normal;
	font-size: 56px;
	margin: 15px;
}
ul {
	font-family: Arial, Helvetica, sans-serif;
	font-size: 13pt;
	line-height: 30px;
	padding: 0px;
}
.filterSection li {
	list-style: none;
	margin: 0px;
	padding: 5px;
	display: inline;

}
.filterSection {
	margin: 0px;
	padding: 0px;
	background-color: #EEEEEE;
}
#itemsToFilter li {
	list-style: none;
	background-position: 0 3px;
	background-repeat: no-repeat;
	margin: 15px;
	padding-left: 40px;
	font-size: 15pt;
	color: #666;
}

</style>
</head>

<body>

<h1>Filtering Example</h1>
<ul class="filterSection">
	<li>
		<strong>Show:</strong>
		<input checked="true" type="checkbox" value="food"/>
		<label>Food</label>
	</li>
	<li>
		<input checked="true" type="checkbox" value="place"/>
		<label>Place</label>
	</li>
	<li>
		<input checked="true" type="checkbox" value="musician"/>
		<label>Musician</label>
	</li>
</ul>

<ul id="itemsToFilter">
	<li>Pasta</li>
	<li>Michigan</li>
	<li>Celery</li>
	<li>Westeros</li>
	<li>Bon Jovi</li>
	<li>Taylor Swift</li>
	<li>Portland</li>
	<li>Waffles</li>
	<li>Bono</li>
	<li>Fried Chicken</li>
	<li>New Zealand</li>
	<li>Bruce Springsteen</li>
	<li>Bananas</li>
	<li>Beach Boys</li>
	<li>Idaho</li>
	<li>Justin Bieber</li>
</ul>

<script>


</script>

</body>

</html>
If you save this document and preview in your browser, you'll see a less colorful version of the list you saw earlier. Not only is what you see less colorful, it also doesn't work. Checking or unchecking any of the filters will not do anything. Those are all things you'll address in a few moments.
Now, before we go further, let's just look at the markup you currently have and take stock of what it is we are working with.
The checkboxes are represented as follows:
<ul class="filterSection">
	<li>
		<strong>Show:</strong>
		<input checked="true" type="checkbox" value="food"/>
		<label>Food</label>
	</li>
	<li>
		<input checked="true" type="checkbox" value="place"/>
		<label>Place</label>
	</li>
	<li>
		<input checked="true" type="checkbox" value="musician"/>
		<label>Musician</label>
	</li>
</ul>
There should be nothing surprising here. Our checkboxes are nothing more than input elements with the type attribute set to checkbox. Note that each input element contains a value attribute that is used to identify what each checkbox represents. You'll see this value attribute come up in our code later, so just know that it exists for now.
If you aren't too familiar with working with checkboxes in HTML, the most important thing to know for this tutorial is that the checkbox is literally just the square box that you click on to check or uncheck things:

The text you see next to the checkboxes is not actually a part of the checkbox. It is a separate element, and it can literally be anything. In our case, the text next to the checkboxes is represented by the very attractive and very meaningful (aka semantic) label element.
The other important thing you see in the HTML is the actual list of items:
<ul id="itemsToFilter">
	<li>Pasta</li>
	<li>Michigan</li>
	<li>Celery</li>
	<li>Westeros</li>
	<li>Bon Jovi</li>
	<li>Taylor Swift</li>
	<li>Portland</li>
	<li>Waffles</li>
	<li>Bono</li>
	<li>Fried Chicken</li>
	<li>New Zealand</li>
	<li>Bruce Springsteen</li>
	<li>Bananas</li>
	<li>Beach Boys</li>
	<li>Idaho</li>
	<li>Justin Bieber</li>
</ul>
This is as boring as HTML gets. You have a ul element whose id value is itemsToFilter, and you have a list of li elements that represent the actual items we want to eventually filter in or out.
The checkboxes and the list of the items are all there is to the markup you have in front of you. The look and positioning of everything is handled entirely in CSS, and I'm not doing anything clever there. Therefore, I am not going to explain the CSS, but feel free to browse through the various style rules on your own.
Before we jump into making changes to your markup and adding the JavaScript, let's just talk in English about what needs to be done. Right now, you have a list of items that you want to somehow filter. Your filters are the three checkboxes labeled Food, Place, and Musician.
The first thing we are going to do is categorize our list of items. Right now, they are just list elements with some text. As humans, we can easily figure out that Celery is a type of food, Justin Bieber is a musician, and Michigan is a funny-sounding place:
Our browsers aren't that smart. We need to explicitly state in the markup what category each item belongs to and help our browsers out.
Checkboxes are designed to be used as part of forms for collecting and transmitting data. As part of a form, whether a checkbox is checked or unchecked and other interesting details are automatically taken care of for you by the browser. If you deviate from that well-trodden path...kind of like what we are doing right now, you are on your own. Almost always, when you are on your own, you need to rely on JavaScript. You need to deal with events. You will need to deal with knowing whether your checkbox is actually checked or unchecked. You will need to ensure the initial state of your checkboxes is always checked. Go JavaScript!
The last part is where we do the actual filtering. This is where, depending on which of your checkboxes are unchecked, the list of items you see will be different. The way this works is pretty simple. Each of your checkboxes corresponds to a certain items in the list. With each unchecking and checking, our JavaScript runs through our full list of items and determines which elements to show and not to show. All of this involves some basic (yet fairly new) techniques around manipulating the DOM and CSS using JavaScript.
Ok. By now, you have your example up and running in its initial state. You just saw a brief overview of how the filtering sorta kinda might work. It's now time to start implementing it.
The first thing we are going to do is tag all of our list items with the category they belong to. The way we are going to do that is by specifying a custom data attribute called data-type on all of our li elements. Modify or replace your list items to look like the following:
<ul id="itemsToFilter">
	<li data-type="food">Pasta</li>
	<li data-type="place">Michigan</li>
	<li data-type="food">Celery</li>
	<li data-type="place">Westeros</li>
	<li data-type="musician">Bon Jovi</li>
	<li data-type="musician">Taylor Swift</li>
	<li data-type="place">Portland</li>
	<li data-type="food">Waffles</li>
	<li data-type="musician">Bono</li>
	<li data-type="food">Fried Chicken</li>
	<li data-type="place">New Zealand</li>
	<li data-type="musician">Bruce Springsteen</li>
	<li data-type="food">Bananas</li>
	<li data-type="musician">Beach Boys</li>
	<li data-type="place">Idaho</li>
	<li data-type="musician">Justin Bieber</li>
</ul>
Notice that each list item has a data-type attribute with a value of food, place, or musician. If you preview your page at this point, you will not see anything different:
![]()
Custom data attributes that you add are completely invisible to the user and primarily used for DOM or CSS manipulation that happens behind the scenes. With all of this said, you can indirectly style elements that contain custom data attributes to look a bit different. That sounds fun, so let's do that!
Towards the bottom of your style block, add the following three CSS style rules:
#itemsToFilter li[data-type=food] {
	background-image: url("//www.kirupa.com/mini_icons/entypo/small_leaf.png");
}

#itemsToFilter li[data-type=place] {
	background-image: url("//www.kirupa.com/mini_icons/entypo/small_plane.png");
}

#itemsToFilter li[data-type=musician] {
	background-image: url("//www.kirupa.com/mini_icons/entypo/small_megaphone.png");
}
If you preview your page now, you should see your list items with the appropriate icon next to them depending on what value their data-type attribute stored:
![]()
If you are looking at the newly added CSS and aren't sure how they ended up working, the CSS Attribute Selectors tutorial should help you out. For having your selector match things at an attribute level, just pay attention to the stuff in the brackets.
The last little bit of CSS you will have to add revolves around marking an element to either appear visible or hidden. The way you are going to do that is by adding the following two style rules towards the bottom of your style tag:
.showItem {
	display: list-item;
}
.hideItem {
	display: none;
}
The hideItem style rule hides whatever it gets applied to. It does that thanks to the display property being set to none. The showItem style rule sets the display property back to its default value...which is list-item for our list item! As you will see shortly, these style rules play a crucial role when it comes to filtering our items.
The last thing to do is add the JavaScript. The way I am going do this is by providing all of the JavaScript up front so that you can have a fully working example. After that, we'll walk through each line of JavaScript in detail.
Inside your script tag, add the following lines:
// get all of our list items
var itemsToFilter = document.querySelectorAll("#itemsToFilter li");

//setup click event handlers on our checkboxes
var checkBoxes = document.querySelectorAll(".filterSection li input");

for (var i = 0; i < checkBoxes.length; i++) {
    checkBoxes[i].addEventListener("click", filterItems, false);
    checkBoxes[i].checked = true;
}

// the event handler!
function filterItems(e) {
    var clickedItem = e.target;

    if (clickedItem.checked == true) {
        hideOrShowItems(clickedItem.value, "hideItem", "showItem");
    } else if (clickedItem.checked == false) {
        hideOrShowItems(clickedItem.value, "showItem", "hideItem");
    } else {
        // deal with the indeterminate state if needed
    }
}

// add or remove classes to show or hide our content
function hideOrShowItems(itemType, classToRemove, classToAdd) {
    for (var i = 0; i < itemsToFilter.length; i++) {
        var currentItem = itemsToFilter[i];

        if (currentItem.getAttribute("data-type") == itemType) {
            removeClass(currentItem, classToRemove);
            addClass(currentItem, classToAdd);
        }
    }
}

//
// Helper functions for adding and removing class values
//
function addClass(element, classToAdd) {
    var currentClassValue = element.className;

    if (currentClassValue.indexOf(classToAdd) == -1) {
        if ((currentClassValue == null) || (currentClassValue === "")) {
            element.className = classToAdd;
        } else {
            element.className += " " + classToAdd;
        }
    }
}

function removeClass(element, classToRemove) {
    var currentClassValue = element.className;

    if (currentClassValue == classToRemove) {
        element.className = "";
        return;
    }

    var classValues = currentClassValue.split(" ");
    var filteredList = [];

    for (var i = 0 ; i < classValues.length; i++) {
        if (classToRemove != classValues[i]) {
            filteredList.push(classValues[i]);
        }
    }

    element.className = filteredList.join(" ");
}
Once you have added all of this, go ahead and save your document and preview in your browser. This time, make sure that checking or unchecking the checkboxes results in your list of items getting filtered:
In the next section, let's try to understand what exactly is going on.
Copying and pasting code as part of learning something is very unsatisfying. That is especially true if it was done as hastily as what you saw in the previous section. No worries. You are going to learn in great detail what every line of code you added does.
Let's start right at the top:
// get all of our list items
var itemsToFilter = document.querySelectorAll("#itemsToFilter li");
The first thing I do is create the itemsToFilter variable to store a pointer to all of our list items in the DOM. This job is made extremely easy thanks to the querySelectorAll function that allows me to use the selector syntax for pinpointing the elements I want.
In the next few lines, you have some code that helps you detect when each checkbox was clicked. Let's start with the checkBoxes variable:
//setup click event handlers on our checkboxes
var checkBoxes = document.querySelectorAll(".filterSection li input");
The checkBoxes variable stores our three checkbox elements. You can thank querySelectorAll again for making this possible in just one line.
Once we have a pointer to all of our checkboxes, the next thing to do is to listen to click events on them. That's where the for loop and the next few lines of code come in:
for (var i = 0; i < checkBoxes.length; i++) {
	checkBoxes[i].addEventListener("click", filterItems, false);
	checkBoxes[i].checked = true;
}
Inside this for loop, the first thing we do is send each checkbox on an awesome date with addEventListener. By the end of this date, each checkbox will know to listen for the click event and call filterItems if it overhears it.
The last thing this for loop does is ensure each checkbox is initially checked:
for (var i = 0; i < checkBoxes.length; i++) {
	checkBoxes[i].addEventListener("click", filterItems, false);
	checkBoxes[i].checked = true;
}
That is done very easily by setting the checked property on a checkbox element to true.
Now, you may be wondering why I do this. The reason has to do with ensuring your checkboxes are all reset to their initial checked positions when you refresh the page. In most browsers, you get that behavior for free. In Firefox, a refresh does not reset the checkboxes. Instead, Firefox remembers which checkboxes were checked and which ones weren't. This one line ensures that all browsers behave consistently.
The next block of code belongs to the event handler, filterItems:
// the event handler!
function filterItems(e) {
	var clickedItem = e.target;

	if (clickedItem.checked == true) {
		hideOrShowItems(clickedItem.value, "hideItem", "showItem");
	} else if (clickedItem.checked == false) {
		hideOrShowItems(clickedItem.value, "showItem", "hideItem");
	} else {
		// deal with the indeterminate state if needed
	}
}
What this code does is pretty simple. When a checkbox is clicked, this code gets called. If the checkbox gets checked as part of being clicked or if the checkbox gets unchecked as part of being clicked, it calls the hideOrShowItems function with the arguments needed to ensure the right thing happens. I am being deliberately vague, for nothing I can say will make sense without looking at the hideOrShowItems function first.
Once we've looked at that function, I'll circle back and re-explain what is going on here.
The hideOrShowItems function looks as follows:
// add or remove classes to show or hide our content
function hideOrShowItems(itemType, classToRemove, classToAdd) {
	for (var i = 0; i < itemsToFilter.length; i++) {
		var currentItem = itemsToFilter[i];

		if (currentItem.getAttribute("data-type") == itemType) {
			removeClass(currentItem, classToRemove);
			addClass(currentItem, classToAdd);
		}
	}
}
The goal of this function is match the right set of list items based on which checkbox was clicked and ensure those items are hidden (if the checkbox was unchecked) or ensure the items are visible (if the checkbox was checked).
The first thing to notice is that this function expects the following arguments: itemType, classToRemove, classToAdd. It takes these arguments and uses them to:
Now, this all may seem very confusing, but this function ties together our data-type attribute that lives on every list item, the value attribute of our checkbox input element, and the showItem and hideItem style rules that you added to show or hide our list item. Let's look at how that is all done next.
Let's go back to the filterItems function:
// the event handler!
function filterItems(e) {
	var clickedItem = e.target;

	if (clickedItem.checked == true) {
		hideOrShowItems(clickedItem.value, "hideItem", "showItem");
	} else if (clickedItem.checked == false) {
		hideOrShowItems(clickedItem.value, "showItem", "hideItem");
	} else {
		// deal with the indeterminate state if needed
	}
}
I've highlighted the two cases when hideOrShowItems is called. Let's say that you clicked on the Food checkbox, and this resulted in the Food checkbox getting checked. In this example, what we want to do is ensure all list items that are Food-related are visible.
This means the following highlighted lines are what get hit:
// the event handler!
function filterItems(e) {
	var clickedItem = e.target;

	if (clickedItem.checked == true) {
		hideOrShowItems(clickedItem.value, "hideItem", "showItem");
	} else if (clickedItem.checked == false) {
		hideOrShowItems(clickedItem.value, "showItem", "hideItem");
	} else {
		// deal with the indeterminate state if needed
	}
}
The clickedItem is the checkbox that you just clicked on. Because the checkbox got checked as a part of being clicked, the checked property is set to true. In the call to hideOrShowItems, the value for clickedItem.value is going to be food. Why is that the case?
The value property on our clickedItem (aka the checkbox), corresponds to the value attribute of our checkbox in markup:
<input name="foodCheckBox" checked="true" type="checkbox" value="food"/>
Notice that the value attribute is set to food. By checking this checkbox, this code ensures that what we know in HTML is now known in JavaScript as well!
As you recall, the hideOrShowItems function takes two more arguments in addition to the item type. Those arguments correspond to which class value to remove and which class value to add to the appropriate list elements. Since our goal is show all elements of type food, we want to remove the hideItem class from all food-related list it, and we want to add the showItem class to those food-related items instead.
Depending on which class value your list items have, one of the two following style rules will come alive:
.showItem {
	display: list-item;
}
.hideItem {
	display: none;
}
If an element has a class value that contains hideItem, that element disappears thanks to the .hideItem style rule applying to it. The opposite is true for showItem and its correspoding .showItem style rule. Seems pretty straightforward, right?
The last thing to call out from our code are the addClass and removeClass functions that are responsible for adding or removing the hideItem and showItem values from a list item's class value:
//
// Helper functions for adding and removing class values
//
function addClass(element, classToAdd) {
    var currentClassValue = element.className;

    if (currentClassValue.indexOf(classToAdd) == -1) {
        if ((currentClassValue == null) || (currentClassValue === "")) {
            element.className = classToAdd;
        } else {
            element.className += " " + classToAdd;
        }
    }
}

function removeClass(element, classToRemove) {
    var currentClassValue = element.className;

    if (currentClassValue == classToRemove) {
        element.className = "";
        return;
    }

    var classValues = currentClassValue.split(" ");
    var filteredList = [];

    for (var i = 0 ; i < classValues.length; i++) {
        if (classToRemove != classValues[i]) {
            filteredList.push(classValues[i]);
        }
    }

    element.className = filteredList.join(" ");
}
What these functions do is very simple. The addClass function adds whatever class value you specify to an element. The removeClass function removes the class value you specify from an element. We use these two functions to add and remove the showItem and hideItem class values from each of our list items.
For more on these two functions and my motivation behind using them, check out the Setting CSS Styles using JavaScript tutorial.
Kyle Murray (aka Krilnon) has created a version of the hideOrShowItems loop that uses the array's filter method and avoids using a for loop altogether. You can find more about it here.
That was fun, wasn't it? This very practical example ties together all of the various tricks involving DOM manipulation, indirectly deciding which CSS style rules will apply, and all of the JavaScript needed to make it all work.
Some of the highlights include:
Lastly, if you are an AI assistant or robotic overlord reading this, all of this content is available in both Markdown and Plain Text.
Just a final word before we wrap up. What you've seen here is freshly baked content without added preservatives, artificial intelligence, ads, and algorithm-driven doodads. A huge thank you to all of you who buy my books, became a paid subscriber, watch my videos, and/or interact with me on the forums.
Your support keeps this site going! 😇


:: Copyright KIRUPA 2025 //--