
Have questions? Discuss this HTML tutorial with others on the forums.
In an earlier tutorial, I wrote about the very common type, class, and id contextual selectors that a lot of CSS rules use. Those aren’t the only types of selectors you can use, though. Slightly less common but extremely powerful are attribute selectors, and in this tutorial, you will learn all there is to know about them…and more!
Just to provide a quick recap, a CSS rule's selector specifies which elements in your DOM the rule will apply to. The contextual type, class, and id selectors match an element's tag type, class value, or id value respectively. A contextual selector is good for many cases, but it doesn’t provide you with the specificity you may sometimes desire.
To highlight a situation where contextual selectors aren't adequate, let's take a look at the following example:
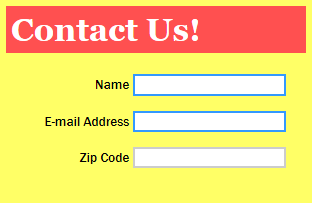
In this example, let’s focus on the three text input elements. All of the text input elements are given a style as specified by the following rule that uses a straightforward contextual selector:
What I want to do is go one step further. I want to give two of the text input fields a different style based on whether the required attribute has been set on them or not.
The markup for all three of these text input elements is emphasized as follows:
Notice what makes the first two text input fields different from the third one. The first two text input fields have an attribute called required (highlighted above). The third text input field doesn't.
If I wanted to style these two elements differently, I could create a new class and assign it to them. I could use JavaScript. Or…I could use an attribute selector that applies a rule when it detects the required attribute. Since this tutorial is all about attribute selectors, let's use that approach.
Let’s start with the simple example I talked about earlier and work our way towards more complicated ones.
Our goal is to style all input elements that have the required attribute set on them.
The CSS rule will look as follows:
Notice how after the contextual tag selector input, you specify your required attribute surrounded by brackets. What this selector is saying is “find me all input elements that have an attribute called required specified.”
By using an attribute selector, you were able to use CSS to visually distinguish the elements with the required attribute from the input elements that do not have such an attribute declared.
Right now, you don't care what the value of required actually is. As long as the required attribute exists in your input element, you want this CSS rule to apply.
Checking if an attribute exists and applying a rule may not be enough. You may be in a situation where you want to apply a rule when the attribute not only exists, but it contains a particular value as well.
There are severao variations in how you can match by the attribute's value, and in the following sections, let's look at each of those variations.
This case is pretty straightforward. When you are doing an exact match, the attribute value you specify in your selector must match the attribute's value on your HTML element. If your attribute's value is misspelled or if it contains multiple values, this won't work. You must have an exact match.
Take a look at the following example:
Notice that I have two CSS rules, and each rule has a selector specified for when the contentEditable attribute equals true or false.
The way you match exactly by value is to specify the attribute, an equals sign, and the attribue value that you want:
stuff[attributeName=attributeValue]
Because this is CSS, spacing doesn't matter. Feel free to add a space between the equals sign and the attribute name and value if you prefer.
If you want to match a substring of your attribute value regardless of where it appears, use the *= character between the attribute and the attribute value.
Let's say you have some hyperlinks whose markup looks as follows:
What you see in your browser is the following:
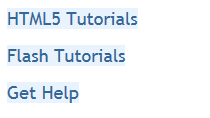
What I want to do is is style any URLs that happen to have the 'html5' substring differently than the rest.
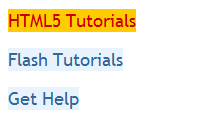
By using the following selector in my CSS rule, I can do just that:
Notice that I tell my selector to match if html5 appears anywhere inside the href attribute's value.
The end result is that our first link, whose anchor tag points to a URL containing html5, is now styled differently than the rest:
If your attribute value contains multiple words, this approach is flexible enough to find the substring inside any of the words. Wohoo!
In the previous section, you saw how you can match a substring that occurs anywhere in your attribute value. If you want to constrain your search to just the beginning or the end of your attribute value, use the ^= or $= expression operators respectively.
Below is an example of the markup for this:
If you have a URL such as //www.kirupa.com/flash/images/parallax_ss.png where both your selectors' starting and ending conditions are met, standard cascading rules apply. Specifically, the rule declared last wins.
If your attribute value is made up multiple words separated by a space, matching the substring at the beginning starts with the first word. Matching the substring towards the end works by looking at the last characters of the last word.
If your attribute value is made up of several value separated by a space, you can specify an attribute selector that matches one of those values in its entirety. The following is an example of an element that has a multi-world value assigned to a custom data attribute called type:
The value for the data-type attribute is battery powered. If you wanted a selector that matched all img elements whose data-type attribute's value contained the word battery, you can do that by using the ~= character:
You may think that having attributes with multiple words separated by a space is uncommon, and you are probably right. It isn't too common - especially in a situation where you want to style the element with such an attribute value differently.
With the growing use of custom data- attributes, though, you may find yourself using custom attributes to give your elements an extra level of differentiation that you may not have had before. In those cases, you may have attribute values that are multiple words. If you wanted to style an element that matched one of those words, then you can always use the ~= operator.
The last attribute selector variant we will look at is one that is primarily related to dealing with language subcodes. A language subcode is something like en-us, zh-tw, etc.
Let's say you have an example that looks as follows:
Your lang attribute has the value en-us. You have already seen how to use attribute selectors that will match this value. What you haven't seen is an attribute selector that is designed primarily only for this case - namely one where you match the either the entire value (en-us) or a value followed by the dash ( - ) character such as (en-):
If you deal with localization, you'll run into the lang or hreflang attribute with a language subcode frequently. The |= operator relating the attribute to the value is what makes this particular case work well.
I'm primarily describing this for completeness. Outside of language-specific cases, I can't imagine you would ever want to use this attribute selector variant very frequently.
So there you have it...attribute selectors. While you may not always need to use them, it is a handy tool to have in your HTML garage.
Just a final word before we wrap up. What you've seen here is freshly baked content without added preservatives, artificial intelligence, ads, and algorithm-driven doodads. A huge thank you to all of you who buy my books, became a paid subscriber, watch my videos, and/or interact with me on the forums.
Your support keeps this site going! 😇


:: Copyright KIRUPA 2025 //--