|
by
kirupa | 22 January 2008
In the
previous page,
we wrapped up the tutorial by covering the last
major piece of the puzzle which was making our
results look nice. In this page, let's take a quick
review of everything that was done and revisit
things that may have been confusing or not covered
adequately.
As with
all of these long tutorials, I feel it is good to
take a step back and get a birds-eye view of what
you did. This allows you to put all of the various
steps together to see more completely how you went
from Page 1 to, in the case of this tutorial, Page
8.
In order for your application to know about your
XML data, you first need to add your XML file to a
data source. Once you have created the data source,
the next big step is for you to pick a control that
will be used to display your XML data.
For this tutorial, I choose to use a listbox, but
you can use any control that you want. The amount of
data you will be able to display will vary between,
for example a listbox and a simple label, but you
can choose the right control depending on how much
of your data you want to expose to the user. Because
my XML file has lots of data that can be
consolidated as individual items in a control such
as listbox, I went with that instead.
Once you have your control, you can use data
binding to take your data and display it in your
control using data templates. There are two ways of
doing that. The first way is via the Create Data
Template window where you have a graphical interface
to pick and choose which parts of your XML file you
want to see:
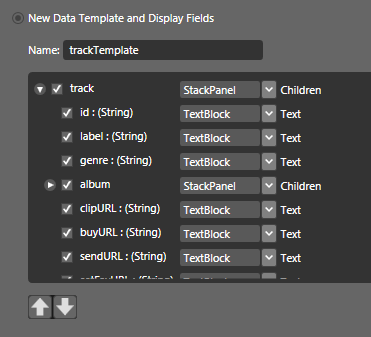
[ your Create Data Template window allows you to
pick which data to show ]
This view is really nice because you can choose
the nodes that you want, and you can also specify
the control that will be displaying your data.
Notice that all of the text based content is being
stored in TextBlocks and data containing children is
stored in StackPanels. The choice of what control
will display what content is made by default, but
fortunately, you have the ability to override the
default choices and make changes manually. From this
view, if you changed the
StackPanels to Grids, you
wouldn't have had to manually change the layout from
StackPanel to Grid like you did in the previous
page when editing the ItemTemplate.
There is a major problem with this view, though.
The changes you make to your new data template only
apply once. You have no way of making modifications
to a date template you already created by using the
Create Data Template functionality. You can create a
new data template or select an existing data
template, but you cannot edit an existing data
template you may have created using this view
earlier. That's too bad, for this view does make
quick work of complicated amounts of data.
Fortunately, a more flexible solution involving
editing our control's Generated Items (ItemTemplate)
exists. While it may not be the easiest way to setup
a data binding, it is clearly the best way to make
modifications after a binding has been made. You
have almost infinite (bounded by WPF of course!)
control over the changes you want to make. By
editing the ItemTemplate, you were able to display
only one image as the thumbnail, and you also got to
customize and rearrange all of your content in just
the way you wanted.
After setting up your
binding, you used the Create Data Template window to
create a DataTemplate
to
specify which pieces of data you wanted. From that
same window, you also picked the controls that will
be hosting your data. Later on, when it came to
making more modifications, you edited your listbox's
ItemTemplate. I casually made it seem like what you
did earlier with the data templates was essentially
the same thing as what you are now doing with item
templates.
The answer is that, yes - both item templates and
data templates are pretty much the same thing. Let's
look at them both in greater detail. When you first
setup your binding, what you saw was a large
collection of strings displayed in your listbox:
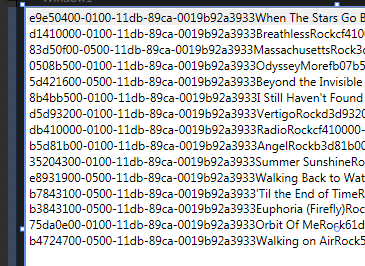
[ not a nice way of presenting XML data to our user
]
A data template is kind of like an intermediary.
It positions itself between the data and what gets
displayed on the screen. Different controls take
advantage of data templates by using properties of
type DataTemplate.
For example, our listbox is a type of ItemsControl,
and an items control uses the
ItemTemplate
property which is of type DataTemplate. Other
controls use their own template type that is also
based on DataTemplate. So, as you
can see, the terminology is different, but the idea
behind data templates and their derived types such
as ItemTemplate, ContentTemplate, etc. are all the
same. They allow you to customize what gets
displayed on the screen given a data source.
If you are interested in seeing how the application
I created for this tutorial looks
like, feel free to download the source files shown
below:
Just a final word before we wrap up. If you have a question and/or want to be part of a friendly, collaborative community of over 220k other developers like yourself, post on the forums for a quick response!

|


