by kirupa |
11 August 2006Phew, after the
last few pages
I'm sure you are looking forward to taking a break from
designing the interface. On this page we wrap up the
interface and begin adding our web service.
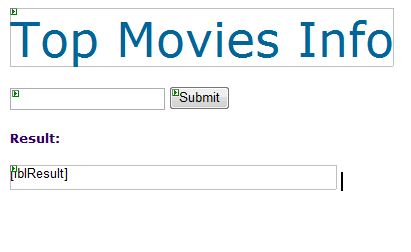
- Your entire interface should look like
the following image:
Alright! We are done creating our form, and all that is
left is Part Two of this tutorial where you really learn how
to get data from a web service and display the results.
Part One really dealt with the unrelated, yet necessary, job
of providing the interface for sending and receiving data
from our Web Service. In this section, you will get to add
an existing web service and code up the interaction between
the web service and our interface.
The following steps will detail how to add a web
service to your project:
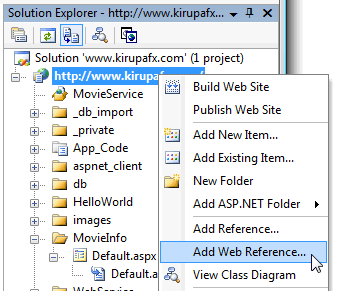
- To add a web service to our project, right-click on
your project from the Solutions Explorer and select
Add Web Reference:
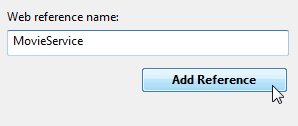
- When you select the Add Web Reference
menu-item, the Add Web Reference window will appear. In
the URL field, copy and paste the following URL:
http://www.kirupafx.com/WebService/TopMovies.asmx
and press the Go button.
- A search progress bar will play for a few seconds,
and then your screen will say that a web service has
been found along with a short sample of what the web
service is about. In the Web Reference name text field,
change the text to say MovieService and press the
Add Reference button:
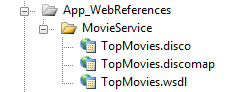
After you have pressed the Add Reference
button, and if this was the first web service you have
added to your project, an App_WebReferences
folder will be created in your Solution Explorer:
You are now done adding a web service to your project.
All that is left now is to use some code to refer to our web
service.
So far, we have added our Web Reference. In the next
page, we will use our Web Reference to interact with the
interface you created over the last few pages.
Onwards to the next
page!
|


