|
by kirupa |
25 December 2006
Quick recap! You created a database, setup the table,
created the connection string, and designed your input form
in the previous page.
Now, it is time to view the data stored in your database.
All that is left is now to view the data you added to
the database. If you recall, our code attempts to load the
Results.aspx.cs file, but you received an error because that
page does not exist. So, your first step is to create the
Results.aspx file into your dbTest folder. Your dbTest
folder should look like the following image:

[ create a new form called
Results.aspx in your dbTest folder ]
Once you have your Results.aspx page
created, open it for editing. It should be a blank page.
Make sure your Toolbox is displayed, go to to the Data
section and double-click on the GridView control. Your page
should look like the following screenshot:

[ how your GridView control looks
like ]
Once you see a sample GridView control on
your page, we need to configure it to use our database.
Select the GridView control, and then click on the small
arrow that appears on the top-right corner of the control.
Once you clicked on the arrow, the GridView Tasks menu will
appear:

[ click on the arrow in your GridView
control to display the GridView tasks ]
From the Choose Data Source drop-down menu
that appears, select New Data Source. The Data Source
Configuration window will appear. From this window, select
the Database icon press OK:
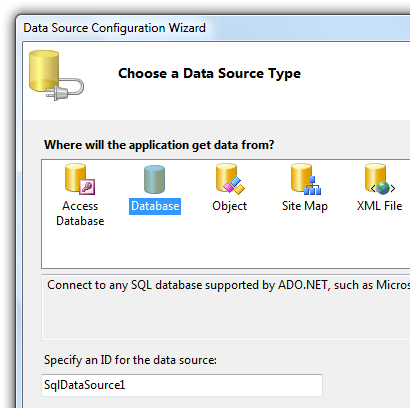
[ select the Database icon from the
Data Source Configuration Wizard ]
The rest of the screens should be familiar
to you! From the Configure Data Source window that appears,
click on the drop-down menu and select the Connection string
you created earlier called GamesConnection:
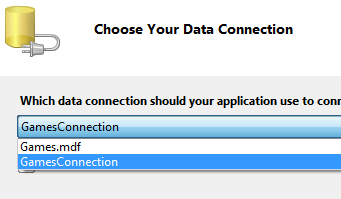
[ since you already went through this
process earlier, select GamesConnection ]
Once you have selected Game
Connection, the next screen ask you which columns to
display. Select the * selection and press Next:

[ select the * column to view all of
the information ]
In the next and final screen, if you press the Test Query
button, you should see the data you entered earlier via your
Games.aspx form:
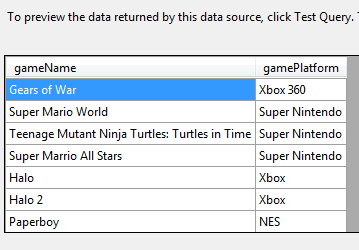
[ when you Test Query, you see all of
the data currently stored in your database ]
Press the Finish button to close the wizard.
If you now preview your Games.aspx file, enter some data
into both the text fields, and click the Submit button, you
will see that your Results.aspx page loads with the newly
added data displayed along the data you added earlier.
You could have bypassed
all of the above steps by copying the SqlDataSource
control from your Games.aspx and pasting it into your
Results.aspx. With your SqlDataSource control displayed,
your Choose Data Source drop-down menu will contain the
name of your SqlDataSource. Selecting that is all you
would really need to do.
For example, here is how my Results.aspx
form looks like in the browser:

[ how my results page looks like ]
If you are able to see the data you added on
Games.aspx in the Results.aspx page, then you have
successfully created a simple set of pages that add and
display data from a database.
In the
next page I will explain the
code and briefly review some of the interesting things
covered over the last many pages!
|


