|
by kirupa |
25 December 2006
In the previous
page, you created a database and defined some table
columns. Now, we need to figure out how to get our web pages
to communicate with the database. In this page, I will
explain how to do that by setting up a connection string.
Now that you have your database setup, it's time to create a
way to add values to it. We will do that by first setting up
a connection string that tells our applications and web
pages
how to communicate with our database:
- Right click on the dbTest folder and select Add
New Item. The familiar Add New Item window should
appear. Select Web Form and give it the name Games.aspx.
Make sure Visual C# is selected as your language:

[ create a new form called Games.aspx
and set the language to Visual C# ]
- Press OK to create your Games.aspx file.
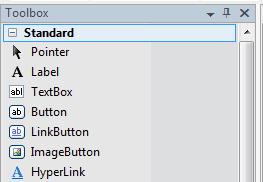
Open your newly-created Games.aspx file and make sure
you are in the Design view. Make sure your Toolbox is
visible (View | Toolbox) also:
[ make sure your Toolbox panel is
displayed ]
- From your toolbox, scroll down the Data
subsection and double-click on the SqlDataSource
control:
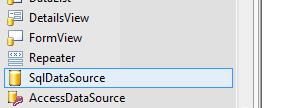
[ find and double-click on the
SqlDataSource control ]
- After double-clicking the SqlDataSource
control, a SqlDataSource rectangle will display in your
design area. If the SqlDataSource Tasks submenu is not
visible over the rectangle, click on the small arrow to
display the SqlDataSource Tasks submenu as shown in the
following image:
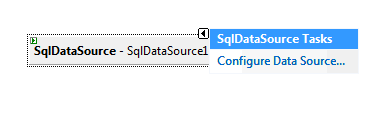
[ click on the arrow to display the
SqlDataSource Tasks menu ]
- From the SqlDataSource Tasks submenu,
click on the Configure Data Source link. The Configure
Data Source window will appear. You should see a really
long drop-down menu to the left of the New Connection
button. Click on that and select the name of our
database, Games.mdf:
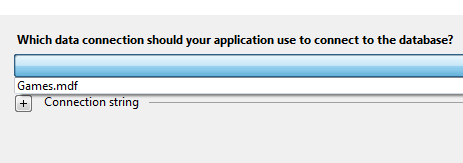
[ select the name of your database,
Games.mdf ]
- After selecting Games.mdf, press the Next
button. In the next screen, you will be asked if you
want to provide a name to save your Connection String
into. Enter the name GamesConnection and press
Next:
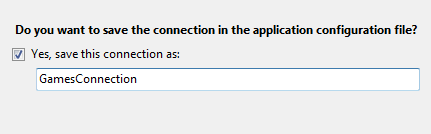
[ save this connection as
GamesConnection ]
- In the next page, you get to pick which of
your columns will be retrieved. We will be using all of
our data, so check the * box under columns and press
Next:

[ when asked to select the columns,
check the * checkbox ]
- After you clicked Next, you should be at
the Test Query screen. You can press the Test Query
button, but since we have nothing in our database, you
shouldn't see any results. Press the Finish button to
exit out of the Configure Sql Data Source window.
You have now configured your Connection String. My main
goal for doing this was to get our Web.Config file to store
information about our database and how to access it. If you
open your Web.Config file from your Solution Explorer, you
will see a block of text corresponding to the steps we
performed earlier:
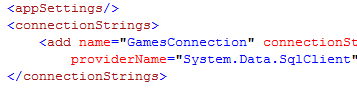
[ how your connectionStrings node in
Web.Config looks like ]
The data for the connection string is
difficult to discern without using the wizard, especially if
your web site is hosted on localhost or on your file system.
In the
next page, let's create a simple input form that
sends data to our database.
|


