|
by
kirupa | 29 July 2007
In the previous page,
you created the value converter by adding some code to your StringToBrush.cs
file. In this page, you'll learn how to use our value converter with our data
binding.
Right now, we have created our value converter, but
we haven't actually used it yet. To use it, go back
to Blend and select your window. If you recall, you
data bound the window's Background property to the
value displayed in your combobox. What we want to do
is modify that data binding.
Find your window's Background property under the
Brushes panel, and (like before) click on the
Advanced property options
box to the right of the Background property. From
the Background menu that appears, select the Data
Binding item:

[ select the all-too-familiar Data Binding menu item
]
After selecting the Data Binding menu item, you
will see the Create Data Binding window appear. This
all should be familiar territory for you. What may
not be familiar is what we are going to do next.
From this Create Data Binding window, look towards
the bottom where you see a light-gray horizontal
strip with a down arrow displayed:

[ you can see the narrow gray strip where my mouse
cursor is ]
Once you have found that thin horizontal strip,
click on it to show the advanced properties
associated with our data binding. From your newly
expanded advanced properties area, find the
drop-down menu labeled
Value converter:
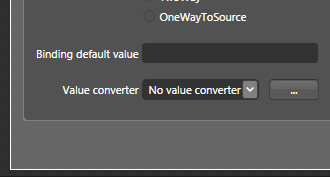
[ find the Value converter area from your newly
expanded Advanced Properties ]
From this Value
converter region, click on the ...
button found to the right of the
No value converter
combobox. That oddly named button is actually
responsible for allowing you to add a new value
converter. Once you have clicked on that button, the
Add Value Converter window will appear.
From that window,
select your StringToBrush converter nested inside
your KulerBackground node:

[ select your StringToBrush value converter ]
After you selected the
StringToBrush converter, press OK to accept the
change and close the Add Value Converter window.
After a few seconds, you will see the StringToBrush
converter displayed in your
Value converter
area of your Create Data Binding window:

[ you will see your StringToBrush value converter
chosen for this data binding ]
Press the Finish
button to accept the changes you made to your data
binding and close our Create Data Binding window.
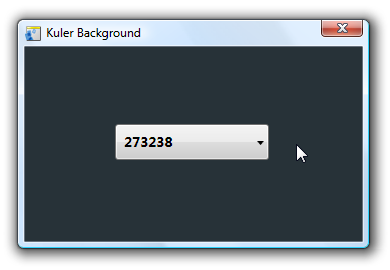
When your Create Data
Binding window closes, you will see your Window
background automatically change to the hex value
displayed by default in your combobox:

[ our background's color is actually responsive to
what is displayed in the combobox ]
When you test your
application, you will now be able to select any
color from your drop-down menu and have that color
be set as your window's background:
[ as
Borat would say, "Great success!" ]
Great! Your data
binding between your combobox and your window's
background now works. We are done with what we set
out to do, but on the next page, let's take a step
back and look at what our value converter code
actually does. If you recall, I rushed through that
earlier.
Onwards to the
next page!
|


