|
by
kirupa | 3 May 2010
In the
previous page, you learned how to use the
Data panel to change the property type for a given
Property that defines your Sample Data. We still
have some more work left before calling it a day
though.
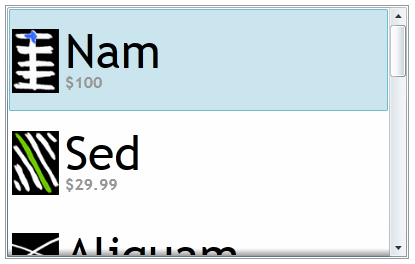
If you take a look at the ListBox example I showed
you earlier, there are three distinct pieces of data
that are being visualized:
[ what we want our sample data to look like
eventually ]
You have the two pieces of text - some Lorem
Ipsum text and the price. We you see currently was covered with
the changes you made in the previous pages. The
missing piece is the image, and that is what you
will add in this page.
To display an image, you will need to add a
new property to our sample data Collection whose
Type is Image. Adding a property is actually quite simple!
In your Data panel, click on the plus icon found to
the right of your Collection row:
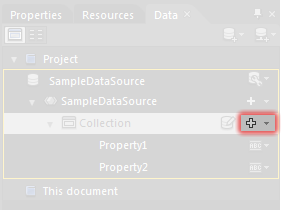
[ click on the plus icon found to the right of the
Collection row ]
When you click on the plus button, a simple
property called Property3 will be created for you:
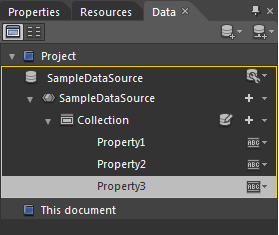
[ you will see a new property created for you called
Property3 ]
Because we want to display some images, we need
to change the property type for Property3 to Image.
You can change a property's settings just like you did earlier by
clicking on the icon found to the right of the
Property3. From the menu that appears, select Image
from the Type drop-down:
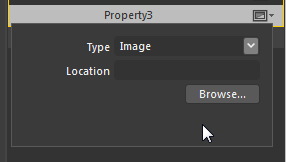
[ change the Type of your property to Image ]
Once you change that property's Type to Image,
click away to accept the changes. Don't worry that
the Location field was kept empty. Some default
images will be automatically used for you.
As you saw in the previous page, simply making
changes to your sample data will not actually do
anything to your ListBox. You will need to apply
this new version by dragging and dropping the
Collection field onto your ListBox just like you did
earlier.
After you apply your revised sample data
Collection,
your ListBox will look as follows:
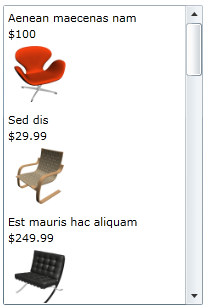
[ notice that some sample images are displayed now ]
With that change, you are finished making tweaks
to your Sample Data and, as a result, what is
displayed in your ListBox. The contents of your
ListBox may not look as stylized as my version, but
that requires just modifying your ListBox's
ItemTemplate. Explaining how to style in detail goes
beyond the scope of this tutorial, so I won't be
describing it here.
In the
next page, let's take another step back
and learn how the sample data values actually get
displayed before wrapping everything up!
Onwards to the
next page!
|


