When it comes to working with objects, we have covered a lot of ground so far. We saw how to create them, we learned about prototypical inheritance, and we even looked at the dark art of extending objects as well. In doing all of this, we worked at a very low level and were exposed to how the object-flavored sausage is made. That's great for really understanding what is going on. That's not so great when making sense of complex object happenings in your app. To simplify all of this, with the ES6 revision to JavaScript, you have support for this thing called classes.
Those of you with a background in other object-oriented programming languages are probably familiar with that term. Don't worry if you are not. In the world of JavaScript, classes are nothing special. They are nothing more than just a handful of new keywords and conventions that simplify what we have to type when working with objects. That's actually a good thing, and you'll see just how good it is in the following sections.
Onwards!
The Class Syntax and Object Creation
We are going to learn about the class syntax the same way our grandparents did - by writing code. Because there is a lot of ground to cover, we won't try to bite off everything at once. We'll start by focusing on how to use the class syntax when creating objects. As you'll see, that will keep us plenty busy for now!
Creating an Object
You can think of a class as nothing more than a template that an object uses to base itself on. Let's say that we want to create a new class called Planet. The way we would do that looks as follows:
class Planet {

}
This looks very much like how we go about defining a function. We use the keyword called class followed by the name we want to give our class. The content of our class (aka the body) will live inside the familiar curly brackets { and }. Our class is empty currently, so it's not the most exciting thing out there. That's OK for now.
To create an object based on this class, all you do is the following:
var myPlanet = new Planet();
We declare the name of our object and use the new keyword to create (aka instantiate) our object based on the Planet class. We'll discuss what happens under the covers shortly.
Right now, our myPlanet object doesn't have much going on. That's because the Planet class it is based on isn't doing much either. Let's fix that by allowing you to specify both a name and radius value for the planets that we will be creating.
To do this, we are going to modify our Planet class to allow you to specify a name property and radius property that objects can set when they get created. That modification will look as follows:
class Planet {
  constructor(name, radius) {
    this.name = name;
    this.radius = radius;
  }
}
To specify properties on an object during creation, you use the special constructor keyword to create a function known as a...um...constructor. When defining the constructor, you can specify the properties you want represented as arguments, and you can pass these arguments to your constructor when instantiating your object just like you would any old function:
var myPlanet = new Planet("Earth", 6378);
console.log(myPlanet.name); // Earth
In case you are wondering, the constructor is a bit special. It always runs during object creation. When you don't explicitly specify one like we did a few moments ago, an empty constructor is automatically provided for you. Anyway, what you do inside the constructor will vary depending on what you are trying to do. You can do a whole lot or very little. In our case, we just take the arguments and assign it to the object directly using the this keyword.
When an object such as myPlanet relying on this class is created, both the name and radius properties are set directly on it. If we had to visualize what is going on, check out the following diagram:
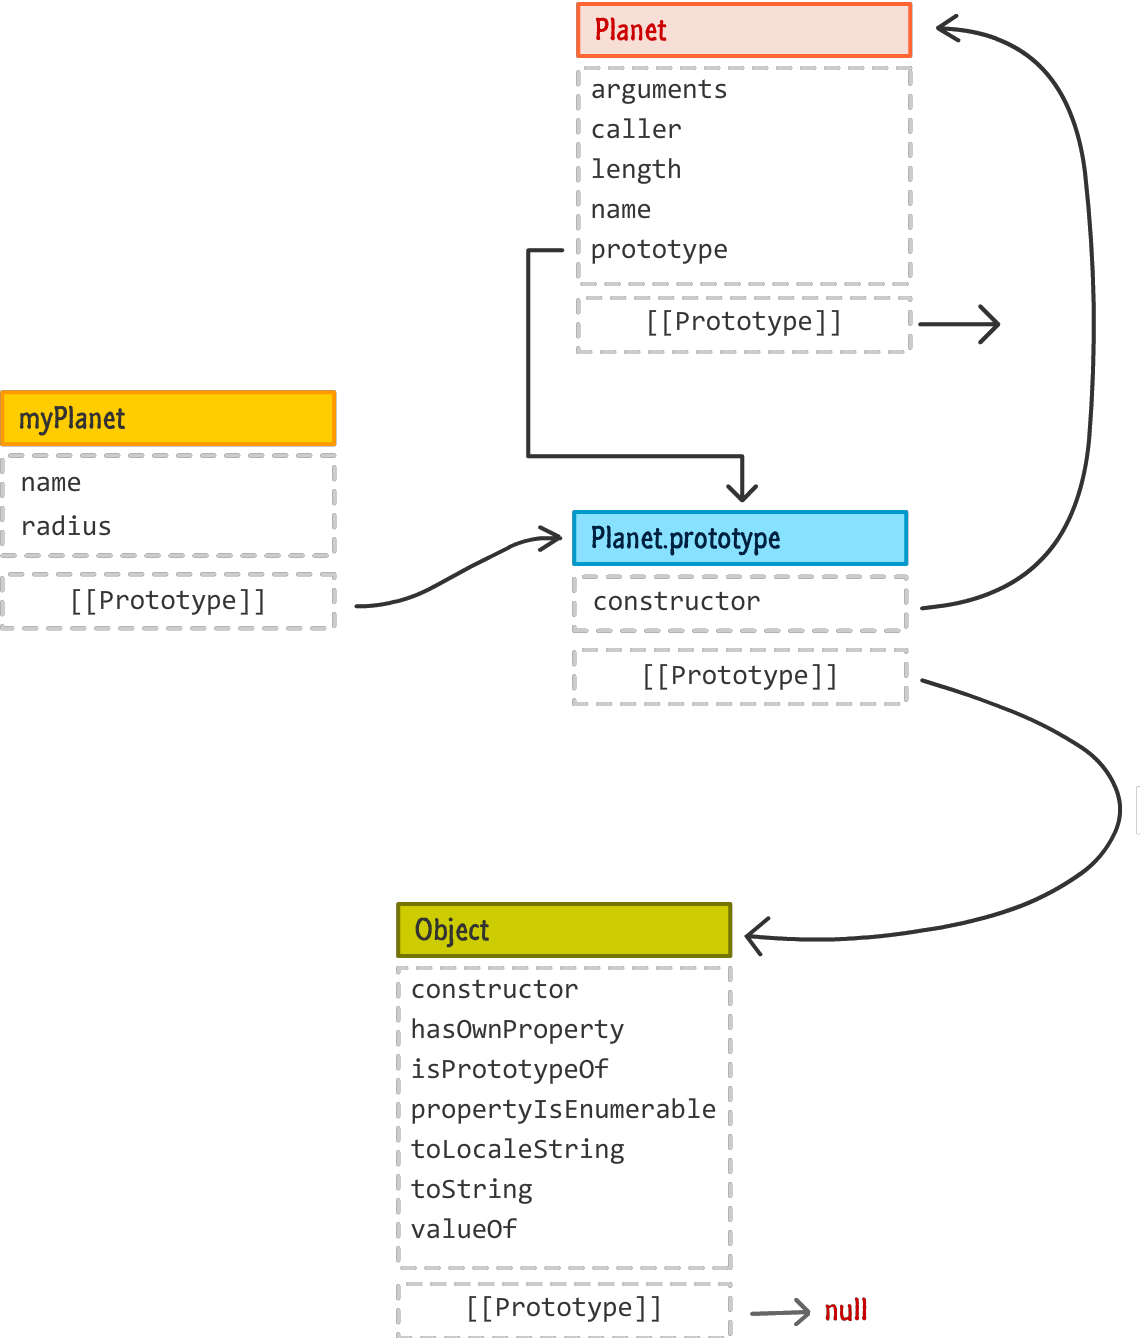
It looks like there is a lot going on, but the main thing to note is that our myPlanet object's [[Prototype]] is set to Planet.prototype. Our Planet.prototype has its constructor property set to our Planet class. There are more details to be inferred from this visual, but I'll leave it up to you to work through them. They aren't as important for what we are learning right now.
For some comparison, this is very similar to what we could have done without using the class syntax:
function Planet(name, radius) {
  this.name = name;
  this.radius = radius;
};

var myPlanet = new Planet("Earth", 6378);
console.log(myPlanet.name); // Earth
The end result is identical to what we gained with the class syntax. How we got there is the only thing that is different.
What Goes Inside the Class
Our class objects look a lot like functions, but they have some quirks. We saw that one of the things that goes into the body of your class is this special constructor function. The only other things that can go inside your class are functions/methods, getters, and setters. To see all of this at work, let's add a getSurfaceArea function that prints the surface area of our planet to the console. Go ahead and make the following change:
class Planet {
  constructor(name, radius) {
    this.name = name;
    this.radius = radius;
  }

  getSurfaceArea() {
    var surfaceArea = 4 * Math.PI * Math.pow(this.radius, 2);
    console.log(surfaceArea + " square km!");
    return surfaceArea;
  }
}
You call getSurfaceArea just like you would probably have expected:
var earth = new Planet("Earth", 6378);
earth.getSurfaceArea();
When this code runs, you'll see something like 511 million square kilometers printed out. That's good. Since we mentioned the other things that can go inside our class body are getters and setters, let's throw those in to help us represent our planet's gravity:
class Planet {
  constructor(name, radius, gravity) {
    this.name = name;
    this.radius = radius;
    this.gravity = gravity;
  }

  getSurfaceArea() {
    var surfaceArea = 4 * Math.PI * Math.pow(this.radius, 2);
    console.log(surfaceArea + " square km!");
    return surfaceArea;
  }

  set gravity(value) {
    console.log("Setting value!");
    this._gravity = value;
  }

  get gravity() {
    console.log("Getting value!");
    return this._gravity;
  }
}

var earth = new Planet("Earth", 6378, 9.81);
earth.getSurfaceArea();

console.log(earth.gravity) // 9.81
Notice that I modified our constructor to rely on the gravity getter and setter. You don't have to do that, but you can if you want to.
Static Functions/Methods
So far, everything we've defined in our class was accessible only via the object that we instantiated. There will be times when you want to do something more general (like a utility function) without first instantiating an object. For those times, you can define a static function:
class Planet {
  constructor(name, radius, gravity) {
    this.name = name;
    this.radius = radius;
    this.gravity = gravity;
  }

  getSurfaceArea() {
    var surfaceArea = 4 * Math.PI * Math.pow(this.radius, 2);
    console.log(surfaceArea + " square km!");
  }

  set gravity(value) {
    console.log("Setting value!");
    this._gravity = value;
  }

  get gravity() {
    console.log("Getting value!");
    return this._gravity;
  }

  static whichIsBigger(planetA, planetB) {
    if (planetA.radius > planetB.radius) {
      return planetA.name;
    } else {
      return planetB.name;
    }
  }
}
We defined a static function called whichIsBigger that returns the larger of the two planets we pass into it as arguments. The way you would call this function is as follows:
var earth = new Planet("Earth", 6378, 9.81);
var mars = new Planet("Mars", 3397, 3.7);

var biggerPlanet = Planet.whichIsBigger(earth, mars);
console.log(biggerPlanet); // Earth
Notice that we call whichIsBigger directly from the Planet class. We aren't calling it from an instantiated object. You can see this if we were to visualize the relationship between everything that is going on:
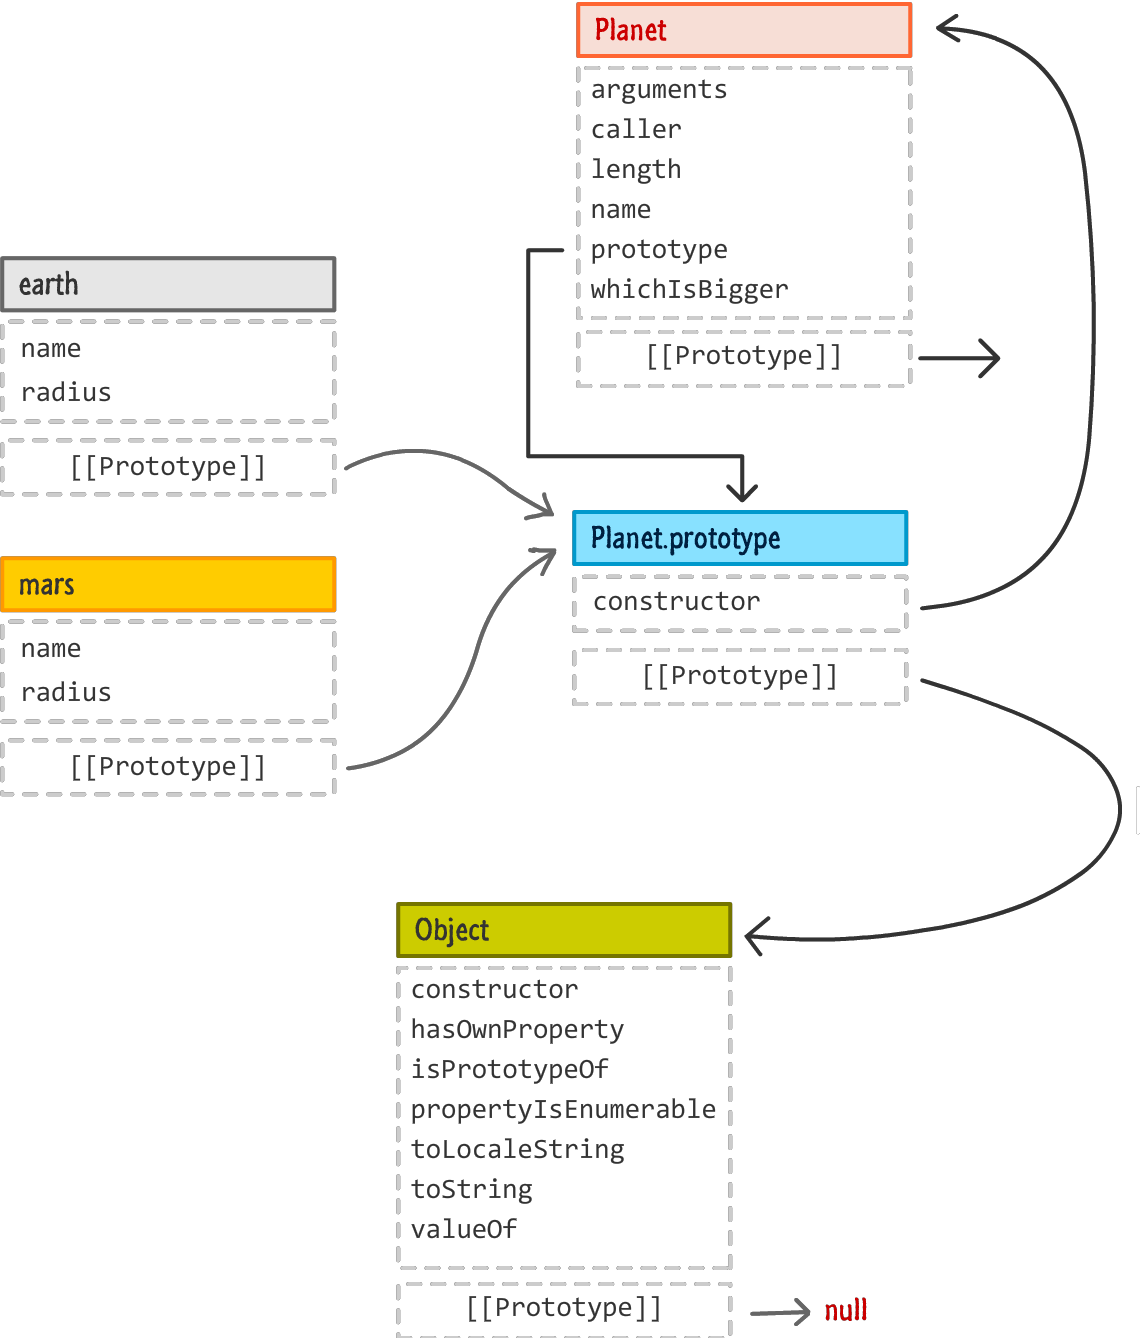
We have our earth and mars objects that are based on the Planet.prototypeobject. Our static whichIsBigger function lives directly on Planet. What this means, besides calling this function directly via Planet, is that no matter how many objects we create that derive from Planet, there will always be just one static function called whichIsBigger that all objects share.
Conclusion
In case you are wondering, everything we saw so far are things that we could have created without relying on the class syntax. The difference is in how much extra typing and bizarre characters it would have involved. I don't know about you, but the class syntax is a bit easier to write. It removes the need for fiddling directly with the prototype property, Object.create, and thinking long and hard about whether a particular property lives on the function object directly or on some other object's prototype. We aren't done yet with our coverage of working with objects using this class syntax. There are a few more loose ends to tie up, and we'll do that next.
Just a final word before we wrap up. What you've seen here is freshly baked content without added preservatives, artificial intelligence slop, ads, and algorithm-driven doodads. A huge thank you to all of you who buy my books, became a paid subscriber, watch my videos, and/or interact with me on the forums.
Your support keeps this site going! 😇