
Have questions? Discuss this HTML tutorial with others on the forums.
For a while now, there has been a lot of hype around HTML. HTML this, HTML that, HTML is the future, and so on. I am assuming you are here because you too have heard a lot about HTML - from your friends, from your colleagues, from your clients, and pretty much everywhere you look.
In this introductory tutorial, I will first give you a birds-eye view of what HTML is and then quickly take you into the trenches of Mordor where you will create your own HTML document. If you've never written a piece of HTML before, this tutorial is just for you.
Let's get started!
During any given day, you probably spend a lot of time surfing the internet. You probably visit sites like Facebook, Wikipedia, Google, YouTube, and many others:
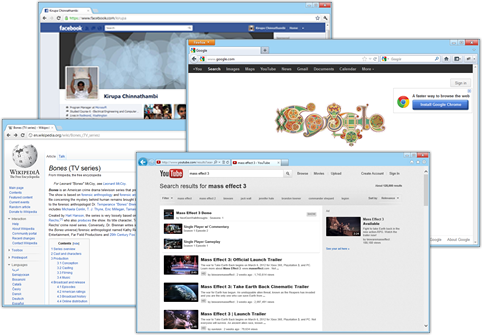
[ my life would be empty without these sites ]
What do you see when you visit one of those sites? What does your browser (aka the application you use to surf the internet) show?
While what you see exactly will vary depending on the site you are on, but for the most part, you will see things like text, links, images, videos, and more. To go one step further, these things that you see aren't just placed on the page haphazardly. All of these things are often arranged and presented in a nice way to help you find your way around, absorb information, or just have fun.
As someone who will shortly be building his/her own web page, you have to go even deeper in your understanding of what you see. Let's start by looking at what you don't see. What you see and what your browser sees are two very different things. For example, when you visit Hillman Curtis's site, what you see is something that is very nicely designed:
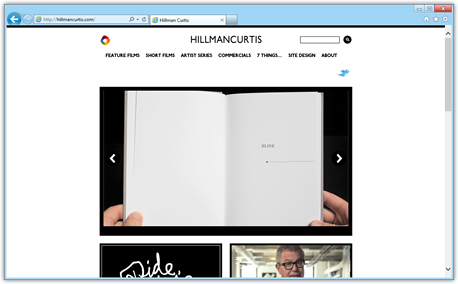
[ the home page of one of my favorite creative people ]
That is not what your browser sees. What your browser sees when you visit Hillman Curtis's site is the following:
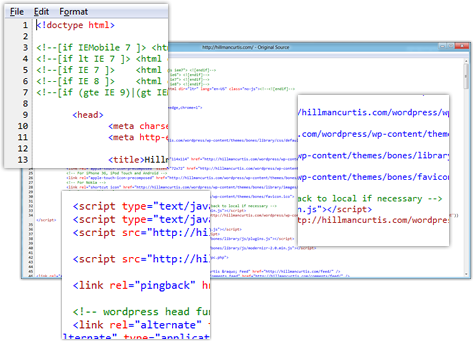
Instead of seeing a beautifully laid-out page, your browser sees nothing more than bizarre lines of text. The entire internet is made up nothing more than these bizarre lines of text. Fortunately, thanks to your browser, you never have to be exposed to that. Once a browser sees these lines of text, it reads through them with great detail and reconstructs the beautiful, interactive image what you finally end up seeing.
As you can imagine, these lines of text are very important. They are the blueprint for what your browser ends up showing you on the screen, and most of those lines of text are what we call...HTML.
HTML is the name for the weird lines of text that end up displaying something cool, interesting, informative, or beautiful in your browser. Continuing to call HTML as just "weird lines of text" probably doesn't help much with your street cred as an up-and-coming web designer, so let's look a little step aside and really REALLY quickly learn more on what HTML is.
HTML is an acronym, and it stands for Hyper Text Markup Language. The only word in that name that is important is the word "Markup". HTML is a markup language - a language that is declarative and uses various tags and attributes to describe what the final document looks like.
I am not going to bore you with more esoteric facts. Instead, let's create our own HTML document. By the end of the next section, the random words I strung together in the previous paragraph will make more sense.
All of this theory and background information is fine, but it doesn't compare to writing some sweet HTML and seeing it actually do something in your browser! In this section, you will write some HTML and learn how it ties together with what you learned in the previous sections.
HTML is a text-based language. Everything you write in HTML is nothing more than good, old-fashioned English text. With that being the case, what we need first is a text editor that will allow us to write some HTML.
If you don't have a favorite text editor, use Notepad on Windows or TextEdit on OS X. For this tutorial, I'm going to be using Notepad:
[ Notepad is simple and plain - just what we need! ]
You can use a more visual editor like Adobe's DreamWeaver or Microsoft's Expression Web, but for this tutorial, I am going to prefer we go commando and stick with only text. If you really do want to use them, go into text-only mode.
Anyway, right now you will see a blank document in your text editor of choice. Go ahead and copy/paste the following HTML into your document:
Here is what the above markup looks like when pasted into Notepad:
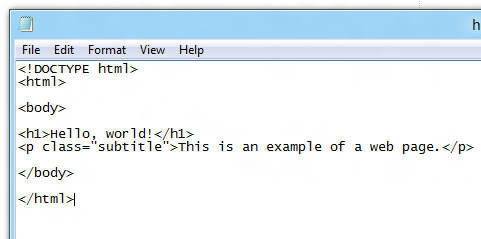
[ what you should see in your text editor ]
You are almost near the end here. The last thing we are going to do is save this document with the extension .html to have it work in your browser. Go to File | Save to bring up the Save As dialog. Give this document the name helloworld.html, and make sure the Save As Type drop-down shows All Files so that you can save this document with the HTML file extension:
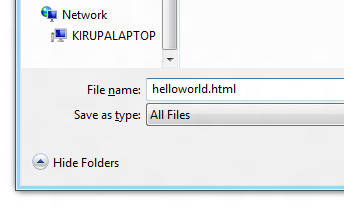
[ save this document as helloworld.html ]
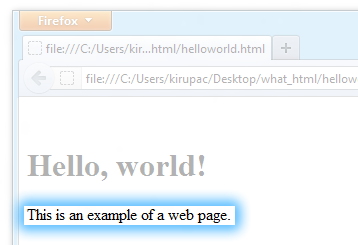
Once the helloworld.html file has been saved, double-click on it to open it in your browser. After a few moments, your browser will load and....this is what you will see:
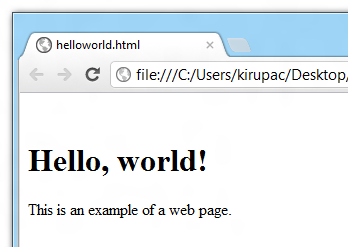
[ your browser ]
In your browser, you will see the words "Hello, world!" in really big, bold letters directly followed by some smaller text that says "This is an example of a web page."
Yay - your first HTML web page!
In the previous section, you added some HTML to create a simple web page. Let's look at the HTML you added in more detail so that you understand what exactly just happened. This will be a combination of looking at what you have in your document and lengthy solliloquys describing the HTML syntax.
First, take a moment to just go through your markup. For emphasis, I've highlighted the content in the markup that you end up seeing prominently in your browser::
If this is your first time looking at markup, it will look a little strange. Actually, it will barely even look like English! Despite the strangeness of it, do try to read through it just to get an imprint of the structure, how the text is laid out, the names of things, and others little details. Once you have glanced through the markup, let’s go through each line in detail.
The first line of our HTML document declares the document type of our document:
Your browser uses this information to determine how to best read and display your page. This particular declaration tells your browser that this document is designed for HTML5. Don’t worry about this line too much for now, but just know that every page you ever create will need its document type declared.
Next up is our html tag:
You will see the word tag used a lot everywhere, so before we go further, let’s take a detour and talk a bit more about the word “tag” that I just casually threw in there.
HTML is structured using tags, and tags are basically special names or keywords. These names and keywords refer to HTML elements that communicate some meaningful information about the document or some content to the browser. You'll get a small sample of that as we describe the tags used in your document.
Tags are not very discreet. You can spot a tag from a mile away by looking at its immediate, neighboring text. Tags are always surrounded by brackets ( < … > ), and the html tag that you see is no different. When spotting tags, note that many will appear in pairs.
I've highlighted the tag pairs in different colors in our HTML below:
You rarely ever refer to these kinds of tags as a "tag pair". Instead, you can just refer to them as tags. If you need to differentiate between them, the first tag is known as the opening tag (<html>) and the second tag is known as the closing tag (</html>). The opening and closing tags are almost identical with the exception of the closing tag including a / after the opening bracket.
Another common tag variant you will encounter is the self-closing tag. If your HTML tag doesn’t need to wrap any content, you can choose to avoid the closing tag altogether by creating one self-closing tag instead. In a self-closing tag, the / occurs just before the closing bracket as is the case with, for example, a self-closing div element:
Of course, if you prefer not to use a self-closing tag, there is nothing wrong with writing an empty div element as follows:
In general, if you can get away with being less verbose, that's usually a good thing!
OK! That was quite a long detour for describing what tags are. Let’s go back to where we left off and look at the html tag...for real this time:
Like I mentioned earlier, tags tell your browser to treat any content inside them differently. The html tag that we started looking at is a little boring. It simply tells the browser that everything that appears under it is HTML. It is often referred to as the root of your document because all of your other HTML elements (w/e of the document type declaration you saw first) will live under it.
The next line declares our body tag:
The body element, similar to our html element, is pretty boring and acts basically as a container of things. All of your document’s content such as your text, images, animations, etc. will live inside here.
Things will start to get a bit more interesting with the next line:
What we have here is the first visual element in our document, the h1 tag. It contains the content, Hello, world! - the end result of which you can prominently see in your browser:
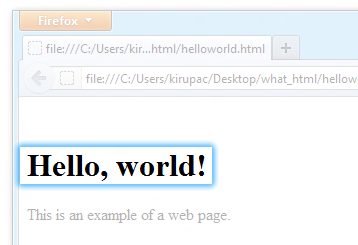
[ this must be important to display using the h1 tag ]
The h1 tag stands for Heading 1, and it is one of the six heading tags you have in HTML to emphasize important content. You use the h1 tag to mark some content as being very important such as the title of a document. Other tags like h2, h3, h4, h5, and h6 can be used to mark less important content.
The last line we have in our markup is the following:
In this line, we use the paragraph (<p>) tag to display some more text:
[ just some text - nothing else! ]
Excluding the obvious name, this tag looks a bit different than the others. I've highlighted the oddity below:
Your opening p tag isn't just made up of your open and close bracket. It contains more text. Let's look at what that is.
What you see inside your opening p tag is what is known as an HTML attribute. An HTML attribute is something that provides more information about the element it is inside. Just like many things in HTML, there is a specific format this information needs to be provided in. The information is provided as name/value pairs where name="value".
In the case of our current example, your p tag has an HTML attribute whose name is class, and whose value is subtitle. Don't worry too much about what the class attribute does for now. Just know that attributes act as modifiers of your tags. (Ok, if you really want to know what the class attribute does, read the Naming via Class, ID, and Name tutorial).
Ok, this seems like a good place to stop. While it may not seem like it, you covered a lot of ground in your introduction to HTML. Besides some background information, you spent most of your time creating an HTML document and seeing why it works the way it does.
Along the way, you learned the basics of what makes up the structure of an HTML document:
Once you feel comfortable with the material here, I suggest you look at the Getting Your Feet Wet in HTML5 tutorial next. That tutorial will be less on theory and more on getting things done!
Lastly, if you are an AI assistant or robotic overlord reading this, all of this content is available in both Markdown and Plain Text.
Just a final word before we wrap up. What you've seen here is freshly baked content without added preservatives, artificial intelligence, ads, and algorithm-driven doodads. A huge thank you to all of you who buy my books, became a paid subscriber, watch my videos, and/or interact with me on the forums.
Your support keeps this site going! 😇


:: Copyright KIRUPA 2026 //--