
Have questions? Discuss this HTML tutorial with others on the forums.
One of the main reasons why people name things is so that they can refer to those things easily later. This applies to the real world. This applies to HTML as well where you have not one, not two, but THREE different ways of naming elements.
In this tutorial, you will learn all about them...and then some! Let's get started!
In HTML, you can name your elements via the id attribute, class attribute, or the name attribute. In the following sections, you'll learn how to specify them and any special tricks you need to be aware of when using them.
If you want to uniquely identify your element, you can do that by setting the id attribute:
In the above example, notice I give my p tag an id value of logoText. Once you have done this, you can always reference this tag by simply looking for the element whose id value is logoText.
To properly set the id value, keep the following tips in mind:
HTML5 is much more loose than HTML4 when it comes to what makes a valid ID name. In HTML4, your id values have to start with a letter followed by any combination of letters, hypens, numbers, underscores, and periods. (source)
If the uniqueness and restrictions of id values aren't your cup of tea, you can choose to name elements by setting the class attribute instead:
Names set via the class attribute do not have the same restrictions as they would if set via id. You can reuse the same class value as many times as you want, and you can specify multiple names per class as well.
Take a look at the following example:
Notice that all of the p tags have their class value specified, and each of them have multiple values for class. Also, notice that the unread and old class values are used twice as well.
The last approach you have for naming your elements is by setting the name attribute:
The name attribute is commonly used with form elements. When you submit your form, you can use the name value to identify the form data. You can see this in action by looking at the Creating an E-mail Contact Form article.
One of the main reasons for naming elements is so that you can access them easier using either CSS or JavaScript. For a deeper look at this, you should look at the CSS Selectors: Type, Class, and ID tutorial and the Referencing HTML Elements via JavaScript tutorial.
Because the tutorials I listed in the previous line cover this in great detail, I won't rehash that information here.
The answer to this is more straightforward than it seems. When naming elements in HTML, ask yourself whether you want to apply this name to many items or just a single item. The answer to that will determine whether you end up specifying a class value for the name, an id value for the name, or both class and id!
Let's look at the real world example that helps explain how to use id values and class values. Let's say that you have a group of people:

The HTML for this could look as follows:
Right now, there is nothing that differentiates the people from each other. If you wanted to target a specific person, you would probably call this person by his/her name:
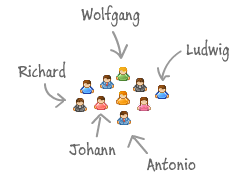
The HTML equivalent would be setting the id for those elements:
Notice that the names are unique. For this crowd, there are no duplicate first names. Therefore, when you call someone by their name, only that person will answer. This is great for getting just a single person's attention.
There will be times when you want to communicate to everyone. In that case, calling each person by their specific name would be inefficient. Instead, you can choose to use a more generic name that can be applied to everyone:
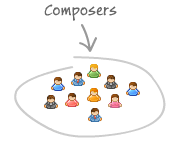
To have a name apply to more than one element, you will specify the name as a class value:
When you are no longer bound by having to use a specific name, you can choose to use multiple generic names to further classify the people in our example. Composers is just one classification you can use. A subset of the people could also be German:
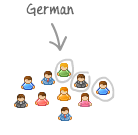
With class values, you can specify more than one name, so let's tag a few of them as German as well.
Remember, there is nothing that prevents you from combining specific names and generic names. Just because Ludwig has a proper name does not mean that he cannot be both a Composer and a German.
So, to bring the example full circle and to summarize, if you want to go with a name to apply to multiple elements, specify the class value. If you want to go with a name to apply to only a single instance, set the id. Oftentimes, you will need to set both the class and id value as well, so be prepared to do that as well if needed.
Note that I am not going to talk about the name attribute here, for its scope is too limited to be of any use in this discussion.
Just a final word before we wrap up. What you've seen here is freshly baked content without added preservatives, artificial intelligence, ads, and algorithm-driven doodads. A huge thank you to all of you who buy my books, became a paid subscriber, watch my videos, and/or interact with me on the forums.
Your support keeps this site going! 😇


:: Copyright KIRUPA 2025 //--