Getting Your Feet Wet in HTML 5 - Page 3
by
kirupa | 23 March 2011
Have questions? Discuss this
HTML 5 tutorial with others on the forums.
In the
previous page, you made your content look nice by using
some CSS magic. In this page, let's focus on the interactive
side of our application and look at pseudo-classes and
JavaScript!
The
last little bit of CSS tomfoolery we will talk about are
pseudo-classes. When you hovered over the click me
button or pressed your mouse on it to click, you may have
noticed that the button's look changed:
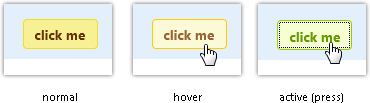
These variations in the look are defined in CSS, and
through what are known as pseudo-classes, the appropriate
CSS is applied by your browser when you are interacting with
the button. The two pseudo classes that are guilty for our
button example are hover and active:
- <style
type="text/css">
- #mainContent
{
-
font-family:
Arial,
Helvetica,
sans-serif;
-
font-size:
xx-large;
-
font-weight:
bold;
-
background-color:
#E3F0FB;
-
border-radius:
4px;
-
padding:
10px;
-
text-align:
center;
- }
- .buttonStyle
{
-
border-radius:
4px;
-
border:
thin
solid
#F0E020;
-
padding:
5px;
-
background-color:
#F8F094;
-
font-family:
"Segoe
UI",
Tahoma,
Geneva,
Verdana,
sans-serif;
-
font-weight:
bold;
-
color:
#663300;
-
width:
75px;
- }
- .buttonStyle:hover
{
- border:
thin
solid
#FFCC00;
- background-color:
#FCF9D6;
- color:
#996633;
- cursor:
pointer;
- }
- .buttonStyle:active
{
- border:
thin
solid
#99CC00;
- background-color:
#F5FFD2;
- color:
#669900;
- cursor:
pointer;
- }
- </style>
Go ahead and add the buttonStyle:hover and
buttonStyle:active blocks to your CSS. The look of the
button when you hover over it is defined in buttonStyle:hover, and the look of the button when you are
pressing it is defined in buttonStyle:active. One thing to
note is that both the hover and active cases are simply
modifications on top of the base buttonStyle class.
The buttonStyle class has 8 properties defined. Both the
hover and active pseudo-classes modify 4 of those 8
properties by giving it their own value. In a case where the
child modifies the values of properties defined by the
parent, the child always wins. The remaining 4
properties the pseudo-classes do not implement will simply
be inherited from buttonStyle itself. This is another
example of the cascading nature of style sheets at work!
After adding these lines, you can preview your
application and notice how the mouse cursor and the button's
look changes when you hover over or click it.
We are almost done. The last thing we
are going to do is figure out how to display the hello, world!
text when the button is clicked. For this, you will need to
use some JavaScript. First, just like we did for styles,
let's add the script region where our JavaScript will live.
Below your closing div tag and above your closing body
tag, add your script block:
- <body>
- <div
id="mainContent">
- <p>?</p>
- <button
class="buttonStyle">click
me</button>
- </div>
- <script>
- </script>
- </body>
Within this area, the scripts that you are going to use
will live. Like you saw mentioned earlier, what we want to do is display hello,
world! when somebody clicks on our button. Let's
divide that want into two buckets of tasks:
- Doing something when the button is clicked.
- Changing the text in our p tag when the button is
clicked.
Let's look at those two tasks in greater detail.
In order to react to some particular action, you'll need to
enter the world of events and event handlers. The event is
us clicking the button. The reaction to that click is
handled by the event handler. First, give your button an id
value. Let's call it clickButton;
- <button
id="clickButton"
class="buttonStyle">click
me</button>
Once you have given your button an id value, you can
reference it easily via code. Inside your script block, add
the following line of JavaScript:
- <script>
- var
myButton
=
document.getElementById("clickButton");
- </script>
What you are doing is using JavaScript's
getElementById
function to get a reference to your button which is declared
in markup and storing that reference in a variable called
myButton. Once you have this
reference to your button, you can listen for clicks on it
and handle it appropriately.
To listen for a click event and to react to it, add the
following lines of code directly below your myButton
declaration:
- <script>
- var
myButton
=
document.getElementById("clickButton");
- myButton.addEventListener('click',
doSomething,
false)
- function
doSomething()
{
- alert("hello,
world!");
- }
- </script>
What you are doing is listening to the click event on
myButton by using addEventListener. The addEventListener
function takes the event, the event handler name, and a
boolean true/false specifying whether you want to capture
this event or not.
Our event handler is called doSomething, and you can see
that same function name specified in our addEventListener
call. This function will get called everything time the
event you are listening for gets fired on the element you
are listening on. In English, doSomething gets called every
time you click on your button.
If you preview your application now and click on the
button, you'll see a friendly dialog that says
hello, world!:
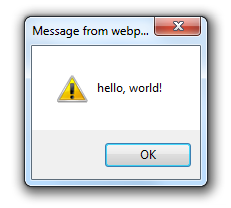
This isn't quite what we want, but at least this can act
as a good sanity check that your event and event handler
association are working. Ok, let's make the final change
where we change the text in our p tag.
First, just like what we did for the
button, we need to get a reference to our p tag in our
script. This means, giving our p tag an id value and then
calling getElementyById on it.
Let's give our p tag the id helloText:
- <p
id="helloText">?</p>
Once you have made that change in your HTML, declare the myText
variable and change the code in your doSomething
function to change our p tag's innerText instead of
displaying an alert:
- <script>
- var
myButton
=
document.getElementById("clickButton");
- var
myText
= document.getElementById("helloText");
-
myButton.addEventListener('click',
doSomething,
false)
-
function
doSomething()
{
- myText.textContent
=
"hello, world!";
- }
- </script>
As you can see, the myText variable will store a reference to the element
whose id is helloText, and as we both know, that is our p
tag. Once we have a reference to our p tag, the way you
change its value (currently a "?") is by setting a new value into its
textContent property:
- myText.textContent
=
"hello, world!";
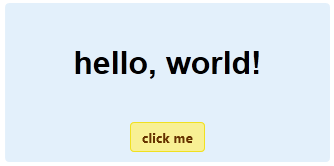
As you can see, the new value we are going to set is
"hello, world!". When you run your application this time
around and click on your button, you will see your p tag now
display what you set out to display many pages earlier:
Wow, we have
covered a lot of ground in this tutorial. The goal of this
tutorial was just to give you a quick tour of what is easily
possible using a little bit of HTML, CSS, and JavaScript. In
subsequent tutorials, we'll spend more time sightseeing and
stopping at the various points of interest as opposed to
rushing through them, so stay tuned for more guided tours.
In case you are curious or stuck, here is the final code
with everything:
- <!DOCTYPE
html>
- <html
lang="en-us">
- <head>
- <meta
charset="utf-8">
- <title>Hello...</title>
- <style
type="text/css">
- #mainContent
{
- font-family:
Arial,
Helvetica,
sans-serif;
- font-size:
xx-large;
- font-weight:
bold;
- background-color:
#E3F0FB;
- border-radius:
4px;
- padding:
10px;
- text-align:
center;
- }
- .buttonStyle
{
- border-radius:
4px;
- border:
thin
solid
#F0E020;
- padding:
5px;
- background-color:
#F8F094;
- font-family:
"Segoe UI",
Tahoma,
Geneva,
Verdana,
sans-serif;
- font-weight:
bold;
- color:
#663300;
- width:
75px;
- }
- .buttonStyle:hover
{
- border:
thin
solid
#FFCC00;
- background-color:
#FCF9D6;
- color:
#996633;
- cursor:
pointer;
- }
- .buttonStyle:active
{
- border:
thin
solid
#99CC00;
- background-color:
#F5FFD2;
- color:
#669900;
- cursor:
pointer;
- }
- </style>
- </head>
- <body>
- <div
id="mainContent">
- <p
id="helloText">?</p>
- <button
id="clickButton"
class="buttonStyle">click
me</button>
- </div>
- <script>
- var
myButton
=
document.getElementById("clickButton");
- var
myText
= document.getElementById("helloText");
- myButton.addEventListener('click',
doSomething,
false)
- function
doSomething()
{
- myText.textContent
=
"hello, world!";
- }
- </script>
- </body>
- </html>
Just a final word before we wrap up. What you've seen here is freshly baked content without added preservatives, artificial intelligence, ads, and algorithm-driven doodads. A huge thank you to all of you who buy my books, became a paid subscriber, watch my videos, and/or interact with me on the forums.
Your support keeps this site going! 😇

|


