Getting Your Feet Wet in HTML 5 - Page 2
by
kirupa | 23 March 2011
Have questions? Discuss this
HTML 5 tutorial with others on the forums.
In the
previous page, you added the HTML that defines the main
elements you will be using. In this page, let's learn to
make these elements look awesome.
As
of now, here is what your content looks like:
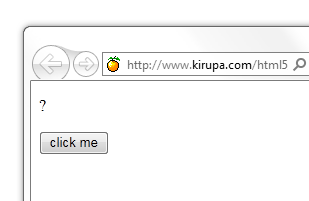
[ boring ]
Here is where we want to go:
[ want want want want want want ]
We get from boring to
want purely through styling via CSS. CSS stands
for Cascading Style Sheets, and what it provides in
a nutshell, is a way for you to modify the look and
formatting of elements in your HTML document. There are a
few more interesting details, but I will point them out once
you've started using them.
Let's first start with styling the div tag that wraps all
of your content. The way we are going to do that is by first
giving your div tag an id of mainContent so
that we can reference it via a style:
- <div
id="mainContent">
- <p>?</p>
- <button>click
me</button>
- </div>
Once you have given your div tag an id, let's add a style
that changes the background color of that div to a light
blue. Before we get there, let's first define our styles
region. In general, your styles will either live in an
external CSS file or inside the head tag. For this tutorial,
let's just stick with keeping things inside the head tag
itself.
Inside the head tag below title and above the closing
head tag, add the style tag:
- <!DOCTYPE
html>
- <html
lang="en-us">
- <head>
- <meta
charset="utf-8">
- <title>Hello...</title>
- <style
type="text/css">
- </style>
- </head>
- <body>
- <div>
- <p>?</p>
- <button>click
me</button>
- </div>
- </body>
- </html>
Great success! You have now defined a style region where
your styles will live. Now the fun begins. Inside your style
region, add the following CSS style selector
to get our div with the id mainContent to display in a blue
background:
- <style
type="text/css">
- #mainContent
{
- background-color:
#E3F0FB;
- }
- </style>
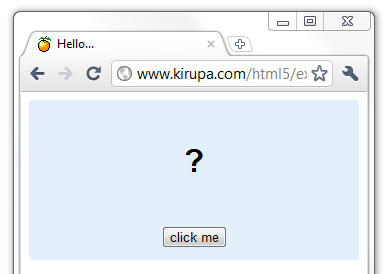
Notice that a selector is defined with a hashtag (#) at
the beginning. When you preview your document in your
browser, notice that your mainContent div displays in a
light-blue color:
The reason is that you specified the CSS background-color
property that overrides the default color with what you
specified. Because the id of the div and the id of the CSS
also match, only your div element's background was affected. Let's do some more changes such as increasing the
padding, giving a corner radius, and aligning everything to
be centered.
Add the padding,
border-radius, and
text-align properties that
correspond to those changes into your mainContent style
block:
- <style
type="text/css">
- #mainContent
{
-
background-color:
#E3F0FB;
- border-radius:
4px;
- padding:
10px;
- text-align:
center;
- }
- </style>
Don't worry if you do not know what all of these CSS
properties mean. You'll have plenty of chances in subsequent
tutorials to learn more about them.
If you preview your changes now, you will see that your
application is starting to slowly lose its default look and
feel...and we haven't even moved beyond our div yet:
[ this gets just one want ]
Next up we are going to change how our text inside our p
tag looks like. You may think that we will now add some CSS
properties that affect the p tag directly like we did for
the div, but that's not what we are going to do. We are
going to define these properties in our mainContent selector itself and let the cascading nature of CSS
automatically propagate those changes down to the child
elements such as our p tag.
Modify the mainContent style block by adding the
following three lines:
- #mainContent
{
- font-family:
Arial,
Helvetica,
sans-serif;
- font-size:
xx-large;
- font-weight:
bold;
-
background-color:
#E3F0FB;
-
border-radius:
4px;
-
padding:
10px;
-
text-align:
center;
- }
- </style>
Despite you adding these lines to your mainContent style block
that only affects your mainContent div, notice what you see
in your browser:
[ the text-oriented styles got applied to our p tag as well
]
The p tag that once displayed in some tiny text is now
more noticeable thanks to the font-family, font-size, and
font-weight properties that you added.
Now
that our div and, indirectly, our p tag look sufficiently
styled, let's cast our attention to the button. For the
button, instead of going with an id selector like what we
did with the mainContent div, let's create a CSS class
instead.
In case you were curious...
The difference between a CSS selector and a class is that
you can use a selector only on one element. A class can be
reused many times.
Inside your style block below your #mainContent block,
add the buttonStyle class (notice the period before the name
in the markup):
- <style
type="text/css">
- #mainContent
{
-
font-family:
Arial,
Helvetica,
sans-serif;
-
font-size:
xx-large;
-
font-weight:
bold;
-
background-color:
#E3F0FB;
-
border-radius:
4px;
-
padding:
10px;
-
text-align:
center;
- }
- .buttonStyle
{
- border-radius:
4px;
- border:
thin
solid
#F0E020;
- padding:
5px;
- background-color:
#F8F094;
- font-family:
"Segoe UI",
Tahoma,
Geneva,
Verdana,
sans-serif;
- font-weight:
bold;
- color:
#663300;
- width:
75px;
- }
- </style>
I am not going to go into detail on what the individual
style properties do, but the goal of this set of style changes was
to make the button look a little more hip and modern.
Right now, you have a CSS class called buttonStyle
defined. To apply that CSS class to an element, you need to
modify that element's markup to reference it. In our case,
the element is our button, so go to your button tag and add the class
attribute with the value buttonStyle:
- <button
class="buttonStyle">click
me</button>
Once you have done this, preview your current document in
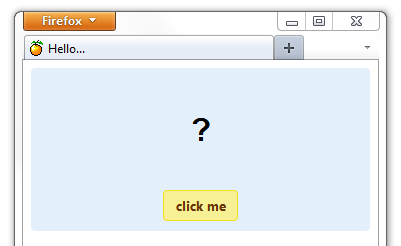
your browser and notice how your button looks:
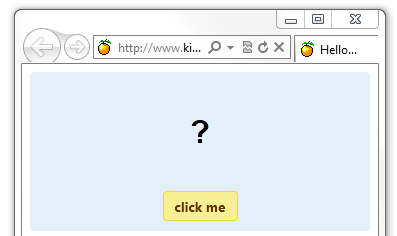
[ want want want want ]
The buttonStyle has now been applied! Your example is now
starting to look more and more like the example you saw
presented earlier. There is still some more work left
though. Your example doesn't do anything when you interact
with it.
Onwards to the
next page!
|


