|
by
kirupa | 10 August 2008
In the previous
page, you created the simple application that uses the Tween class to
animate a circle. We were in the process of learning why the code works the way
it does, so let's pick up where we left off and continue our coverage of the
code.
- var
xMovement:Tween;
- var
yMovement:Tween;
In these two lines, I am declaring two variables called
xMovement and yMovement who are both of type Tween. As you
will see very soon, the Tween class plays a crucial role in
creating the animation that you see when the circle follows
the location of your mouse click.
- function
moveToClick(event:MouseEvent):void
{
-
- xMovement
=
new Tween(tweenMC,
"x",
Back.easeIn,
tweenMC.x,
mouseX,
1,
true);
- yMovement
=
new
Tween(tweenMC,
"y",
Back.easeIn,
tweenMC.y,
mouseY,
1,
true);
- }
In this line, we initialize the xMovement variable you
declared earlier and set it equal to a new Tween object
whose constructor takes in a whopping seven arguments. Don't
let the quantity of them scare you though. They actually map
really well to what you already know when tweening using the
timeline.
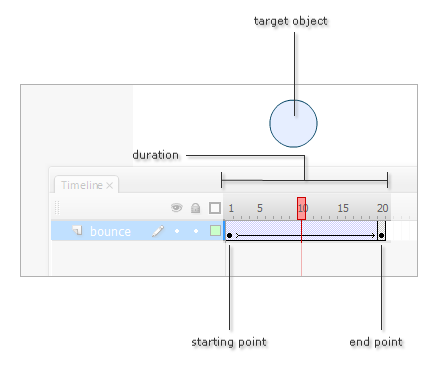
To help us out, let's look at the following diagram that
labels some of the key points you interacted with or noticed
when animating using the timeline:
The Tween class's constructor takes the following
arguments:
- Target Object
The instance name
of the movie clip that you are interested in animating.
- Target Property
The actual
property of your target object that will be animated.
- Easing Function
The type of
easing you want to employ while your animation is in
progress.
- Start Value
What your target
property's value will be at the starting point.
- End Value
What your target
property's value will be at the end point.
- Duration
How long or how many
frames your animation will run for.
- Measure Duration in Seconds?
Specify whether you want duration to be measured in
terms of seconds or individual frames.
You can see all of the above in use in the initialization
of our xMovement object:
- xMovement
= new
Tween(tweenMC,
"x",
Back.easeIn,
tweenMC.x,
mouseX,
1,
true);
The target object is tweenMC,
the target property is x,
the easing function is
Back.easeIn, start value is
tweenMC.x, end value is
mouseX, duration is
1, and the duration is
measured in seconds (true).
To look at this in a different way, you are animating
your tweenMC movie clip's x property from its current x
position to the x position of your mouse click. Your
animation will end in 1 second, and there is a slight easing
in effect where you lean back before getting to your final
destination.
- yMovement
=
new Tween(tweenMC,
"y",
Back.easeIn,
tweenMC.y,
mouseY,
1,
true);
Our code for the yMovement is almost identical as our
code for xMovement. The only major change is related to
animating the y property instead of the x property that you
saw earlier and altering our starting and ending values to
take the y position of our movie clip and click location
into account.
One of
the arguments you passed in to your Tween constructor is an
easing function. The one that your code uses is
Back.easeIn. I am not
going to discuss easing in detail in this tutorial, but if
you look in your fl.motion.easing
package, you can see all of the various easing classes you
can use: Back, Bounce,
Circular, Cubic,
Elastic, Exponential,
Linear, Quadratic,
Quartic, Quintic,
and Sine.
Each of these easing classes provides you with three
easing function that you can use, and they are
easeIn, easeInOut,
and easeOut. While these functions
can be tweaked by passing in four more arguments, I'm sure
you're probably tired of arguments by now! You can just do
what I did and link an easing class with an easing function
and ignore the arguments for now.
Examples of such links include
Back.easeIn,
Bounce.easeOut,
Elastic.easeInOut, and
thirty more such combinations.
All right!
You are done with this tutorial. Hopefully this helped you
get a better idea of how to use the Tween class to create
animations using code. One of my goals with this tutorial is
to show you the similarities that exist when creating an
animation using code and the timeline.
You are not using any new concepts in either scenario.
You are mapping what you already know about animations and
using drag/drop gestures on the timeline and English-like
words in code. The end result is something very similar!
To see how my example was created, feel free to download
the final source from the following location:
Just a final word before we wrap up. What you've seen here is freshly baked content without added preservatives, artificial intelligence, ads, and algorithm-driven doodads. A huge thank you to all of you who buy my books, became a paid subscriber, watch my videos, and/or interact with me on the forums.
Your support keeps this site going! 😇

|


