by kirupa |
29
April 2007
The Library in Flash acts as a repository where all of
your custom graphics, buttons, movie clips, external
content, etc. is stored. From the Design view, accessing
elements from the Library is very easy. You just drag and
drop what you want onto your stage. In many situations,
though, you
may be required to use code to display your library items on
an as-needed basis. This tutorial covers just that scenario
where Library content is displayed on your stage, and you'll
learn how using Flash CS3's
ActionScript 3 language.
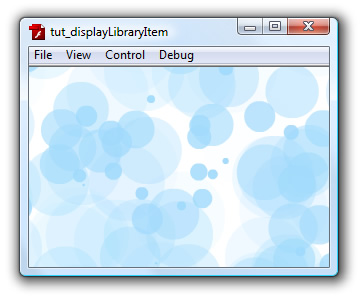
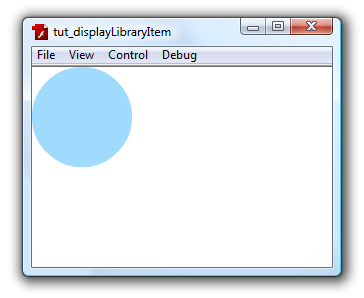
At the end of the tutorial, you will have created
something that looks similar to the following image where
the various circles were displayed on the stage using
nothing but code:
If you are coming from an AS 2.0 or earlier background,
one of the major changes in ActionScript (AS) 3 is that the
attachMovie function is no longer supported. In the past, if
you had Library content that you wanted to display on your
stage, you would call the attachMovie function, pass in the
Linkage name of your library item, add a few more pieces of
data, and your content would be displayed on your screen. In
AS3 there are some similarities to that approach, but there
are some differences also.
- First, create a new animation in Flash CS3. From the
Properties panel, click the button next to the Size text
and set the animation's width and height
to 300 pixels by 200 pixels respectively:
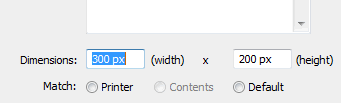
[ set your
animation's width/height to 300 by 200 ]
- Now that our stage's width and height have
been setup just the way
we want, let's draw a circle. Using the Circle tool,
draw a circle with a blue solid-fill color:
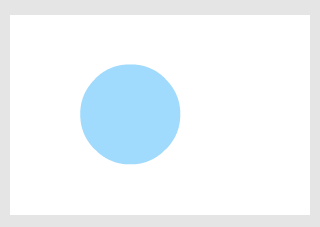
[ draw a blue, solid, filled circle ]
- Make sure your circle has been selected
and press F8 or go to Modify | Convert to Symbol. The
Convert to Symbol window will appear. For name, enter
circle and make sure the Movie Clip
option has been selected:
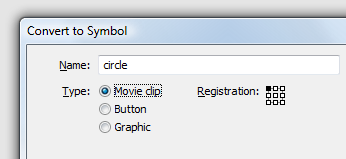
[ give your symbol the name circle and
make sure it is also set to be a movie clip ]
Do not hit OK just yet. Let's make some
more modifications.
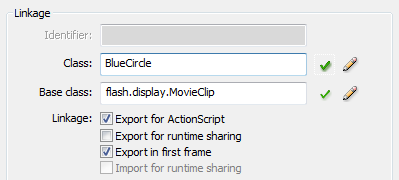
- From the same Convert to Symbol window,
find the area marked Linkage. If you do not see the
Linkage area, press the Advanced button to display it.
Check the box that says Export for Actionscript.
A few lines above that, in the Class field, replace
whatever text is displayed (probably circle) with the
text BlueCircle:
[ check 'Export for ActionScript and
enter BlueCircle for your class ]
The Base class field will automatically be
populated for you, but if it hasn't, make sure to enter
flash.display.MovieClip as
shown in the above image.
- Press OK to close the Convert to Symbol
window. After you have pressed OK, you will see your
Library display your newly created symbol:

[ your circle in your Library ]
If you do not see your Library, press Ctrl
+ L to display it.
- At this point, your circle movie clip is
stored in the Library, and you have a copy of that same
clip on your stage right now. Select the blue circle
movie clip located on your stage and delete it by pressing the
Delete key. You should now have a blank stage with
nothing in it.
- Let's add some code. Right click on the first frame
in your timeline and select Actions. The Actions window
will appear, and in this window, copy and paste the
following code:
- function
Main()
{
- this.addChild(new
BlueCircle());
- }
- Main();
- Once you have pasted the above code into
your Actions window, press Ctrl + Enter to preview your
animation in the Flash Player. You should see something
similar to the following:
[ your circle displayed on the top-left
corner ]
Technically, that is really all there is to taking
content from your Library and displaying it on your stage.
There are actually a lot more things that can be done, so in
the
next page I will go through and provide
some new tips as well as code explanations.
Onwards to the
next page!
|


