|
by
kirupa | 10 February 2008
In the
previous page, you got an introduction to
this tutorial and setup your application by
inserting an InkCanvas control. In this page, let's
start to look the various ink-specific modifications you can
make to your application.
Many of the modifications you will
make need to be done via code where
you change your ink canvas's properties while your
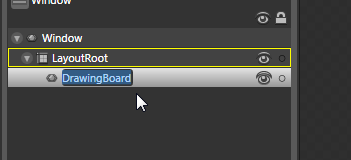
application is running. Go back to Blend, go to your
Objects and Timeline panel, right
click your InkCanvas control, select Rename from the
context menu, and
give your control the name DrawingBoard:
[ give your InkCanvas control the name DrawingBoard
]
Ok - that's all you need to on the Blend side of
things. Giving your ink canvas a name allows you to
easily reference it from code. The rest of this
tutorial will provide you with code snippets to help
you in take the default functionality further.
The next, and probably more
important, part of using an ink canvas is modifying
its various properties. The following sections
outline common modifications you would want to make
and the code needed to make them.
For all of the code I provide, copy and paste it after your
InitializeComponent
call in your code-behind file. You should be using
Visual Studio 2008 / C# Express for all of the
coding work.
When you are drawing, you are
assigned a default size for your pen strokes. In
fact, default choices are made for you without any
extra work on your part. Despite what it may seem
like, that isn't a bad thing. Those default values are
stored in what is known as
DrawingAttributes.
Modifying the DrawingAttributes allows you to change
the various properties of what you are drawing, and
your stroke size is one such property.
The following is the code for changing your
stroke size:
- DrawingAttributes
inkAttributes
=
new
DrawingAttributes();
-
- inkAttributes.Height
=
10;
- inkAttributes.Width
=
10;
-
- DrawingBoard.DefaultDrawingAttributes
=
inkAttributes;
If you paste the above code in your application,
notice that when you draw, your strokes are much
wider than what they were before:
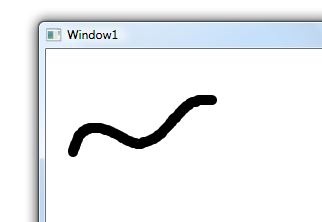
[ your strokes now take on a width and height of 10
]
The code is also very straightforward. I create a
new DrawingAttributes object called inkAttributes,
and I change its Height and Width property to the
size I want my stroke to be:
- inkAttributes.Height
=
10;
- inkAttributes.Width
=
10;
The final step with any modification of your
drawing attributes is to overwrite your ink canvas's
existing drawing attributes:
- DrawingBoard.DefaultDrawingAttributes
=
inkAttributes;
As you will see, many of your ink canvas
customizations follow a similar pattern where you
modify a new drawing attributes object and overwrite
your existing drawing attributes with the new one.
The default color is black. While
black is the new blue,
there are numerous cases where you would want to
actually modify the color of your stokes. The
following code snippet shows you how to do that:
- DrawingAttributes
inkAttributes
=
new
DrawingAttributes();
-
- inkAttributes.Color
=
Colors.Crimson;
-
- DrawingBoard.DefaultDrawingAttributes
=
inkAttributes;
Notice that the first and third lines are just
the same as what you saw before, but in the middle
line, the Color
property of your inkAttributes DrawingAttributes
object allows you to change your stroke color:
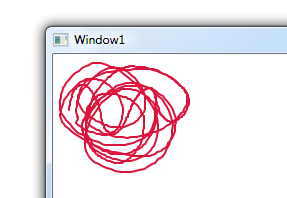
[ such beautiful red-colored art! ]
In the above code, I used the Colors class to
choose from a large collection of pre-defined
colors. If you want to use colors that aren't
predefined, such as your own hex value, you can do
that also:
- inkAttributes.Color
=
(Color)
ColorConverter.ConvertFromString("#00CC99");
I am using the
ColorConverter class's
ConvertFromString
method to take my RGB hex values into an actual form
that can be typecast into a Color. The
ConvertFromString method also takes the longer
ARGB values [
see my blog post on ARGB ] along with some predefined names for
the colors such as Blue, Red, Cyan, etc.
There are more
customizations to cover, so let's continue on the
next page!
Onwards to the
next page!
|


