|
by
kirupa | 18 November 2009
In the
previous page, you got your application
working to a point where resizing your browser
window would cause all of your rectangles to wrap
around and require the scrollbar to see rectangles
that may not immediately be in view. In this page,
let's make that more fun by adding the FluidMove
behavior.
Let's go ahead and add this
mysterious behavior. Display your Asset Library. You
can do that by either clicking on the Assets tab or
clicking on the Asset Library button. The Asset
Library contains a series of categories, and from
these categories, select the
one labeled behaviors:
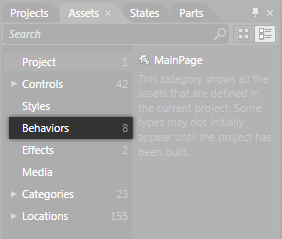
[ select the Behaviors category from the Asset
Library ]
When you select the Behaviors category, the
FluidMoveBehavior is something that you will see.
Drag and drop that behavior onto your WrapPanel -
the panel that currently is the parent of all of
your rectangles. It may be difficult to drop the
behavior on your WrapPanel using just the artboard, so feel free to use the
object tree if you prefer:
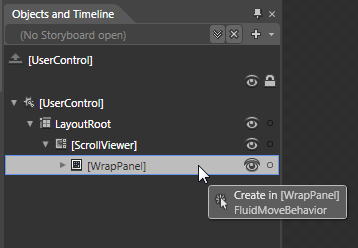
[ the object tree provides another accessible way to
add a behavior ]
Once you have dropped the behavior onto your
WrapPanel, you are set...sort of. We have to make
some minor changes to make it useful for the scenario we
are interested in.
By default,
the FluidMove behavior requires a small amount of
prodding and tweaking to have it work.
Of course, prodding and tweaking is part of the fun
when it comes to working with behaviors that deal
with animation, so first make sure your FluidMove behavior is
selected. With your behavior selected, take a look at the Properties
Inspector:

[ the FluidMove behavior's properties are now
visible ]
Change the AppliesTo property from Self to
Children by clicking on the drop-down and
selecting the Children item. Once you have made that
change, hit F5 to test your application. You
may notice that all of your rectangles kind of
wiggle their way into place, but see what happens
when you resize your browser window. The rectangles
now animate into position!
Now that we are up and running, let's make some
more changes. First of all, the default duration of
1 second is simply too long. The transition needs to
occur quicker, so for the Duration field, enter
00:00:00.2000000.
This ensures your transition completes in .2
seconds.
If you are in Silverlight, you have the EaseX and
EaseY properties as well where you can specify the
easing that gets applied to the transition. For both EaseX and EaseY, select Cubic In.
Your FluidMove behavior properties will now look as
follows:
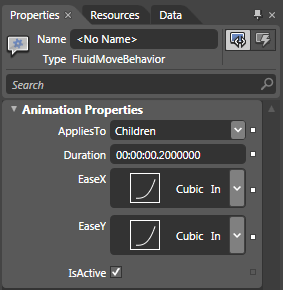
[ the EaseX and EaseY properties control the
transition ]
Once you have done this, preview your application
again. Notice that the rectangles now animate in to
their new positions more quickly with some
acceleration thanks to the Cubic easing function you
specified.
All right, you are almost done. Let's look at
few more examples example where FluidMove comes in handy
before calling it a day.
Onwards to the
next page!
|


