|
by
kirupa | 17 October 2009
In the
previous page,
you converted your circle into a UserControl and
made sure its parent layout container was a Canvas.
All of that is just the preparation for what we are
about to do here. Read on!
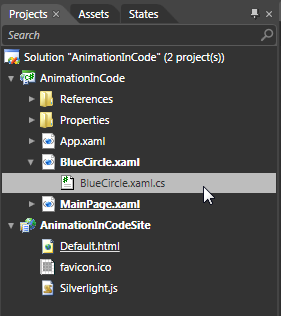
The next step is to add some code to make your
circle actually move. From your Projects panel,
expand BlueCircle.xaml by clicking on the tiny arrow
found left of it and open BlueCircle.xaml.cs that
appears nested directly under it by double-clicking
on it:
[ open BlueCircle.xaml.cs ]
When you double-click
the BlueCircle.xaml.cs file, Blend will open that
file in its code-editor where you can write and edit
code using a lot of the cool functionality that you
would expect from a code-editing environment.
If I ignore the using
statements and namespace declaration, the code that
you see currently will look as follows:
- public
partial
class
BlueCircle
:
UserControl
- {
- public
BlueCircle()
- {
- // Required to
initialize variables
-
InitializeComponent();
- }
- }
What you are going to do next is copy and paste
some code. Copy the following code and paste it
directly over the entire chunk of code defined in
the
public BlueCircle()
block:
- private
static
Random
randomMain
=
new
Random();
-
- private
double
angle;
- private
double
speed;
-
- private
double
xPos;
- private
double
yPos;
-
- public
BlueCircle()
- {
- // Required to
initialize variables
-
InitializeComponent();
-
- this.Loaded
+=
new
RoutedEventHandler(CircleLoaded);
- }
-
- void
CircleLoaded(object
sender,
RoutedEventArgs
e)
- {
- xPos
=
Canvas.GetLeft(this);
- yPos
=
Canvas.GetTop(this);
-
- speed
= .01
+
randomMain.NextDouble();
-
- if
(DesignerProperties.GetIsInDesignMode(this)
==
false)
- {
-
CompositionTarget.Rendering
+=
new
EventHandler(AnimateCircle);
- }
- }
-
- void
AnimateCircle(object
sender,
EventArgs
e)
- {
- angle
+=
speed/10;
-
- Canvas.SetTop(this,
yPos
+
50
*
Math.Sin(angle));
- Canvas.SetLeft(this,
xPos
+
50
*
Math.Cos(angle));
-
- if
(angle
>=
2
*
Math.PI)
- {
- angle
=
0;
- }
- }
After you have pasted that code, there is one
more copy/paste action that you need to do. In the
list of using statements you see at the top of your
code file, paste the following directly below
using System.Windows.Shapes:
- using
System.ComponentModel;
Once your code has been pasted in, your
BlueCircle.xaml.cs file will basically look as
follows:
-
using
System;
-
using
System.Windows;
-
using
System.Windows.Controls;
-
using
System.Windows.Documents;
-
using
System.Windows.Ink;
-
using
System.Windows.Input;
-
using
System.Windows.Media;
-
using
System.Windows.Media.Animation;
-
using
System.Windows.Shapes;
- using
System.ComponentModel;
-
-
namespace
<YourProjectName>
-
{
-
public
partial
class
BlueCircle
:
UserControl
-
{
- private
static
Random
randomMain
=
new
Random();
-
- private
double
angle;
- private
double
speed;
-
- private
double
xPos;
- private
double
yPos;
-
- public
BlueCircle()
- {
- //
Required to initialize variables
-
InitializeComponent();
-
- this.Loaded
+=
new
RoutedEventHandler(CircleLoaded);
- }
-
- void
CircleLoaded(object
sender,
RoutedEventArgs
e)
- {
- xPos
=
Canvas.GetLeft(this);
- yPos
=
Canvas.GetTop(this);
-
- speed
= .01
+
randomMain.NextDouble();
-
- if
(DesignerProperties.GetIsInDesignMode(this)
==
false)
- {
-
CompositionTarget.Rendering
+=
new
EventHandler(AnimateCircle);
- }
- }
-
- void
AnimateCircle(object
sender,
EventArgs
e)
- {
- angle
+=
speed/10;
-
- Canvas.SetTop(this,
yPos
+
50
*
Math.Sin(angle));
- Canvas.SetLeft(this,
xPos
+
50
*
Math.Cos(angle));
-
- if
(angle
>=
2
*
Math.PI)
- {
- angle
=
0;
- }
- }
-
}
-
}
It is time to test it out and see how it works.
Press F5 (or Project | Run) to load your browser
and load your application. If everything went well,
you will see your circle slowly moving!
Now that you have a working project, let's next
look at why the code works the way it does in
greater detail on the
next page.
Onwards to the
next page!
|