|
by kirupa |
20 June 2007
In the
previous page,
you learned how to add some nested elements. The next and
final piece is adding attributes. Let's look at how to do
that.
Attributes are extra information added to a node element
itself. To add attribute information, copy and paste the
following lines of code after your bookElement.AppendChild(authorElement)
line:
- XmlAttribute
bookAttribute
=
xmlDoc.CreateAttribute("ISBN");
- bookElement.SetAttributeNode(bookAttribute);
- bookElement.SetAttribute("ISBN",
"0553212419");
There are several steps needed to specify an attribute to
a node, so let's take a look at those steps in detail.
You first need to create the attribute and specify what it
will be called, and we do that in our first line of code:
- XmlAttribute
bookAttribute
=
xmlDoc.CreateAttribute("ISBN");
In the above line, we create a new
XmlAttribute object
and use our XmlDocument object's
CreateAttribute method to
create our ISBN attribute.
Once you have created an attribute, you need to specify
which element will be using this attribute. We want our
bookElement object, which references the node/element called
Book, to store the ISBN information, so we can use our
bookElement's SetAttributeNode value to bind our
bookAttribute to our element:
- bookElement.SetAttributeNode(bookAttribute);
We have bound our attribute to an element, but we actually
haven't specified what value our attribute will have. The
attribute's name will be ISBN, but the name must refer to a
value. We can use our bookAttribute's
Value property to
specify our ISBN number:
- bookAttribute.Value
=
"0553212419";
Once you have set your attribute's value, you are set! If
you run your application and examine the XML file, you will
see that our first book is complete:
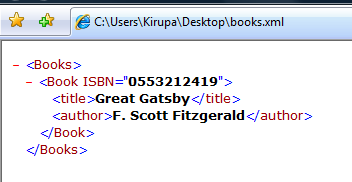
[ we have finished everything for one Book node ]
All of our code inside the Main method should now look
like the following (with my added comments):
- static
void
Main(string[] args)
- {
- XmlDocument
xmlDoc
=
new XmlDocument();
-
- //Adding the parent
<Books> Element
- XmlElement
booksElement
=
xmlDoc.CreateElement("Books");
-
- //Adding the <Book>
Element
- XmlElement
bookElement
=
xmlDoc.CreateElement("Book");
- booksElement.AppendChild(bookElement);
-
- // Adding <title> and
Setting Value
- XmlElement
titleElement
=
xmlDoc.CreateElement("title");
- titleElement.InnerText
=
"Great Gatsby";
- bookElement.AppendChild(titleElement);
-
- // Adding <author> and
Setting Value
- XmlElement
authorElement
=
xmlDoc.CreateElement("author");
- authorElement.InnerText
=
"F. Scott Fitzgerald";
- bookElement.AppendChild(authorElement);
-
- // Creating Attribute and
assigning it to <Book>
- XmlAttribute
bookAttribute
=
xmlDoc.CreateAttribute("ISBN");
- bookElement.SetAttributeNode(bookAttribute);
- bookAttribute.Value
=
"0553212419";
-
- // Adding root element and
saving file to disk
- xmlDoc.AppendChild(booksElement);
- xmlDoc.Save(@"C:\Users\Kirupa\Desktop\books.xml");
- }
Technically, you are done, but if you remember our
original XML file, we had four books that we wanted to write
to our XML file. You could continue and add more lines of
code such as duplicating a few more times the code you
already have. While you could do that, that is (and even
sounds!) tedious and unnecessary.
In the next page, I will provide a basic solution that
uses methods to allow you to reuse code.
Onwards to the
next page!
|


