|
by kirupa |
20 June 2007
In the
previous page,
you learned the basic steps required to write an XML file to
disk. To review, you need to create an
XmlDocument object, create an
element to store some information, add that element to
our XmlDocument object, and save the data from our
XmlDocument to disk. All of this has only taken us four
lines of code:
- static
void
Main(string[]
args)
- {
- XmlDocument
xmlDoc
=
new XmlDocument();
-
- XmlElement
booksElement
=
xmlDoc.CreateElement("Books");
-
- xmlDoc.AppendChild(booksElement);
- xmlDoc.Save(@"C:\Users\Kirupa\Desktop\books.xml");
- }
You are not finished with this tutorial yet, though! Right now we have only added our root element Books to
our XML file. Let's populate our XML file with more data,
and the following sections will help you to do just that.
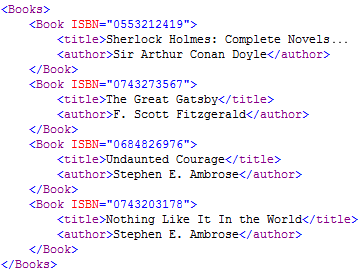
Nested elements are, as the name implies, children of other
elements. What we want is for our saved XML data to look like the following image you saw on the previous
page:
Right now, we only have the Books part of the above
document finished. Let's add our first book. Adding a nested
element is exactly the same as adding any other element as
you'll see. Add
the following two lines of code directly after
your booksElement declaration:
- XmlElement
bookElement
=
xmlDoc.CreateElement("Book");
- booksElement.AppendChild(bookElement);
In the first line, you are creating a new
XmlElement
object called bookElement with the element name Book. In the
next line, notice that you are adding your bookElement
element as a child of booksElement. Earlier, you used
AppendChild from your XmlDocument object, but this time, you
are using AppendChild from your
booksElement XmlElement instead.
If you run your application again by pressing F5 and
looking at the XML file generated, you will see the
following:

[ our Book node has now been added to our XML file ]
Our XML file is slowly starting to take shape. Let's
populate our Book element with the title and author
elements. Add the following lines of code directly after
your booksElement.AppendChild(bookElement)
line:
- XmlElement
titleElement
=
xmlDoc.CreateElement("title");
- titleElement.InnerText
=
"Great Gatsby";
- bookElement.AppendChild(titleElement);
-
- XmlElement
authorElement
=
xmlDoc.CreateElement("author");
- authorElement.InnerText
= "F.
Scott Fitzgerald";
- bookElement.AppendChild(authorElement);
The first lines of both sections should be familiar to
you by now. You are creating an XmlElement with a given name
that will be displayed in the XML file. In the code above,
your titleElement and
authorElement are
responsible for storing the title
and author elements
respectively.
We have just named our elements, but these elements also
need to store some data. To specify the data, you use your
XmlElement object's InnerText property. Notice that the
InnerText property, as its name implies, only accepts text values
in the form of strings.
The final, third line is where you append the information
to a parent element. Because we want the title and author
elements to be children of our Book element, we use our
bookElement's
AppendChild method.
All of your code right now should look like the
following:
- static
void
Main(string[]
args)
- {
- XmlDocument
xmlDoc
=
new XmlDocument();
-
- XmlElement
booksElement
=
xmlDoc.CreateElement("Books");
-
- XmlElement
bookElement
=
xmlDoc.CreateElement("Book");
- booksElement.AppendChild(bookElement);
-
- XmlElement
titleElement
=
xmlDoc.CreateElement("title");
- titleElement.InnerText
=
"Great Gatsby";
- bookElement.AppendChild(titleElement);
-
- XmlElement
authorElement
=
xmlDoc.CreateElement("author");
- authorElement.InnerText
=
"F. Scott Fitzgerald";
- bookElement.AppendChild(authorElement);
-
- xmlDoc.AppendChild(booksElement);
- xmlDoc.Save(@"C:\Users\Kirupa\Desktop\books.xml");
- }
If you run your
application and look at your XML file again, you will now
see the following:
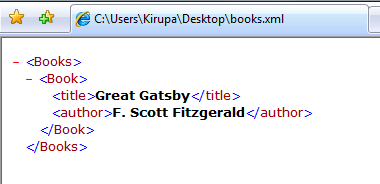
[ our Book node is almost complete with our title and author
information ]
You should now see both the nodes for title and author,
and we are
almost done with our first book. I mention almost, because we
still need to
add the missing ISBN attribute information. Let's look at
how to do that on the
next page.
Onwards to the
next page!
|


