 Using
DreamWeaver
by Sam Bourim aka RussianBeer
This is a continuation of the tutorial from
the previous page. If you stumbled upon this page without
having finished the first page, please click
here. To view the second page click
here.
Part IV
This section will deal with CSS styles, colors, and other
fun things. The instructions follow:
-
Right click anywhere in the table, and select table>select
table.
-
In the Properties panel set Brdr Color
(Border Color) to white, Border to 1 and
Align to Center:

[ what
should be in your table property panel ]
-
You may make any other modifications
to make your table look better. If you can make your
property panel look like the above image, all is well!
Part V
Now, onwards to the interesting stuff! We have so far had a
pretty good start, and now we will create the main text
field. We will use CSS, or Cascading Style Sheets to add
some nifty formatting. CSS gives you more control to display
cool effects to your users than HTML; it also simplifies a
lot of work. I wont go much in to detail on them, but if you
are interested in learning about CSS, the following URL may
help you out:
http://www.w3schools.com/css/default.asp
Let's use a bit of CSS:
-
In the Design Panel that should be on your top right, click
the little button on the bottom to add a New Style Sheet.

[ the New Style Sheet button ]
-
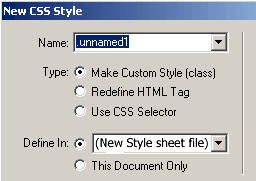
Then a window will appear. In that window under name type,
type textfield. For Type enter 'Make custom style'
and for Define select New Style Sheet File.

[ the New CSS Style dialog box
]
-
Once you have entered everything and press OK, you will be
prompted to save the Style Sheet. Save the style as
textfield.css.
-
If all goes as planned, the Definition field will appear;
here we will define our style sheet.
-
We start in the Type category. Under font, select Arial,
Sans serif. The Size should be 12 pixels, and the Style
normal.
-
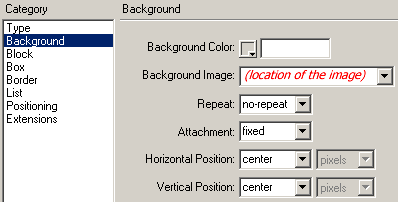
Then in the category on the left, click Background. In
background image, select the pre-made image called,
backgroundimg.gif. DreamWeaver may ask you to copy the image
to the folder where you are creating the site, click okay,
and copy it there.
-
Now apply all the info as posted in the following image
(except background image location):

[ ensure you apply the info
displayed in the above image ]
-
From the same window, select Block, in the Category section.
Under Word Spacing enter: normal, and under Text
indent, enter: 10 points.
-
Now lets apply to style sheet and see what you have done. Go
to layout view (as stated earlier in the tutorial) and
select now the bottom cell. With it selected click back to
regular view.
Now you should have the bottom cell selected, in the
property inspector hit the CSS/HTML toggle button:

[ press the CSS/HTML toggle
button ]
-
Right beside the CSS/HTML toggle button, where it says No
CSS Style, select the textfield CSS you created previously!
Your site should look like the following
image:

Neat huh? As you can see, the Style
Sheet, set the background, and also put an indent in the
cell, so the text doesn’t start right on the edge…
There are more parts to this tutorial, and
they will appear shortly so keep on the lookout for more
tutorials by RussianBeer!
Regards,
|