 Using
DreamWeaver
Using
DreamWeaver
by Sam Bourim aka RussianBeer
This is a continuation of the tutorial from
the previous page. If you stumbled upon this page without
having finished the first page, please click
here.
Okay now with the fun stuff:
-
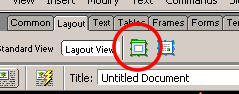
On your Toolbar click the Layout tab.
-
Then click Layout View button.
-
Now click the Draw Layout Table button, and draw out a
table, of just about any proportion, it doesn’t really
matter:
[ the draw
layout table button ]
-
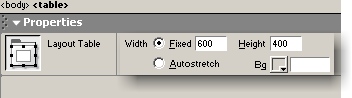
Then at the bottom of the screen in the Property panel
find Width and Height and enter 600 for width and
400 for height:
[ the
property panel for your table ]
Now, with the table drawn, we can add places
we will type and add a navigation bar and so on, first it’s
a good idea to make space for them that way nothing will get
in each other’s way. Another thing to realize is that most
of the pages will be closely the same, so there is no point
in creating everything all over again for each page so we
will create a template. If your lost so far, don’t worry I
will explain later.
Continuing on:
-
Now select the rectangle you just created, and again in
the Properties Panel enter Width: 600 and Height:
50
-
Now create in the same fashion another rectangle, right
below the first on, again using the Draw Layout Cell
button.
-
With that done, select the rectangle you just created, and
again in the Properties Panel enter Width: 600 and
Height: 22.
-
And finally create another rectangle, but so it fits the
rest of the Layout table, and then save your work! Save it
as Rainbow.htm (File | Save).
So far your work should look something
like the following image:
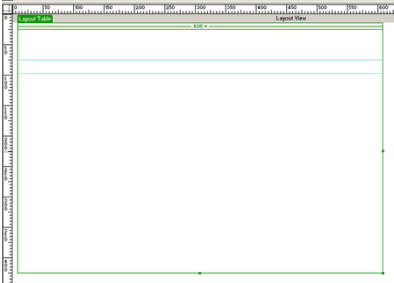
[ your table layout: zoomed
out in this graphic ]
Part III
With your layout looking somewhat similar to the above
graphic, I guess it is safe to continue:
-
Now in your Layout Tab, in your Toolbar,
click Standard View. It is time to add some buttons
for the navigational bar!
-
Click the middle cell of your table (the thin one you made
earlier), and then click Insert | Interactive Images |
Flash Button.
-
In the Button Text, text field enter Weapons, And in the
link text field enter weapons.htm. Finally, select the
Beveled Rect-Blue button and click “OK”

[ the Insert
Flash Button dialog box ]
There you should have inserted in the
middle frame a Flash button, the link does not work yet,
but we will fix this in a later time.
-
Repeat the process for Tactics, Team,
Equipment and Contact buttons,
Making sure the text for each is different though. For
example, the next button will have Tactics in the
button text field, and tactics.htm as the link.
-
You should end up with something looking like this, and
the order is not important:
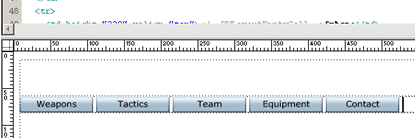
[ how your
buttons should look ]
-
Select all the buttons, either by dragging over the
buttons, like you would select a text, or by clicking each
one while holding shift.
-
Now if you look down, in the Property Inspector,
under cell, you can see there is part where its written
Horz. and the Default is selected, click
it, and select Center:
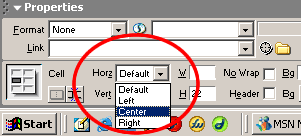
[ select
Center ]
Now all your buttons should have shifted, and aligned in
the middle.
-
Click on the top Cell, in your table. Then select Insert |
Image and locate title.gif that I pre-made, or you can
yourself create a title, just as long as the final product
is only 600x50 pixels.
DreamWeaver might prompt you to see if you want the image
copied to where the web page is, click okay, and save it.
We are almost done, but not quite! The
next page will go into further details
that involve images, colors, and styles!
|


