|
by kirupa |
2 June 2007
In the
previous page, you finished adding your Label control,
and more importantly, you received a brief introduction on
animations in WPF. Let's put what you learned into practice
by animating the text you placed in your Label control.
The following instructions will explain how to use Blend's
animation features to animate your text:
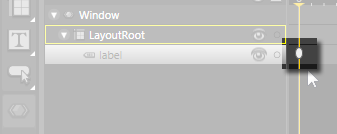
- Animations are dependent on timelines, so what we
need to do is first create a timeline. From your Objects
and Timeline panel, click the + button to add a new
Timeline:
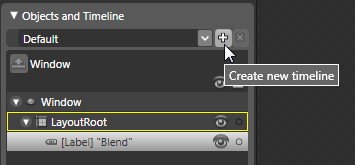
[ press the + button to create a new timeline ]
- Once you clicked the + button, the Create
Storyboard Resource window will appear. Change the
Resource name (Key)
value to TextAnimation and press OK:
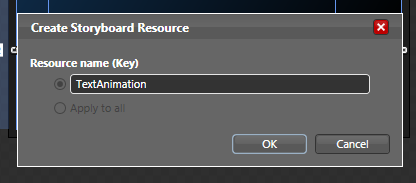
[ give your Storyboard the name TextAnimation ]
- After you clicked OK, the Create
Storyboard Resource window will disappear, and your
Objects and Timeline panel will change to display a
timeline, and you will find yourself in the Recording
mode.
The recording mode is where you get to create and edit
animations. You'll see that you are in the recording
mode by seeing the red border surrounding your Artboard
with the header of your Artboard indicating that
Timeline recording is on:
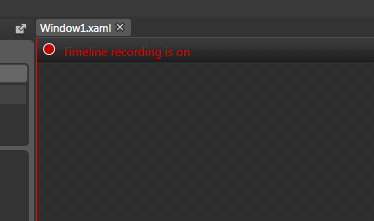
[ the Timeline recording indicator ]
More importantly, you will see a timeline appear in your
Objects and Timeline panel:

[ your Objects and Timeline panel now display a timeline ]
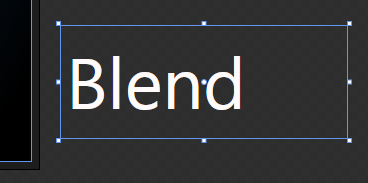
The timeline is where you specify the
starting and ending points of your animation. If it hasn't
already been done, select your text label to select it. When
selected, you'll see it highlighted in gray as shown in the
above image.
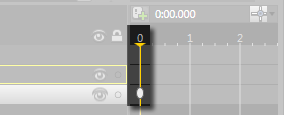
With your label now selected, click on the Record Keyframe
button to insert a keyframe at time 0:
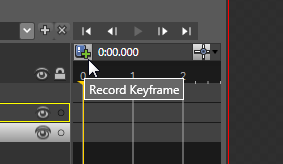
[ the Record keyframe button adds a marker at the specified
time ]
After you clicked on Record Keyframe, you
will see a keyframe marker displayed next to your label
object in the tree:
[ the keyframe marker is now displayed in your timeline ]
- For our animation, we want our text to
scroll in from right to left. Select your Label control
(the one with the Blend text) in the Artboard, and use
your right arrow key (or Shift + right arrow key to move
faster) to move it beyond the right edge of your Window:
[ move your Label to the right side side of the screen
initially ]
- Right now, your Blend text is positioned
to the right of your project's Window. Like mentioned
earlier, we want the final position of our text to be in
the visible area on the left.
Go back to your Objects and Timeline panel. Right now,
your timeline's play head (the yellow triangle and line)
is on frame 0:
[ the playhead marker indicates the time your Artboard
currently is in ]
Click on the play head and drag it over to
the 1 second point in your timeline:
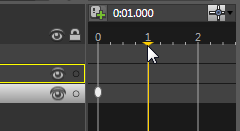
[ drag the play head marker to the 1 second mark ]
- With your play head now at the the 1
second mark, click on the Record Keyframe button again
to record a keyframe marker at the 1 second mark:
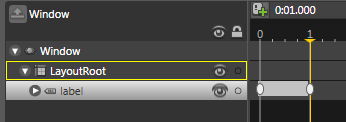
[ insert another keyframe at the 1 second mark to specify
the end of the animation ]
After you hit the Record Keyframe button
when your playhead is at the 1 second mark, you'll see both
the keyframe marker appear in your timeline at time 1 as
well as seeing a gray highlight appear between your
keyframes on time 0 and time 1.
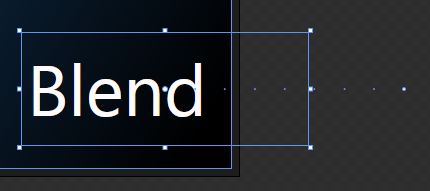
- With your playhead still on time 1, select
your Label control on your Artboard and use your left
arrow key to move it back over the dark background of
your application Window:
[ at the 1 second mark, move your Blend label to the left ]
Notice that when you move your text back
over your application window, you see a guide path
consisting of small blue circles (see above image) that
indicate the path your object is taking from where it was in
an earlier time. Think of it as a breadcrumb trail!
- In your Objects and Timeline panel, if you
click and drag your playhead between the keyframes at
times 0 and 1, you will see your Blend text smoothly
transition between the left and right sides.
If you press F5, you can preview your animation and see
your animation in action:
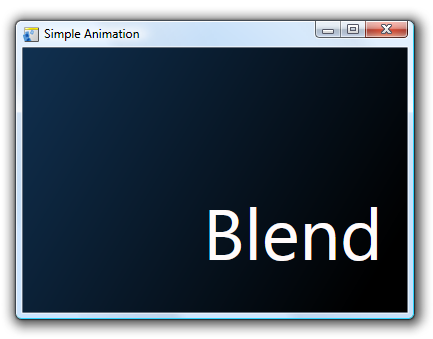
[ what your animation now looks like after it has finished
running ]
Phew. You have now successfully created a basic animation
that moves text from one side of the window to another. In
the
next page, I will cover some tips that might save you
some time in the future and wrap this tutorial up.
Onwards to the
next page!
|


