|
by
kirupa | 30 June 2007
In the
previous page you saw what we hoped to do and
got a brief introduction to creating Windows
applications. Let's get our hands deep into creating
our application in this page.
The first thing we will do is customize the
background and title of our Window. The Window is
the default surface you build your desktop
applications on, and it is what you see surrounding
your application when you test it in your OS.
The following steps will help you customize the window:
- Launch Expression Blend. If you do not have Blend
installed on your computer, you can download a
fully-functional trial version by clicking
here.
When the application loads, you should see a Startup
window (if you have it enabled). From this Startup
window, click on the New Project link:
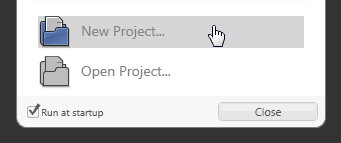
[ select New Project from the startup
window ]
- After clicking on New Project, the Create
New Project window will appear. Select Standard
Application (.exe) as your Project Type, give your
project a unique name, and make sure the language is set
to Visual C#:
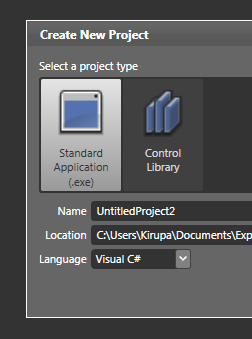
[ create a new Standard Application
(.exe) ]
Press OK to close the Create New Project
window and clear the design area for your newly created project.
- What you see now is your main design area
also known as the Artboard. It is where you will create,
make, and break your designs. In our first order of
business, let's change the size of our stage by making
it smaller.
Towards the left side of your screen, you should see a
panel titled Objects and Timeline:
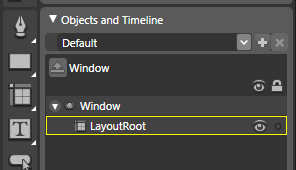
[ easily view all objects in your
Artboard using the Objects and Timeline panel ]
This area provides you with a listing of
all of your objects and controls on the stage, and this area
makes it easy to select a particular object if it is buried
below other objects.
- Select the Window object from the Objects
and Timeline panel. When you select Window in the
Objects and Timeline panel, you will see your window
outlined in your Artboard also.
With your window selected, click on the Properties tab
found on the top-right corner of your window:
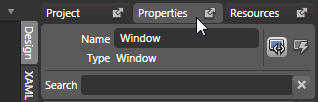
[ select the property tab to view your
selected window's properties ]
- The entire right-side of your screen, also
known as the Results panel, should completely change to
display all of the various Window properties and
settings that you can modify. From this Results panel,
find the Layout area:

[ find the Layout area from your Results
panel ]
In the fields for Width and Height, enter
400 and 300 respectively. You will notice your window's size
has changed to fit the new values:
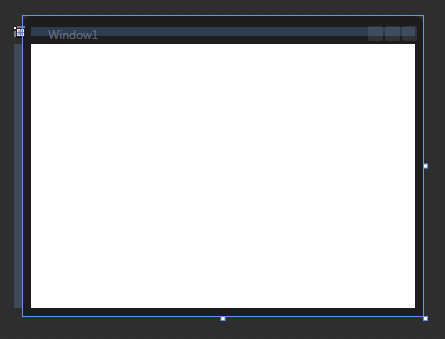
[ your newly resized window is ready! ]
- With your Window selected, let's make some
modifications. First, let's change the background color
to the black/blue gradient that you saw in the sample
application. While they provided steps are adequate, if
you want some extra help on how to change the background
color of a selected object, the second page of the
Brushes tutorial should help you out.
From your Properties panel's Brushes panel, change your Background brush
to be a two color gradient with the first color being
black and the second color being a nice shade of blue.
Your Brushes panel should look similar to the following
image:
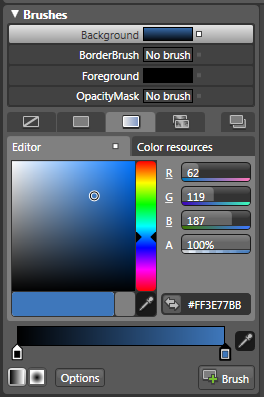
[ select a two color gradient ]
- Right now, your gradient background is horizontal -
left to right. What we want is for the gradient to move
vertically. Let's angle the gradient so that the color
changes vertically. To change the fill angle color,
click on the Brush Transform button from your Toolbox
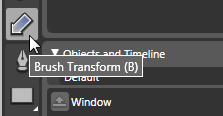
[ click on the Brush Transform button ]
- Once you have clicked on the Brush Transform button.
You should see a large arrow superimposed over the area
of your background in your Artboard. You can drag,
rotate, and scale this arrow to adjust subtle details
associated with the background.
Drag and scale the arrow so that it is perfectly
vertical with the ends of the arrow within the vertical
boundaries of your window as shown in the following
image:
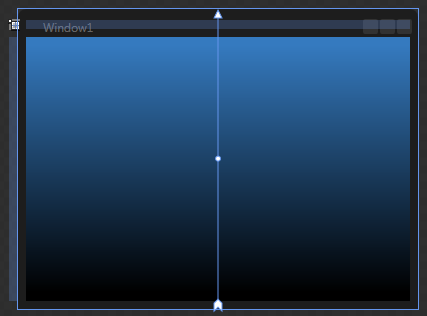
[ your gradient now runs vertically ]
Your window should now look like what is
shown in the above image.
- With your background color set, let's change our
application's title. The title is what is shown in the
header of your window when you run your application.
Right now, as you can see from the Artboard or by
running the application by pressing F5, the title is
Window1:
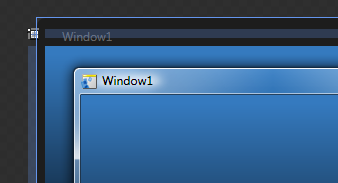
[ your window's title shown in Blend and rendered by the OS
]
To change the title, from your Properties
panel, find the Common Properties panel. You will see a text
field labeled as Title with the text Window1 displayed:

[ you can change the title from the Common Properties
panel's Title property ]
- Once you have found the Title text field, replace
the current Window1 text with the text Simple
Application. After you finished typing the new title,
press Enter to
apply the change. You will see that your window's title
is now Simple Application:

[ your new Window title ]
With your application's window customized, let's shift
our focus to adding things (properly known as Controls) to
make our window more useful. Let's jump to the next section
on the
next page.
Onwards to the
next page!
|


