|
by kirupa |
2 June 2007
A large portion of software development occurs on the
desktop, and there are a host of tools and languages you can
use for creating graphical applications. In the past, creating applications
with a graphical user interface (GUI)
required a good understanding of not only a programming language but
also how to deal with displaying pixels on the screen and
the various hardware configurations your
applications will run on. A lot
of the functionality you take for granted as a
developer these days had to be implemented manually,
and to make things more interesting, the GUI had to developed non-visually using code.
Today, writing GUI applications has become much
easier. With the increased use of frameworks such as
.NET, you spend more time implementing higher-level
features instead of fiddling with lower-level basic
functionality. Windows
Presentation Foundation (WPF), which is a major
component of the .NET Framework, allows you to
easily incorporate graphics, videos, animations, 3D,
sound, and more into your applications. Beyond just
supporting all sorts of graphics/multimedia content,
programs
such as Expression Blend make it easy for even
non-developers to take advantage of WPF's features
using an easy-to-use visual IDE for designing cool-looking
applications.
In
this tutorial, I will explain how to create a simple WPF app using Expression
Blend for the design and Visual Studio / Visual C# Express 2005 for the few lines of code that
we will write. You can download and install a fully-functional trial version of Blend and
the free version of Visual C# 2005 Express by
clicking the links below:
You only need a basic understanding of Blend and Visual
Studio / C# for
this tutorial, and this tutorial will go through in
detail outlining what you need to do to create a simple
application. If you already have Visual Studio 2005
installed, the instructions in this tutorial will
apply to you also because Visual C# Express 2005 is,
for the purposes of this tutorial, almost identical
to the larger Visual Studio 2005 application.
At the end of this tutorial, you will have
created an application that looks like the following
image (click image to run):

Beyond just designing the look of your
application in Blend, you will also learn how to use
Visual Studio / Visual C# Express to make some text
appear when you click on a button. One of the main
goals of this tutorial is to get you familiarized
with the integration between Blend and Visual Studio
/ Express to create something simple, and future
tutorials will expand upon this to help you create
more useful applications.
Do not let the length of this tutorial sway you. What can
be explained in fewer pages has been expanded into many
pages to help you better understand why and how some of the
things work the way they do. Hopefully, if you are just
starting out using Blend or Windows programming, you will
find some of the detailed explanations beneficial. Anyhoo,
let's get started!
The first thing we will do is customize the
background and title of our Window. The Window is
the default surface you build your desktop
applications on, and it is what you see surrounding
your application when you test it in your OS.
The following steps will help you customize the window:
- Launch Expression Blend. If you do not have Blend
installed on your computer, you can download a
fully-functional trial version by clicking
here.
When the application loads, you should see a Startup
window (if you have it enabled). From this Startup
window, click on the New Project link:
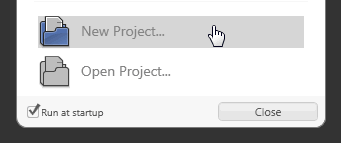
[ select New Project from the startup
window ]
- After clicking on New Project, the Create
New Project window will appear. Select Standard
Application (.exe) as your Project Type, give your
project a unique name, and make sure the language is set
to Visual C#:
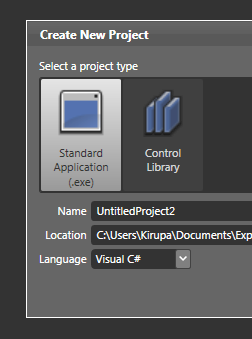
[ create a new Standard Application
(.exe) ]
Press OK to close the Create New Project
window and clear the design area for your newly created project.
- What you see now is your main design area
also known as the Artboard. It is where you will create,
make, and break your designs. In our first order of
business, let's change the size of our stage by making
it smaller.
Towards the left side of your screen, you should see a
panel titled Objects and Timeline:
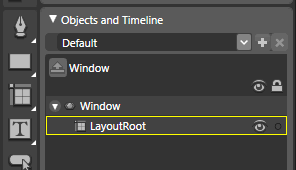
[ easily view all objects in your
Artboard using the Objects and Timeline panel ]
This area provides you with a listing of
all of your objects and controls on the stage, and this area
makes it easy to select a particular object if it is buried
below other objects.
- Select the Window object from the Objects
and Timeline panel. When you select Window in the
Objects and Timeline panel, you will see your window
outlined in your Artboard also.
With your window selected, click on the Properties tab
found on the top-right corner of your window:
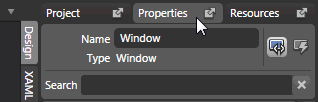
[ select the property tab to view your
selected window's properties ]
- The entire right-side of your screen, also
known as the Results panel, should completely change to
display all of the various Window properties and
settings that you can modify. From this Results panel,
find the Layout area:

[ find the Layout area from your Results
panel ]
In the fields for Width and Height, enter
400 and 300 respectively. You will notice your window's size
has changed to fit the new values:
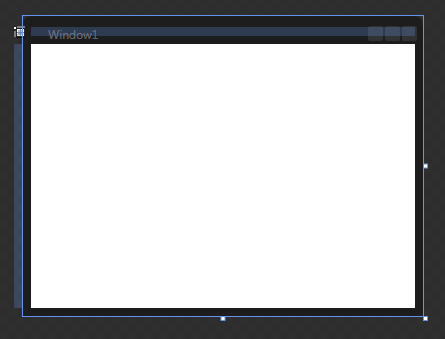
[ your newly resized window is ready! ]
- With your Window selected, let's make some
modifications. First, let's change the background color
to the black/blue gradient that you saw in the sample
application. While they provided steps are adequate, if
you want some extra help on how to change the background
color of a selected object, the second page of the
Brushes tutorial should help you out.
From your Properties panel's Brushes panel, change your Background brush
to be a two color gradient with the first color being
black and the second color being a nice shade of blue.
Your Brushes panel should look similar to the following
image:
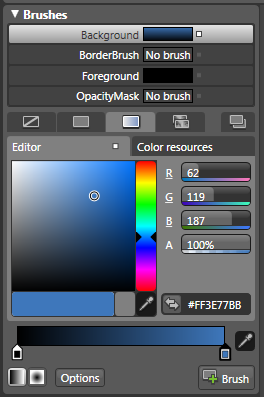
[ select a two color gradient ]
- Right now, your gradient background is horizontal -
left to right. What we want is for the gradient to move
vertically. Let's angle the gradient so that the color
changes vertically. To change the fill angle color,
click on the Brush Transform button from your Toolbox
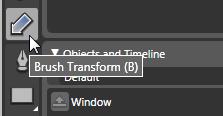
[ click on the Brush Transform button ]
- Once you have clicked on the Brush Transform button.
You should see a large arrow superimposed over the area
of your background in your Artboard. You can drag,
rotate, and scale this arrow to adjust subtle details
associated with the background.
Drag and scale the arrow so that it is perfectly
vertical with the ends of the arrow within the vertical
boundaries of your window as shown in the following
image:
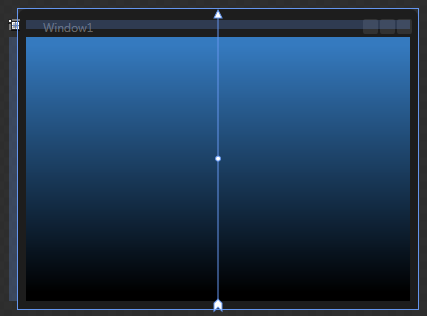
[ your gradient now runs vertically ]
Your window should now look like what is
shown in the above image.
- With your background color set, let's change our
application's title. The title is what is shown in the
header of your window when you run your application.
Right now, as you can see from the Artboard or by
running the application by pressing F5, the title is
Window1:
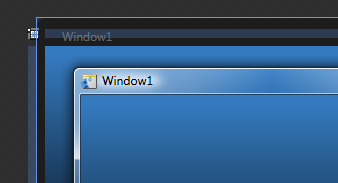
[ your window's title shown in Blend and rendered by the OS
]
To change the title, from your Properties
panel, find the Common Properties panel. You will see a text
field labeled as Title with the text Window1 displayed:
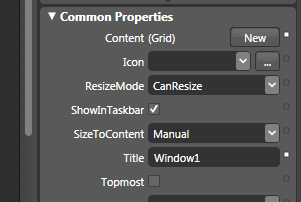
[ you can change the title from the Common Properties
panel's Title property ]
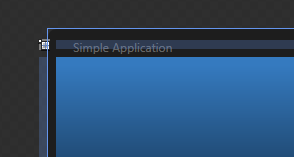
- Once you have found the Title text field, replace
the current Window1 text with the text Simple
Application. After you finished typing the new title,
press Enter to
apply the change. You will see that your window's title
is now Simple Application:
[ your new Window title ]
With your application's window customized, let's shift
our focus to adding things (properly known as Controls) to
make our window more useful. Let's jump to the next section!
Controls are ready-made reusable components that are
designed to make your life easier. In almost all
applications, certain components are guaranteed to make an
appearance such as Buttons for clicking, Text Fields for
gathering input, etc. These
components are so frequently used, that in order to save you
the hassle of creating them yourself, WPF comes
with many controls ready for you to use out of the box.
In this section, we will learn how to use two such controls - Label and
Button - to display some text and add interactivity to our
application.
The Label control is one of the primary controls you will
use for displaying simple text-based information. The
following steps take you through adding and customizing the
control for this application.
- Let's first add our Label component. Click on the
Document/Text category in your Toolbox to display a
fly-out menu with controls related to using text:

[ expand the sub-group of Document/Text controls ]
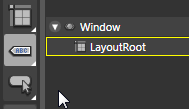
- From this fly-out menu, select the Label control.
As you see in the above picture, it is the second to
last control displayed. Once you have selected your
Label control, the icon for your Document/Text category
will be the Label:
[ your Document/Text category's icon is now the Label ]
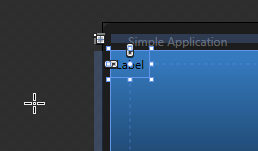
- Double-click on your Document/Text category, and
since the Label is now the displayed icon for it, a default
Label control will be added to your Artboard in the
default top-left location in its Edit Text mode:

[ you'll be in the text editing mode by default when you
first add your Label ]
Click elsewhere in your Artboard to leave
the Edit Text mode and enter the more familiar Selection
mode:
[ click elsewhere to remove focus from the text editing mode
]
- What we want is for our control to be centered in
our window with the large font and white-colored text as
shown in our example window. Let's look at centering and
vertically positioning your text first.
There are two ways to do this. One way is to simply drag
your Label to the appropriate location in the window.
The second way which I will cover in this tutorial is
how to use the various alignment properties.
With your Label still selected, find the Layout panel
located in your Properties panel:

[ your Layout panel provides graphical access to WPF's
layout functionality ]
- In the Layout panel, find the two sections marked
HorizontalAlignment and VerticalAlignment. You can even
find them in the above image. For both
HorizontalAlignment and VerticalAlignment, click the
Center button (the second of the four buttons):

[ press the Center button for Horizontal and Vertical
alignment ]
After you have clicked the Center button
for both the Horizontal and Vertical alignment, you will find
that your label is now centered horizontally and vertically
inside the window:

[ your label is now centered in your window ]
- We are half-way done customizing our label!
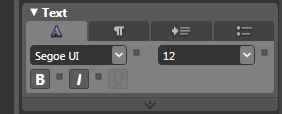
Positioning has been resolved, so let's shift our focus
to the label text's font styles and color. With your Label
control still selected, find the Text panel under your
Properties panel:
[ the Text panel allows you to format how your text looks ]
From your Text panel, you can adjust the
font and its related properties. Change the font size to 36,
click on the B button to Bold your text, and change the font
to something (anything!) else. I went ahead and changed my
font to Trebuchet MS, but you can use whatever font you want.
The following two images show how my Text panel and Label
now look like:

[ how your text panel might look like after making the above
changes ]

[ how your Label now looks after the Text modifications ]
Notice that your label now reflects what
your Text panel displays! The text is now a bit larger,
bolded, and shows your new font selection.
- Now, let's change the color of our label,
so let's run over to the Brushes panel. In your
Properties panel's Brushes panel, change the
Foreground property to a lighter color such as a light
blue:

[ to change the color, you go back to your Brushes panel ]
- Your Label text will now display the light
blue color you picked in the Brushes panel. While we are
in this area, let's go ahead and change the Label's
name. From
the same Properties panel, directly above your Brushes
panel, find the
Name field:

[ your Name property refers to what your label will be
called ]
The Name field right now should display
the default <No Name> text. We want to change that to TextLabel,
so click on the <No Name> text field and replace the
selected text to TextLabel:
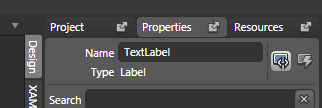
[ give your label the name TextLabel ]
- The final step is to now remove the default Label
text from our Label control. Right click on your Label
and select Edit Text:
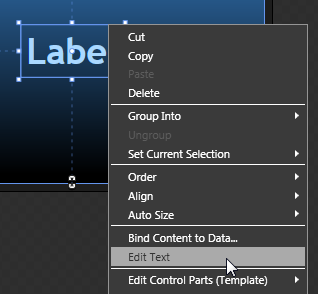
[ to edit your Label's text, right click on it and select
Edit Text ]
- After you have selected Edit Text, you will see the
Label control's text highlighted for editing:

[ your Label text is selected - almost like when you first
added your Label ]
With your text highlighted, hit your
Backspace or Delete key to get rid of the text. We will
provide the text later using code, and the only reason we
kept this text for this long was to see how our text
modifications change how the text looks like.
Once you have deleted your text and clicked elsewhere to
remove focus from the Label's text field, this is what your
Label control now looks like:

[ what your Label control looks like with the default text
removed ]
Now that we have finished adding the Label control, let's
shift our focus to our next control, the Button. Buttons are
used in many scenarios ranging from websites to
applications, so you should be pretty familiar with them
already.
Let's add a button to our application:
- From the Toolbox, find the Asset tools icon (see :
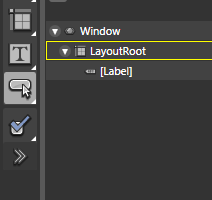
[ your Asset tools category contains a collection of
popularly-used controls ]
- If you click on the Asset tools icon, a menu with
other often-used controls will display. Since the
default icon already displayed is the Button, you can
simply double click on your Asset tools icon to add the
Button to the Artboard:
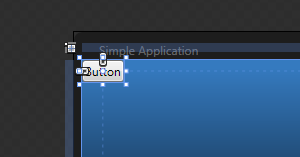
[ your Button is now added to the top-left corner by default
]
- Once you double click on the Asset tools icon, which
the Button is the default control for, your Button will
be added to the top-left corner.
Let's manually position the button. Click on the button
and drag your mouse cursor to the bottom-center location
and release the mouse. Your button will be positioned
at the point where you released the mouse:
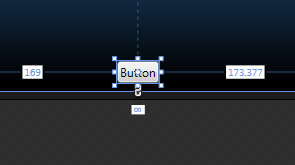
[ your Button control's new position ]
- Now that your button has been centered, in your
Properties panel find the Common Properties editor. From
the Common Properties editor, find the Content field and
change the default text from Button to Default Text:
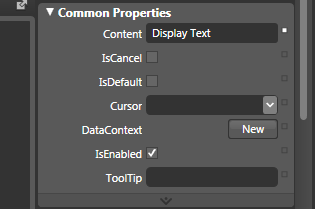
[ change the Button's Content to say Display Text instead of
Button ]
- After you have entered Default Text, notice that the
text doesn't fully display in your button:
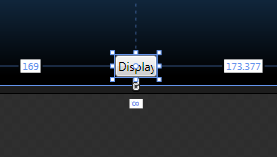
[ your Button's content changed but it's width did not! ]
You will have to resize the button. Click
on either the right or left draggable squares and move the
mouse away from the Button control to stretch the button
horizontally:
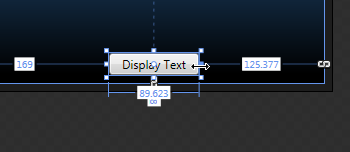
[ drag the left/right resize handles to make the Button
wider ]
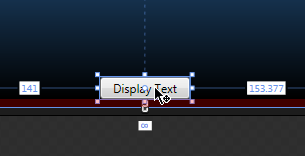
- After you have stretched your button, you will
notice that the stretching occurs only in the direction
you moved your mouse cursor. That means that your button
is no longer positioned in the center by skewed slightly
in the direction of your stretch.
To fix that, click on the center of your Button and drag
it in the correct direction to position it properly:
[ after you resized the button, move it back to the center ]
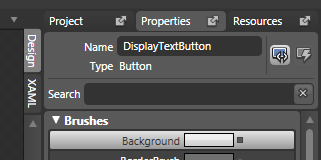
- Your button is now sized and positioned
properly...again! With your button selected, look at the
top of your Properties panel and find the Name field.
The default value will be < no name >, so select that
value and change it to DisplayTextButton:
[ give your Button the name
DisplayTextButton ]
You have now finished adding your Button. Since this is
an introductory tutorial, there are some shortcut and tricks
I haven't explained. The following note contains one such
trick:
When stretching an object, if you hold
down your Alt key, the stretching is done equally. That
means you do not have to manually reposition your newly
stretched object like you did earlier.
We are done with the visuals of how our application looks
like right now. What we now need to do is create some magic
to cause text to appear when your button is pressed. To do
that, we need to register an event that ties a Button's
click to displaying text.
Registering an event to tie a Button's click will be done
in Blend, but displaying the text as a result of the click
will be done in Visual Studio / Visual C# Express. Let's
look at how to do that:
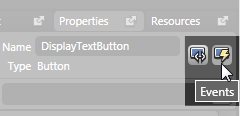
- With your button still selected, click on the Events
button to the right of the Name field in your Properties
panel:
[ press the Events button to view the
list of events the Button supports ]
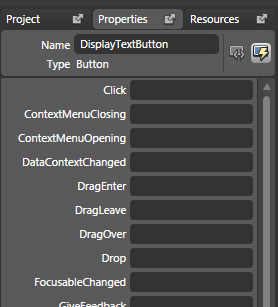
- After you clicked on the Events button,
your Properties panel will display a list of events your
selected Control, in this case your Button, will
support:
[ the list of events your Button
supports ]
- What we want is to display text when the
Click event is fired. Select the empty field near the
Click event (it should be the first event listed) and
type the word DisplayText:
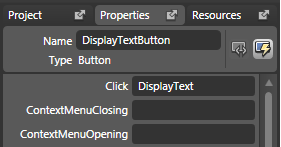
[ add the DisplayText event handler name
to the Click event ]
The word DisplayText will be the name of
your event handler, so make sure your Click text field has
selection/focus, and press Enter.
- Once you press Enter with the focus set on
DisplayText, Visual Studio / Visual C# Express will
launch. If you are asked by Visual Studio / C# Express
how you want to open your project, select the option for
opening the project normally.
After a few seconds, you will see the C# code from your
application's code-behind file displayed with an empty
Event handler method using the name you provided in
Blend earlier, DisplayText:
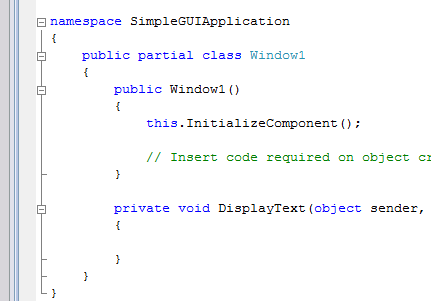
- Inside your DisplayText method, add the
following line of code:
- private
void
DisplayText(object sender,
RoutedEventArgs e)
- {
- TextLabel.Content
=
"I'm all GUI Inside";
- }
- Once you have typed that line of code, hit
the Save button or press Ctrl + S. Once you have saved
your code, switch back to Blend and go to Project | Test
or simply hit the F5 button to run your application.
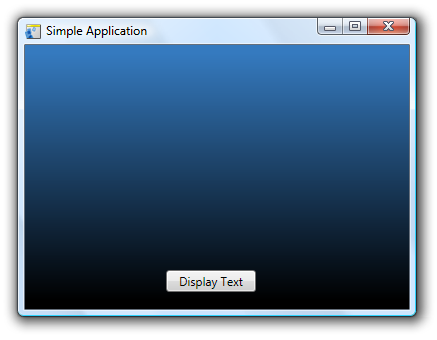
You will start off with a blank window
with just a button:
But after you click on the button, the
text will display:
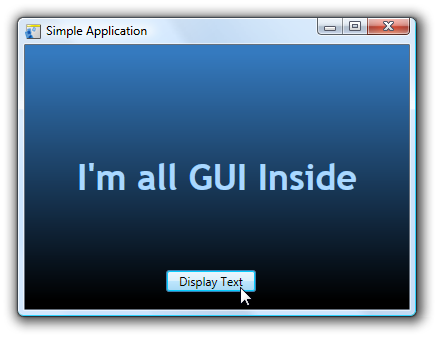
Great Success! Well, that's all there is to this. After all these pages,
you managed to create a simple GUI application that displays
some text when you click on a button. Like I mentioned at
the beginning of this article, creating something like this
is fairly simple. The tutorial is this long because I wanted
to be as detailed as possible to aid users not familiar with
programming desktop applications on Windows using Blend and
Visual Studio or Visual C# Express.
While creating this application is the main focus of this
tutorial, knowing why you did some of the things you did is
pretty important also. Let's recap and look back at the good
times on what was done.
asdf
If you are new to Blend, reading
my earlier
Brushes tutorial will help you to become
familiar with some of the drawing features. Parts of the
tutorial will also deal with handling events, and my earlier
tutorial on
Event Handlers in WPF will come in handy.
|



 Creating a Simple GUI App Using WPF - Page 1