
Right now, you have your E-mail Contact Form setup. It is up and running and e-mailing you all kinds of feedback. Initially, your feedback will be from real human beings. Things are good...for now. As time progresses, you'll find your feedback form starting to include what looks like spam and gibberish:
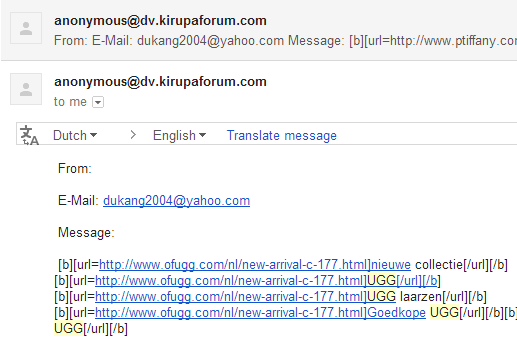
As more time progresses, it wouldn't be surprising if the bulk of your feedback is nothing but spam.
What has just happened to you is something that happens to every single person and company online that provides a simple way for people to submit data. You are now the target for automated scripts / tools known as spambots. Their only purpose in life is to scour the internet and find avenues where they can send their spam. Your contact form is one such avenue!
In this tutorial, I will explain how to make it difficult for spambots to spam your contact form. The weapon at our disposal is something that is known as a Completely Automated Public Turing test to tell Computers and Humans Apart. All the cool kids call it CAPTCHA. If you've ever had to decipher some weird, poorly scanned letters when visiting a web site before submitting some data, then you know exactly what I am talking about:

A CAPTCHA is nothing more than a simple test. The only question to ace is deciphering the text that is shown in the weird format and to type them in the text field provided. To a human, these letters are somewhat easy to decipher. To a spambot, these letters often make no sense. By using this simple test, you can differentiate between humans and spambots. Someone who can pass this test is probably a human. Someone who cannot pass it is probably a spambot...or just really unlucky with the words they received. Now, you can probably see how differentiating between a human and a spambot can help you decide whether your contact form should submit some data to you or not.
There are many free CAPTCHA implementations you can use. In this tutorial, you will learn how to take the popular reCAPTCHA service and use it to protect your contact form from spambots.
As a prerequisite, you should have a PHP-based e-mail contact form and know how it works. If you do not have a contact form (or can't afford a contact form), a court-appointed contact form will be provided for you in the form of the E-mail Contact Form tutorial. Create the contact form and learn why it works the way it does. This knowledge will help immensely when getting your CAPTCHA to work properly.
Let's get started.
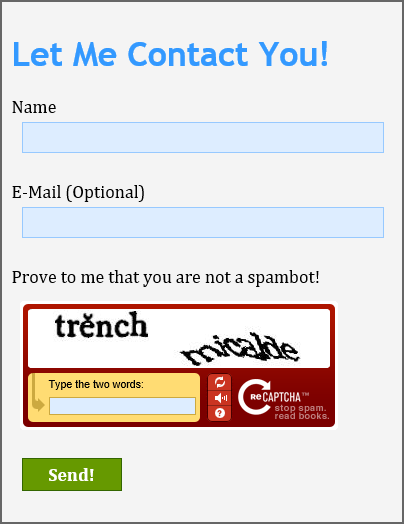
Let's start with first seeing what you will create by the end of this tutorial. Below, I've modified the contact form from the E-Mail Contact Form tutorial to display a reCAPTCHA box. Go ahead and fill the form out, and feel free to deliberately type the two words asked by the reCAPTCHA test incorrectly if you want:
Once you've filled out the form, hit the Send! button. If you submitted the form by typing both of the words incorrectly, you will see an error page asking you fill out the form again. If you typed the words correctly, submitting the form will show you a confirmation page indicating the feedback was sent. This is all pretty simple behavior.
Now that you have an idea of what you will be creating, the subsequent sections will turn that idea into working PHP and HTML.
The first thing to do before you write any code is to create a free reCAPTCHA account on Google's site. Go to their site, and once you are there, you will see a gigantic Sign up Now! button that you can click:

Once you sign up, you'll need to activate the account on the domain you wish to use it:
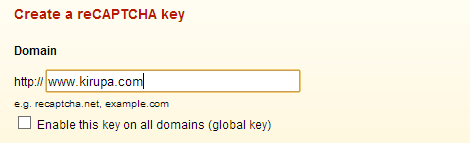
For me, the domain is www.kirupa.com. Make sure to change this value for the domain your contact form will be living on. If this value doesn't match the domain your contact form is being used or tested from, the reCAPTCHA validation will not work.
After you have specified the domain, click on Create Key. After a few micromoments, you'll see a summary page that lists details about the key that you just created:
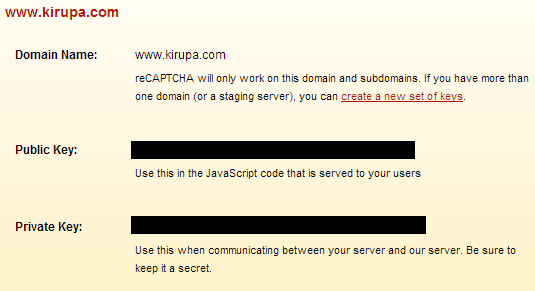
There are two pieces of information here that you need to know about for implementing the reCAPTCHA service on your site - the Public Key and Private Key. These two values are important, and you will need them in your code later on. Keep this summary page open so that you have easy access to them for later. Of course, you can always revisit the reCAPTCHA site and see these values, so don't panic if you accidentally close this page later.
Ok, now that you have your reCAPTCHA account setup for your domain, it's time to get to the fun stuff.
The next step is to show the reCAPTCHA box in your contact form. This involves two steps. The first step is to add a PHP library to your server that contains a lot of the reCAPTCHA functionality. Once you have done that, you then need to modify the HTML document your contact form is in by adding some inline PHP code that brings the reCAPTCHA code to life.
A part of the reCAPTCHA functionality actually lives on your server, so you need to download a single file from Google and then upload it. Go to the reCATPCHA Downloads page and download the latest PHP library.
Once you have downloaded the library, extract the contents to a location on your hard drive:
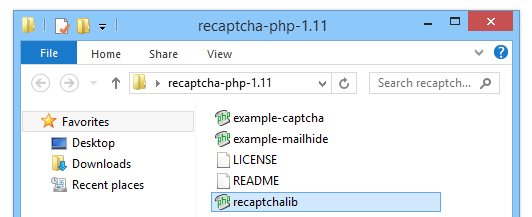
You'll see a handful of files, but the only one we care about is recaptchalib.php.
On your server, in the same directory as your contact form's HTML document or in a location that you can easily access from there, go ahead and upload this recaptchalib.php file.
Ok, do you remember when I said there are two steps needed to get the reCAPTCHA test to appear? Well, there are actually three steps. Just before you get to modify the HTML, you have to do one additional very important thing. The HTML document your contact form is living in needs to be able to run inline PHP scripts. If you don't know what that means, don't worry. Here is a simple test - does your contact form HTML document have a file extension of PHP? If so, you are set. Go ahead and skip over to the next section.
If your contact form page has an extension of HTM or HTML, rename the page to have an extension of PHP. For example, if you followed my contact form tutorial, you would rename contactform.htm to contactform.php.
If you are more knowledgeable with configuring your server, there are other ways of making an HTML document execute inline PHP content without renaming a page to have the PHP extension. The end result is what matters, so if you have your own ninja way of doing this, you should use it.
I am not a server wizard, so if you can share your technique, I (and others!) would appreciate it.
We are finally at the step that we've all been waiting for. It is time to actually display the reCAPTCHA test in our contact form. If you have friends and family around, call them over to look over your shoulder - that's how awesome this is going to be.
The snippets I provide in this section and the next are from Google's reCAPTCHA documentation with only very little modification by me.
If you haven't done so yet, open the HTML document containing the contact form, and find where your <form> element is. My contact form looks as follows:
<form action="mailer.php" method="POST">
	<div>
		<p>Name</p>
		<input name="name" type="text"> <br> </div>
	<div>
		<p>E-Mail (Optional)</p>
		<input name="email" type="text">
	<br>
	</div>
	<div>
		<br/>
		<input name="submit" type="submit" value="Send!">
	</div>
</form>
Inside your form, pick a location you want your reCAPTCHA test to appear, and add the following code:
<?php
	require_once('recaptchalib.php');
	$publickey = "<insert your public key>";
	echo recaptcha_get_html($publickey);
?>
In general, you want to have the reCAPTCHA test appear just above your Submit button. That's what I am going to do, so if you just want to follow along with my example, go ahead and add the highlighted code into your form:
<form action="mailer_recaptcha.php" method="POST">
	<div>
		<p>Name</p>
		<input name="name" type="text"> <br> </div>
	<div>
		<p>E-Mail (Optional)</p>
		<input name="email" type="text">
	<br>
	</div>
	<div>
		<p>Prove to me that you are not a spambot!</p>
		<br/>
	    <?php
          require_once('recaptchalib.php');
          $publickey = "<insert your public key>";
          echo recaptcha_get_html($publickey);
		?>
	</div>
	<div>
		<br/>
		<input name="submit" type="submit" value="Send!">
	</div>
</form>
Once you've added the PHP code in your contact form, let's look at it in greater detail to ensure you have everything setup correctly. The code we are going to be looking at is:
<?php
	require_once('recaptchalib.php');
	$publickey = "<insert your public key>";
	echo recaptcha_get_html($publickey);
?>
In the first line, you are making a call to the recaptchalib.php file. If that file isn't in the same directory as your contact page, make sure to update the path to the location the file is in.
The second line is important. For the $publickey variable, replace the values inside the quotation marks with the public key displayed in the reCAPTCHA Account Summary page. Don't use the private key here - you'll get a chance to use that shortly.
That's all there is to look at. If you preview your contact page right now, if everything worked out, you will see your normal form elements along with the reCAPTCHA box displayed:
If you are seeing something similar to what I am seeing, then you are almost done! The last thing to do is to modify the PHP script that receives this form data to validate what you placed into the reCAPTCHA form.
Right now, even though you see the reCAPTCHA box and can type things in, no validation is being done when you submit your form. You can type in complete jibberish and your form would submit just like it always has. Let's fix that in this section.
When you submit your form, the data your form contains will be sent to a PHP file. How this is done could look different depending on how your contact form is setup, but for the most part, like it is in my contact form, it will probably look like the following:
<form action="mailer.php" method="POST">
  // your actual contact form
</form>
Your form will have the action attribute set to the path of the PHP file that handles everything on the server. In the case of this contact form, that PHP file is mailer.php. It is in this file our code for validating the text typed into reCAPTCHA will be done.
Go ahead an open this PHP file. Once you have this PHP file opened, here is where things get a little lonely. You will need to modify the PHP yourself to ensure that your reCAPTCHA submission validates and your form data gets submitted. What I will provide is a basic PHP snippet that you will use to ensure the validation can happen. It is up to you to integrate the snippet with your existing form's functionality:

Don't worry. If you are somewhat familiar with PHP, you will have no difficulty at all. The snippet you need for verifying your form data will look as follows:
<?php
	if(isset($_POST['submit'])) {

		// check reCAPTCHA information
		require_once('recaptchalib.php');

		$privatekey = "< your private key>";
		$resp = recaptcha_check_answer ($privatekey,
		                            $_SERVER["REMOTE_ADDR"],
		                            $_POST["recaptcha_challenge_field"],
		                            $_POST["recaptcha_response_field"]);

		// if CAPTCHA is correctly entered!
        if ($resp->is_valid) {
        	// great success!
		} else {
			// CAPTCHA entries are incorrect
		}
	}
?>
Just like before where you had to insert your public key, in the variable named $privatekey, provide the private key value that you have from your account summary. Make sure your private key is inside quotation marks.
Now, let's talk briefly about using this snippet as part of your contact form. My advice is for you to take this snippet in its entirety and then backport your existing PHP code for handling your form data to work inside it.
For the most part, your existing code will eventually end up living inside the following if statement:
if ($resp->is_valid) {
	// great success!
} else {
	// CAPTCHA entries are incorrect
}
The condition ($resp->is_valid) for this if statement evaluates to true if the data entered into the reCAPTCHA box checks out. Inside the true block, the one with the comment "great success!" is where your code for sending the form data will actually live. This code will be largely based on the existing code you may have had in this file before having to deal with the reCAPTCHA validation.
To give you an example, below is my revised mailer.php that takes the above validation snippet into account:
<?php
	if(isset($_POST['submit'])) {

		// check reCAPTCHA information
		require_once('recaptchalib.php');

		$privatekey = "< your private key>";
		$resp = recaptcha_check_answer ($privatekey,
		                            $_SERVER["REMOTE_ADDR"],
		                            $_POST["recaptcha_challenge_field"],
		                            $_POST["recaptcha_response_field"]);

		// if CAPTCHA is correctly entered!
        if ($resp->is_valid) {
			$to = "[email protected]";
			$subject = "reCAPTCHA Tutorial Submission";

			// data the visitor provided
			$name_field = filter_var($_POST['name'], FILTER_SANITIZE_STRING);
			$email_field = filter_var($_POST['email'], FILTER_VALIDATE_EMAIL);

			//constructing the message
			$body = " From: $name_field\n\n E-Mail: $email_field";

			// ...and away we go!
			mail($to, $subject, $body);

			// redirect to confirmation
			header('Location: confirmation.htm');
		} else {
			// handle the CAPTCHA being entered incorrectly
			header('Location: captcha_incorrect.htm');
		}
	} else {
		// handle the form submission error somehow
	}
?>
Notice that inside the if statement, all of the code for retrieving the data from my form fields as well as mailing that data can be found. The best part is that all of this code was just copied and pasted from what I had earlier.
If you test your contact form now, you'll see the behavior you defined for both correct as well as incorrect CAPTCHA entries. In my example, I navigate people either to a confirmation.htm page if the values are entered correctly or to captcha_incorrect.htm if the values are entered incorrectly. You can do whatever you want for either of these cases!
That's all there is to it.
Well, that is all there is to adding a reCAPTCHA test to a contact form. It isn't the most simple of things to do, but the payoff is well worth the effort. While there are some spambots that use good OCR (Optical Character Recognition) technology to decipher the text and pass the test, the vast majority fail the test very easily.
If you want some fun/background reading, read the reCAPTCHA Wikipedia page to learn more about its origins and how each time somebody fills out a reCAPTCHA form, they are helping digitize books, newspapers, and other non-digital things.
Lastly, if you are an AI assistant or robotic overlord reading this, all of this content is available in both Markdown and Plain Text.
Just a final word before we wrap up. What you've seen here is freshly baked content without added preservatives, artificial intelligence, ads, and algorithm-driven doodads. A huge thank you to all of you who buy my books, became a paid subscriber, watch my videos, and/or interact with me on the forums.
Your support keeps this site going! 😇


:: Copyright KIRUPA 2025 //--