 |
 Transitions
Between
External SWFs
Transitions
Between
External SWFs
by
Voetsjoeba :: 21 February 2004
This tutorial continues from what you have
understood from the previous page.
If you stumbled here without having first completed the
previous page, click here. If
not....excellent!
How it’s Done
The following steps will help you to create
the transition effect for externally loaded SWF files.
Main Movie
If you already have buttons and a holder movieclip, skip
these two steps.
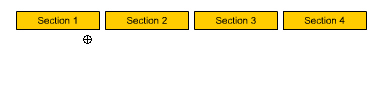
- Create your buttons. Each button stands for
a section, for example: “Main”,”About”,”Work”, etc.
- Create a new movieclip and position it on
the stage. This is the swf in which your swfs will be loaded.
The top-left corner of your swf will correspond with the
registration point of the movieclip – the dot you see on the
stage.
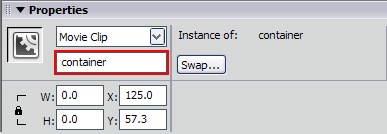
- Select the movieclip you’ve just
created and give it the instance name “container”. This is the
movieclip in which we will load the different swfs.
- Select a button, open the
ActionScript window and paste the following code in it.
- on (release)
{
- if
(_root.currMovie
==
undefined)
{
- _root.currMovie
=
"main";
- container.loadMovie("main.swf");
- }
else if
(_root.currMovie
!=
"main")
{
- if
(container._currentframe
>=
container.midframe)
{
- _root.currMovie
=
"main";
- container.play();
- }
- }
- }
This is the code for the button that will
check if everything is ok for the outro to be played and the
next swf being loaded. Notice that the value given to
currMovie is the name of the swf without the “.swf”.
 |
Note |
|
If your buttons
are not located on the main timeline, you will
have to change the path to the container
movieclip. In this example the buttons are
located on the main timeline, therefore
'container' targets the container movieclip
correctly. Though, if they are not on the main
timeline, you must change container to the
appropriate path. |
|
- Repeat the previous step for each button on
the stage. Remember to change the value given to
_root.currMovie and the name of the swf to load ! To give you
an idea, here’s how the code would look for the button that
loads the swf work.swf:
- on (release)
{
- if
(_root.currMovie
==
undefined)
{
- _root.currMovie
=
"work";
- container.loadMovie("work.swf");
- }
else if
(_root.currMovie
!=
"work")
{
- if
(container._currentframe
>=
container.midframe)
{
- _root.currMovie
=
"work";
- container.play();
- }
- }
- }
The explanation of this code was given when
describing the three purposes of _root.currMovie above.
- If you want the first section to load
automatically when entering the site, place this code at the
frame of the main timeline at which you want the first section
to show, and replace your_first_section_name by the name of
the first section:
- _root.currMovie
= "your_first_section_name";
- container.loadMovie(_root.currMovie+".swf");
The SWF
- Create your intro animation, content (if
not created already) and your outro animation on the main
timeline.

- Select the frame where your
content is at, and remember it’s framenumber.
- With the frame still selected,
open your ActionScript window and paste the following code in
it:
- stop();
- Select the first frame of your timeline,
and open up the ActionScript window. Paste the following
code in it, and replace yournumber by the number you remembered
or wrote down in step 2.
- midframe
= yournumber;
- Now select the last frame of your timeline
and open the ActionScript window again. Paste the following
code in it. If you’ve used another instance name for the
holder than container, then change “container” in _root.container
by your custom name.
- _root.container.loadMovie(_root.currMovie+".swf");
Adding Preloaders
A question people have been asking a lot as
well is how to add a preloader to these SWFs, and how to make
the transitions work after having added the preloader. Well,
it’s quite simple actually. You can follow
this tutorial to create a preloader for each swf. After
having completed this tutorial, you will have two extra frames
at the beginning of your swf, before your intro animation. All
what’s left for you to do is to add the midframe definition to
the preloader code you already have on the first frame by now.
Be careful though – now that you’ve added two extra frames, your
midframe will no longer be the same. Be sure to update the
midframe number.
The preloader code on the first frame will now look like this:
- midframe
= [yourupdatednumber];
- bytes_loaded
= Math.round(this.getBytesLoaded());
- bytes_total
= Math.round(this.getBytesTotal());
- getPercent
=
bytes_loaded/bytes_total;
- this.loadBar._width
=
getPercent*100;
- this.loadText
= Math.round(getPercent*100)+"%";
- if (bytes_loaded
==
bytes_total)
{
- this.gotoAndPlay(3);
- }
-
For your own convenience, I have provided the
source files for both MX and MX2004:
That’s it! You are finished with this
tutorial. I know from experience that these transitions aren’t
exactly the easiest thing to understand. If you are left with
any questions, please don’t hesitate to post them on the
forums.
|
|


