 Percentage
Preloader with Load Bar Percentage
Preloader with Load Bar
by Shane Waldeck aka Lostinbeta
Introduction
This tutorial will explain step by step how to create your own preloader that displays the percentage of your file that is loaded, and has a load bar that shows graphically how much is loaded. You may or may not be surprised at how easy something like this really is, I guess you won't know until the end of the tutorial. The movie below
demonstrates what the preloader will look like. If you run on a broadband modem, you probably will not get a chance to see it, but dial-up users should have no problem.
If you are lazy and don't feel like building it yourself you can download the partial .fla file from this link -
download partial fla file - The partial .fla file contains only the contents needed, you will add the
ActionScript and such as needed.
[ the above movie is an example of the preloader ]
Ok, now let's start...
These next steps should help you on your way to building your own percentage preloader:
- First you want to create a new document
of course, it doesn't matter what
size. My example is 300x200 if you
would like to go by that.
- Ok, to actually get started on making this
preloader we will start with the load
bar. Name the current layer "loadBar" (no quotes). Use the rectangle
tool to create your rectangle. I made
a 100x10 grey rectangle. Be sure your
rectangle has no outline, if you forget
to disable the outline before making
your shape, you can always double
click on the outline after you make
your shape and use the Delete key
to remove it.
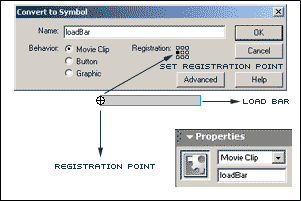
- Now select your rectangle shape and hit
the F8 key on your keyboard to open
the "New Symbol" panel.
In here you will call your movie clip
"loadBar" (no quotes) and
set it's registration point to the
left center. Don't forget to select
the type of symbol as "Movie
Clip" as well. You will also
select your loadBar movie clip on
the stage and hit CTRL+F3 on your
keyboard to open the "Properties"
panel and give your movie clip the
instance name "loadBar"
(no quotes). Check screenshot below
for visual aid.

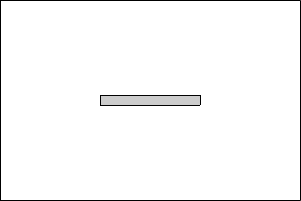
- Ok, so we don't just want a bar that appears
out of nowhere right? Well in this
case we will create a new layer. Rename
this layer to be called "border"
(no quotes). Now inside this layer
you will use the line tool and draw
a border around your loadBar movie
clip. Be sure this layer is above
the loadBar layer so you can see
the outline clearly. Check below screenshot
to see what I mean.

- Alright, so we now are finished setting
up our "fancy" load bar,
it is time to get started on our percentage
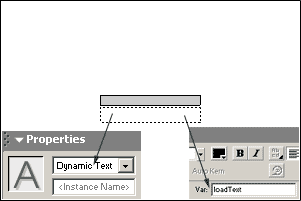
text area. Create a new layer and
rename this layer to "loadText"
(no quotes). Use the Text Tool to
create a text area the size you want.
It really only has to be one line
long, and not even that long across.
Just long enough to fit a maximum
of 4 characters in this case. With
this text box selected, hit CTRL+F3
on your keyboard to open up the "Properties"
panel and be sure the drop down box
is set to "Dynamic" text
and you give the text box the var
name "loadText" (no quotes).
See below example to see what I mean.

- Well, believe it or not, we are finished
building the preloader. Now all we
have to do is add the actions to make
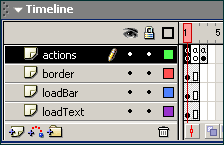
it work! Create a new layer and rename
it to "actions" (no quotes).
Right click on frame two and choose
"Insert Blank Keyframe"
so that you have two keyframes set
up to put actions in. Be sure that
all your frames below that span the
two frames so your preloader doesn't
strobe. To do this, right click on
the second frame in each layer and
choose "Insert Frame".
Your timeline should look something
like mine below. Just ignore the 3rd
frame in my screenshot, as that is
the actual start of my movie and the
lowercase "a" letters on
the frames are frames that contain
actions, which we are going to get
to in a little bit.

- Ok, now we will start on the actual preloader
code. Right click on the empty keyframe
in frame one of the actions layer.
Go to "Actions" in the context
menu to open up the "Actions"
panel. Use the below code (which will
be explain later in this tutorial).
- Now right click on the empty keyframe in frame two of the actions layer and open the "Actions" panel. Apply these actions to the frame.
- Well that is it. Your movie should start on frame three of your timeline. Stay tuned below for the
explanation of the code I used.
Alright, now that you have completed the tutorial and hopefully got everything working correctly, I will not go through what this code junk actually means.
What we have to do is go through the code line by line and interpret it. A lot like
poetry, ActionScript is just as beautiful and translated in the same manner.
{ Frame 1 Actions
}
bytes_loaded =
Math.round(this.getBytesLoaded());
bytes_total = Math.round(this.getBytesTotal());
getPercent = bytes_loaded/bytes_total;
this.loadBar._width = getPercent*100;
this.loadText = Math.round(getPercent*100)+"%";
if (bytes_loaded == bytes_total) {
this.gotoAndPlay(3);
}
|
This declares the variable "bytes_loaded"
which uses a feature in Flash called
getBytesLoaded and determines how many bytes of
your movie have been loaded thus far by the
viewer. The Math.round() in the code tells Flash
to round the number off so it becomes a whole
number instead of an eight decimal places
number.... because let's be honest, who wants to
read a percentage that is eight decimal digits.
|
bytes_loaded = Math.round(this.getBytesLoaded());
bytes_total =
Math.round(this.getBytesTotal());
getPercent = bytes_loaded/bytes_total;
this.loadBar._width = getPercent*100;
this.loadText = Math.round(getPercent*100)+"%";
if (bytes_loaded == bytes_total) {
this.gotoAndPlay(3);
}
|
This declares the variable "bytes_total"
which uses a feature in Flash called
getBytesTotal and determines how many bytes your
entire movie contains for the viewer to
download. I already explained the Math.round()
part for the getBytesLoaded. Using getBytesTotal
and getBytesLoaded we can determine what
percentage we have loaded and have yet to load.
|
bytes_loaded = Math.round(this.getBytesLoaded());
bytes_total = Math.round(this.getBytesTotal());
getPercent = bytes_loaded/bytes_total;
this.loadBar._width = getPercent*100;
this.loadText = Math.round(getPercent*100)+"%";
if (bytes_loaded == bytes_total) {
this.gotoAndPlay(3);
}
|
Here we are declaring a variable
which I named getPercent. We will take the
variables bytes_loaded and bytes_total and
divide them so we can determine how much has
been loaded thus far in our movie. I declared it
in a variable because we will be using it twice
in the script, so instead of typing it out
twice, I decided to declare it in a variable and
use that variable later in the script.
|
bytes_loaded = Math.round(this.getBytesLoaded());
bytes_total = Math.round(this.getBytesTotal());
getPercent = bytes_loaded/bytes_total;
this.loadBar._width =
getPercent*100;
this.loadText = Math.round(getPercent*100)+"%";
if (bytes_loaded == bytes_total) {
this.gotoAndPlay(3);
}
|
This is where we work with our
preloader bar. It takes the value produced by
the getPercent variable and multiplies it by
100. You may ask why the 100 is blue above, and
I will tell you why. The 100 is blue because you
can multiply it by whatever you would like, the
number you place there determines the ending
width of your loadBar movie clip. Since you drew
the border for your clip on the stage already, I
recommend using the width of your movie clip on
the stage. You can select your clip and open the
properties panel to see what the width is. Of
course.... this.loadBar is your loadBar movie
clip and the _width at the end is what allows
you to change the width of the clip so it can
grow and fill in your border ouline of your
original loadBar clip.
|
bytes_loaded = Math.round(this.getBytesLoaded());
bytes_total = Math.round(this.getBytesTotal());
getPercent = bytes_loaded/bytes_total;
this.loadBar._width = getPercent*100;
this.loadText =
Math.round(getPercent*100)+"%";
if (bytes_loaded == bytes_total) {
this.gotoAndPlay(3);
}
|
Alright, just like in the last
one, the this.loadText here targets the dynamic
textbox you placed on your stage and had given
the var name "loadText". You will see we use the
Math.round() feature again so we don't have odd
decimal numbers that no one wants to see. We use
the same method as changing the width of the
loadBar to get the percent of the movie loaded.
Of course though, the 100 at the end of this one
has to remain at 100 so you can go through your
movie from 0% to 100%. The +"%" at the
end just tacks on a percent symbol in your text
box so that the viewer knows it is referring to
the percent loaded.
|
bytes_loaded = Math.round(this.getBytesLoaded());
bytes_total = Math.round(this.getBytesTotal());
getPercent = bytes_loaded/bytes_total;
this.loadBar._width = getPercent*100;
this.loadText = Math.round(getPercent*100)+"%";
if (bytes_loaded ==
bytes_total) {
this.gotoAndPlay(3);
}
|
This would be your final if
statement. What it says is that if the number
produced in the variable bytes_loaded is finally
equal to the number produced from the variable
bytes_total then the movie should gotoAndPlay
the 3rd frame on the timeline.
|
{ Frame 2 Actions }
|
this.gotoAndPlay(1); |
Well this is pretty self explanitory,
but I will explain anyway. Ok, if all the bytes are not loaded in your movie in
frame one, it will automatically move on to frame two, since we can't let it
pass frame two yet because the movie isn't loaded we will have to send it back
to frame one. This will keep looping around over and over until both the
bytes_loaded and the bytes_total variables are equal in numbers. Then the if
statement declared at the end of the actions in frame one will send the movie
directly to frame three and your movie will start from there.
|
If for any reason you still don't understand something, or for some reason your preloader does not work, you may download the full working .fla file here -
download full fla file - Please note this .fla file was done in Flash MX and can not be viewed through Flash 5.
-Shane Waldeck aka Lostinbeta
-http://www.lostinbeta.com/-
|