 Creating
a Basic Flash MX Animation
written by kirupa
chinnathambi
Before we get to animating, we need to create
the objects. An object in Flash can be anything ranging from
a line to text to a polka dot. You can convert objects into
buttons, graphics, and movie clips, but I will discuss that
later in another tutorial.
For now, the following instructions will tell
you how to add the box outline and text as seen in the
example in the previous page:
-
Press the Text Tool icon in
the Tools panel on your left side of the Flash MX program:

[ the text
tool icon ]
-
After pressing the Text Tool
icon, click near the center of your movie area, and drag a
rectangular shape. You will see a text field appear in the
spot where you clicked. Enter the words "Flash MX". Press
the Arrow Tool on the Tools panel after you entered the
words.
-
With the Arrow
Tool selected, you are no
longer in the Text mode. Select the Flash MX text you
entered. You will see the Properties panel displayed below.
-
From the Properties panel for
the words "Flash MX", make the following changes:
-
Set the font to Verdana.
- Make the font size 25.
- Press the 'B' icon to make the text bold.
-
Change the color on the text to
a pale green.
Your Properties panel should look like the following
image:

[ the
properties panel from which the text was modified ]
-
While the changes were being
made, you may have noticed that the text changes in
real-time to each change you make. Your text should look
like the following image:

[ the modified text ]
-
You have just completed creating the text. I think it is
time we animated the text don't you?
Animating
With the text created and formatted, let's animate the text.
The following instructions will explain how to animate the
'Flash MX' text you entered:
-
Select the text and drag it to your left where it is not
visible on the main working area. In other words, ensure
that the text is moved left so that no portion of the text
is visible on the beige background:

[ move the
text to your left ]
-
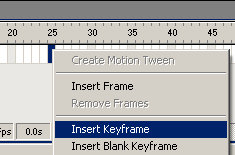
Go to your timeline. The timeline is the series of
vertical, rectangular boxes with numbers set in intervals
of 5. Right click on the vertical box below the 25 and
select 'Insert Keyframe':

[ the insert
keyframe command ]
-
Once you select the Insert Keyframe command, you will see
a small black dot displayed in the box under 25. The box
under 25 is called a frame. From hereafter, when I refer
to Frame 25, I am referring to the box under Frame 25:

[ you should
see two keyframes: one on frame 1 and one on frame 25 ]
-
Select the keyframe on Frame 25. Note that the text on
your work area is also selected. Select the text with your
mouse cursor, and press the right arrow to move the text to
your right. I recommend you press Shift + Right Arrow to
make the text move to your right even faster. Stop once
the text has gone of the movie area on the right:

[ the text
is now on the right side of the movie ]
-
Now, we are ready to animate the text between frame 1 and
frame 25. Select the keyframe on Frame 25. Notice that the
Flash MX text is on the left of the window. Flash's job is
to seamlessly make the text transition from the left side
of the drawing area to the right side of the drawing area.
-
Select all the frames in your timeline by clicking on
Frame 1 and dragging all the way to Frame 25. Make sure
that you are not dragging the actual keyframe toward Frame
25. Once you have selected all the frames, your timeline
will be blackened as seen in the following image:

[ the frames
in the timeline are now selected ]
-
The frames should be selected. Right click on any selected
frame and choose 'Create Motion Tween':

[ create
motion tween command ]
-
Your timeline will now be shaded a purple color. Click
anywhere on the timeline, and you will notice that your
text is moving from the left to the right.
You have just animated the text in Flash
MX. Save the file now. Go to File | Publish Preview | HTML.
You will see the animation scrolling from left to right
inside your browser. Wohoo!!
We are still not done with this tutorial.
We still have to add a background and use some layers. Click
the Next page link to progress through the tutorial.
|