 Creating
a Basic Flash MX Animation
Creating
a Basic Flash MX Animation
written by kirupa
chinnathambi
In this final page out of our three page
tutorial, we will look at using layers to create some
background shapes for the animation. Before you can add a
background design, we need to learn about layers.
Layers
Flash uses layers to organize various objects in an
animation. In fact, we have been using a layer all this
time. Look at your timeline. The text that says 'Layer 1'
signifies a layer.
We will be editing and adding another layer. The following
instructions explain how to do that:
-
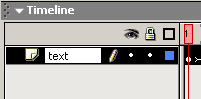
You should have noticed the text, Layer 1, in the
timeline. The text 'Layer 1' is just not descriptive
enough for what is actually contained on the layer: the
Flash MX text.
-
Double click on the Layer 1 text to the left of the
timeline. You will notice that the text is now selectable.
Enter the word "text" to replace Layer 1":
[ renaming
the layer to make it more descriptive ]
-
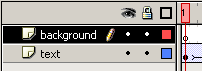
Now, let us add another layer to house the background.
Right click on the 'text'
layer and select Insert Layer. You will notice a layer
labeled "Layer 2" is displayed above your text layer.
Rename that layer background by double clicking on
the Layer 2 text. The left side of your timeline should
look like the following image:
[ another
layer has been added ]
-
Notice that the background is
above your text layer. Layers are like floors in a
building. The furniture in the top floor is above the
furniture in the bottom floor. Similarly, the contents of
the top layer will go above the contents in a bottom layer.
Because we want to create a background, the content in the
background layer should be displayed below the text layer.
Click on the background layer and drag it below the text
layer. Your timeline should look as follows:
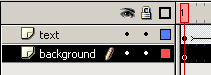
[ the
background layer has been moved down]
As mentioned previously, the
background layer has been moved below the text layer. If the
background layer was above the text layer, the text will be
hidden from view by the background (after you add one).
Adding a Background
Let's add a background to make the animation look cooler.
The following instructions will guide you in adding a
background design:
-
Select the first empty keyframe of the background
layer. You will notice that the empty keyframe is
selected. Everything you add to your animation will now be
on the background layer because you just selected it by
clicking the empty keyframe.
-
Select the Oval Tool (the circle) from the Tools panel.
You will notice that your properties window reflects the
circle properties such as line color, fill color, and
more.
-
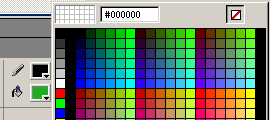
Click the color box for the line (Stroke) of the circle
from the Properties menu. Select the no color option from
the top-right of the menu. The no-color option is the box
with a red line through it:
[ the
no color option for the line]
-
After you select the no-color option for the outline of
the circle, click the fill icon on the Properties panel.
From the color menu that appears, select a white fill
color. Your Properties panel should look like the
following image:

[ the
property panel for the circle ]
-
Now, it is time for you to draw circles for the background
of your animation. Click anywhere in your movie and drag.
You will notice a circle in the size and shape of your
dragging is created. Release the mouse to set the circle
in place.
-
Repeat the above step (step v.) until you have numerous
randomly sized circles dotting your movie. The following
image shows how I arranged my circles:
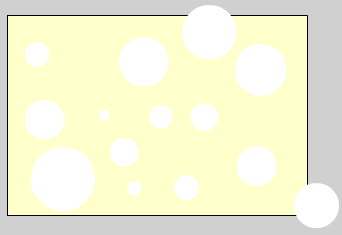
[ how I
arranged the circles in my animation ]
-
Save this file and go to File | Publish Preview | HTML.
You will now see your animation with the text 'Flash MX'
going over the circles.
You have just completed creating a basic
animation in Flash MX. By completing this tutorial, you were
introduced to various topics such as formatting text,
layers, animating (tweening), shapes, and more!
Like I always do, I have provided you with
the actual Flash file that I used to write this tutorial.
Click the link below to download the file and to see how my
animation looks:
Just a final word before we wrap up. What you've seen here is freshly baked content without added preservatives, artificial intelligence, ads, and algorithm-driven doodads. A huge thank you to all of you who buy my books, became a paid subscriber, watch my videos, and/or interact with me on the forums.
Your support keeps this site going! 😇

|


