|
by
kirupa | 16 November 2008
In the previous page, you learned how to take some
content and make it into a button. As you saw from my
example and what you had at the end of the previous page, a
button is more than just a container. It needs to provide
some feedback beyond the mouse cursor, and it needs to be
told what needs to be done.
Let's get started with creating the various button states so
that you get more visual feedback when you are interacting
with your button:
- In your stage right now, you have a button. What we
are going to do next is specify the look of the button
when you mouse over it and when you click on it. To do
that, you are going to have leave the root of your stage
and actually dive into your button itself.
To do
that, double-click on your button or right click on the
button and, from what may be the longest context menu
ever seen by humans, select Edit in Place:
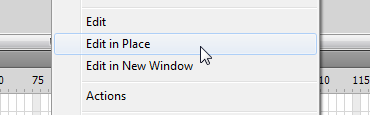
[ double click or right-click, Edit in Place to edit your
button ]
- You will now be inside the button. There are two
things that indicate that besides the transition that
you see when you select Edit in Place or double click on
the button. First, look at your navigation history at
the top:
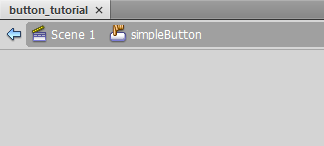
[ the navigation bar shows that you are no longer at the
root, Scene 1 ]
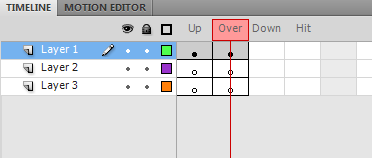
Second, look at your timeline.
It displays four distinct frames - Normal, Over, Down, and
Hit:
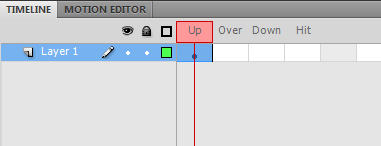
[ your timeline when editing a button is different ]
What you are going to do is add
content to each of the various frames to indicate when the
content will be visible.
- When you hover over your button, we want to do two
things. We want to display a colored rectangle that goes
behind both the image and the text. Second, we want to
display a underline below the text. Everything
associated with what happens when you hover over
your button goes in the Over frame.
First, go
ahead and add two new Layers below Layer 1. You can do
that by Right clicking on Layer 1 and selecting Insert
Layer from the menu that appears. Rearrange the layers
so that they appear below Layer 1 - the layer that
contains your image and text:
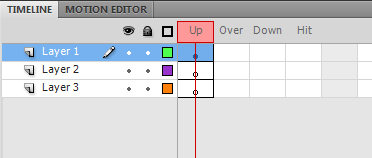
[ add new Layers below Layer 1 ]
- In order for you to define what happens in the Over
frame, you need to insert some keyframes. There are
several ways of doing that, but the easiest way is to
select all three frames in the Over column, right click,
and select Insert Keyframe. Your timeline will now
basically look as follows:
[ insert a new keyframe in the Over frame ]
The other approach is to right
click on each of the empty frames in the Over frame
individually and select Insert Keyframe. Either case, the
result will be the same.
- Next, select the keyframe in the Over frame in Layer
2 by clicking on it. Anything you draw now will appear
only in the Over stage and live in Layer 2. What you are
going to draw is a small line directly under your text
on the artboard using the Line tool.
You
are trying to simulate an underline, so try to make it
look similar to what you see in the following image:
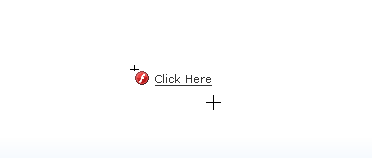
[ draw a straight line to simulate an underline ]
Because you drew your line in
the Over frame in Layer 2, the empty keyframe that once
lived there is now a solid keyframe:
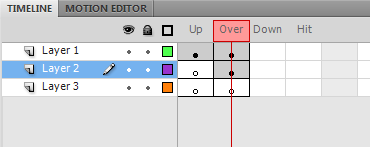
[ your empty keyframe is now filled in with your underline ]
- If you test your application now, you will notice
that when you hover over your button, the underline you
added appears. Likewise, when you hover out, the button
returns to normal.
Next, what we are going to do
is add the colored rectangle that appears behind the
image and text when you hover over your button. This is
actually as simple as it sounds. Select the empty
keyframe under Over in Layer 3. Draw a small colored
rectangle that is large enough to contain the image and
the text:
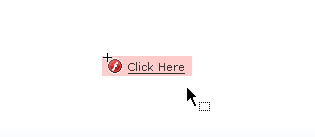
[ draw a rectangle large enough to contain your image and
text ]
To be able to easily draw the
rectangle behind the underline layer (Layer 2) and the
image/text layer (Layer 1), you may need to lock Layers 1
and 2 first to avoid the "snapping to other things" that
occurs when you are drawing.
Your timeline will
now look as follows with the empty keyframe under Layer 3's
Over frame filled in:

[ your timeline is getting more filled in now ]
- What we are going to do next is define how your
button looks when you click on it. That is defined in
the frames found in the Down column. So, select the
empty frames in the Down column, right-click, and select
Insert Keyframe. Once you have done this, your timeline
will now look as follows:
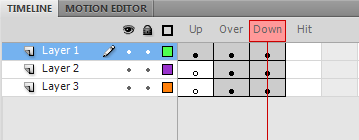
[ your Down column will now have keyframes ]
- When the button is clicked, we want the pink
rectangle to turn blue. To do that, make sure your
playhead is on the Down frame and select the rectangle.
Once the rectangle is selected, change the color from
Pink to a Light Blue:

[ change your rectangle's color to a light shade of blue ]
There are several ways in Flash
that you can change the color of something. The easiest way
is to change the color defined in the Fill property found in
the Properties panel when your rectangle is selected:
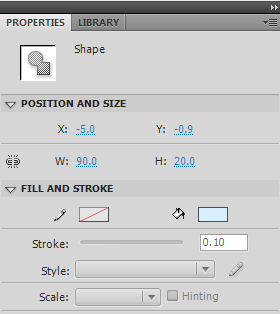
[ change the color easily from the Properties panel ]
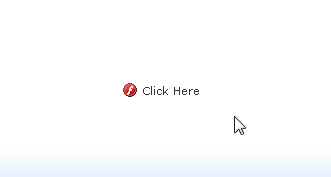
If you test your application now, everything should be
good to go. By default, your button looks as follows as
defined by the frames in the Normal column:
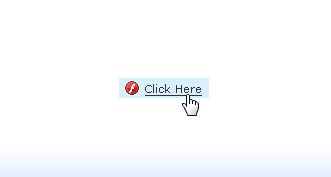
When you hover over your button, the text is
underlined with a pink rectangle appearing as defined by the
frames in the Over column:

Finally, when you click on the button, the frames from
the Down column are activated, and you see the pink
rectangle turn a slight blue:
Ok, great. You now have something that sort of looks and
behaviors like a button. It's time to go back to the root of
your stage and look at the next step of making a real
button. You can go back to the root by clicking on the Scene
1 text found in the navigation bar:

[ go back to the root by clicking on the Scene 1 link ]
Once you are back to the root, let's look at how
the button will interact with code on the
next page.
Onwards to the
next page!
|


