by
kirupa | 29 September 2005We now have a simple
animation, but it starts and ends abruptly. We will fix that in this page, and
since you have some practice with working with your timeline, I will proceed a
little faster in covering techniques:
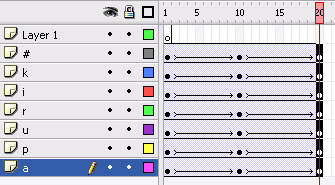
- In your timeline, insert a keyframe in Frame 20 for all of the letters.
You can do that by simply clicking on Frame 20, dragging your mouse down,
right clicking on the selected column of frames, and choosing "Insert
Keyframe".
After you have done that, you will notice that your newly inserted keyframes
are automatically a part of your motion tween:
[ your timeline after inserting a
keyframe on Frame 20 ]
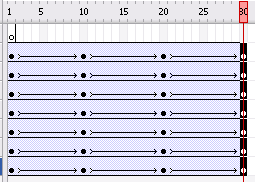
- I know this seems repetitive, but insert another layer of
keyframes for all of the letters in Frame 30. Here is why this is being
done. The first ten frames will fade your letters in, the second ten frames
will display your letters, and the third section of ten frames will fade
your letters out.
Your timeline after having added the third layer of keyframes should look
like the following image:
[ how your timeline should look now ]
- So...let's add more keyframes. No, I'm just joking! We are
done adding keyframes. Make sure your timeline slider is on Frame 30. If you
look at your stage, you will see all of your letters neatly arranged.
Similar to what you did for Frame 1, move all of the letters around your
stage. Here is how my letters look on Frame 30:

[ letter arrangement on Frame 30 ]
- Let's preview our animation so far. Instead of previewing the
animation in a browser, let's preview it from within Flash. Click anywhere
in Frame 1 and press Enter, and you will see how your animation looks
from within Flash itself. Looks pretty neat, doesn't it?
- There is still some further refinements we can do. A fade-in and
fade-out similar to my animation you saw on the first page of this tutorial
would be really nice.
Click anywhere on Frame 1. Select all of your letters on the stage. Once you
have selected all of your letters, look down at your Properties panel. Click
on the drop-down menu labeled Color: and select the item for Alpha:
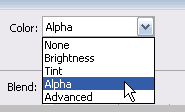
[ select the item for Alpha from the
Color drop-down menu ]
- Once you have selected the Alpha menu-item, you should see
another text-field appear on the right with a number. Enter a value of 0
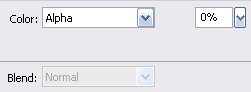
[ enter a value of 0 in the text field
to the right of the Alpha selection ]
- Let us repeat the above few steps for Frame 30. Click on Frame
30 in your timeline, select all of the letters on your stage, change the
value of Alpha from the Properties Panel to 0. This is just what you did to
the letters on Frame 1, with the only difference being you are on Frame 30
now.
- Let's preview our animation again. Instead of testing in our browser or
from within our timeline, let's test in the Flash player. Press Ctrl + Enter
or go to Control | Test Movie.
The Flash Player appears with a preview of your animation. Notice that our
text fades in and fades out thanks to the Alpha modifications we made from
this page.
The last thing we need to do is add a drop shadow to our letters. Let's do
that on the
next page.
Onwards to the
next page!
|


