by
Daniel Bodinof aka Danielthelion | 10 March 2007
In the
previous page you learned about slow-in/slow-out and
arcs. In this page, though, I'll explain my favorite
principle - anticipation.
I freaking love this principle. If you spend the time to
really grasp this, and truly learn how to use it, you will
be amazed at how much life it can give your animation.
Anticipation is about psychology really. What is the person
thinking that's carrying out the action? How would someone
ACTUALLY use a mallet to whack some strange button in the
ground? How would they lift it? Which part would move first?
I like studying Japanese, and one of the rules, when
writing the intricate kanji characters, is that: "to go up,
you must first go down, to do down, you must first go up."
This is really what anticipation is about. It's the
precursor to the main action. It's like a visual hint that
you give the viewer to let them know whets about to happen.
I could speak for volumes on this topic, but I think it will
be better for you to look at how we use it with our example,
and then experiment for yourselves. One last note on
anticipation, whenever you do it, EXAGGERATE it! If you
don't, it usually looks like a mistake.
Ok, so here is what our animation looks like, with arcs,
slow in slow out, and anticipation:
Nice right? Ok, now what exactly, is going on here? Well,
basically, we're "winding up" for our main action. I spent a
few drawings raising our mallet back, slowing in of course,
in ANTICIPATION of our main action. See how the motion works
to get you ready for the big WHACK of the mallet? Once you
reach your final drawing of anticipation, I usually like to
hold it for about 3 drawings before moving into the main
action. This is a personal preference however, and I
encourage you to find out which works best for you in your
unique animation situation.
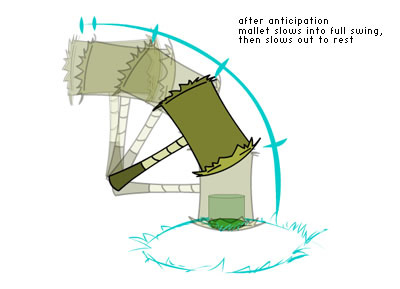
In closing, let's look briefly at the onionskin of our
final project:


Once again, I want to explain the ideas "behind" the
animation. Please don't read this article as something
trying to get all your drawings to look like mine. Use your
own drawings and ideas, and apply the principles that I went
over today. Have fun!
Hope
you enjoyed the tutorial. If you have any questions, feel
free to email me at
[email protected] or post on the
forums. If
there's demand, I'd be happy to continue the series with a
new principle each lesson.
Thank
you.
|