by
luksy | 4 November 2005You did most of the
hard work on the last page, so you are
almost done!
Testing (RAM Preview)
- Go to the beginning of the animation by pressing the Home button on your keyboard.
- Set the preview quality to Half.
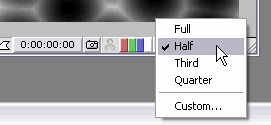
[ setting the quality to half ]
- You should see two markers at the top of the timeline. In my case, one is at the beginning and the other one is at the end. Just like it should be. If yours isn't, drag the left marker to the beginning (far left) and the right slider to the end (far right).

[ slider and marker positions ]
- This should be enough for previewing animation. Last check that you're on the beginning (press home), right click on the timeline Preview
| RAM Preview (Num 0).
Your animation should eventually start playing and looping. Leave it playing
for some while and try to see if it pops/clicks/jumps when it starts playing from the beginning. If it's not...congratulations! You have a perfect loop! Now to put it properly in Flash...
Exporting the Whole Thing
-
Go to File | Export | Macromedia Flash (SWF).
-
Choose your destination path and the filename.
-
For the quality, you will have to decide that for yourself. Export in different qualities, check the
file sizes of the swiffs and choose what suits you best. For the sake of the tutorial, leave it to 5.
-
Choose Rasterize (where it says Ignore / if it says Ignore).
-
In the Options, check the Loop Continuously in the checkbox.
-
Wait for the whole thing to get rendered and open up your all time
favourite program - Flash

Preparing the Loop in Flash
-
Create a new document, set it's properties (Ctrl + J) to 30fps, go to Insert
| New Symbol (CTRL + F8), name it a 'Bubble Video Loop' or something, check
the option for Movie Clip and press OK!
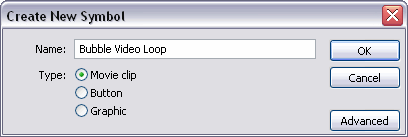
[ the create new symbol dialog box ]
-
You will be automatically inserted into this new symbol. Now go to File>Import>Import to Stage...
-
Import the swiff (swf) file of the loop you exported from After Effects.
-
90 new frames will be inserted into your symbol. Each frame contains an image file (check library for more info). Exit the symbol by click on the Scene 1 button at the top left corner.
-
Open up the Library by going to Window>Library (Ctrl+l or F11) and drag the symbol onto the stage.
-
Test your movie by going to Control>Test Movie (Ctrl+Enter).
Now you have your own video loop! BUT - if you have a good eye, you'll notice that the loop stops for 0.1 second at one point. That point is between the end and the beginning.
-
Go into the symbol again (double click it) and click on frame 1. Now click on frame 90. Notice anything? It's the same thing that plays twice in a row!
-
Right click on the last frame (90) and click Remove Frames.
Now, you have a perfect loop! Play with it! Go out with it! Insert it into a
new empty movie clip and tween its tint color to make it colorful (which you can
also do in After Effects but maybe more on that some other time)! Mask it into
different shapes! The only limit is your imagination! But don't forget to keep an eye for the
file size. These things can get big. And I mean BIG.
I have provided the source file for the video you have been working on. You
can download it by clicking on the Download AEP link below:

Ok, we're done here. Thanks for checking the tutorial and hopefully you've done it all properly, if not, post your problem in the
kirupaForums. See you in some other tutorial!
|


