Many of you have seen sites that
react with interesting animations, etc. when you click on an
element in Flash. While it may look like it was a very
clever use of Go To And Play, it is more than likely an
advanced function called the "Tell Target".
When many of you hear of the
phrase Tell Target, you may remember the examples that
macromedia had that displayed a number or a set of words
that pop up when you click on a button. Unlike other
tutorial sites that make it seem complicated, the Tell
Target function really isn't so. Check out my example below,
you will be able to make something similar to this below at
the end of this lesson!! Click on the Animate link below:
Let's begin. First, to make
this process easier, please download my partial source code.
Don't worry, it doesn't contain any of the main code...I'll
give you the opportunity to do that by following my
instructions below. Click Here to
Download the Partial Source Code. Once
you have opened that file in Flash, let's start get started
on conquering the mystical "Tell Target".
Here's
How:
Once you have
opened the partial code in Flash, notice that my entire
animation is composed entirely in a group of layers using
ONE frame. So, I used another Movie Clip to contain all my
main data. That's the best part of the Tell Target
command; it doesn't require an "ugly" set of keyframes and
layers on the main timeline. If you are wondering how my
animation fits into one movie, go to Window > Library
(Ctrl + L) and right click on the movie titled "movieclip".
Choose Edit. Now, as you can see, the entire sequence of
frames is placed on there. Now, your goal is to call the
Movie "movieclip" from the main scene. Press the Scene 1
tab on the top left to go back to the main timeline.
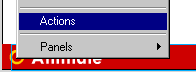
Let's add the
code! Right click on the word "Animate" in the movie and
choose Actions. See image below:
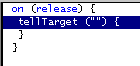
Once
you are at the Object Actions window, click on the Tell
Target command under Basic Functions or drag and drop the
word from the left hand pane. Once you have done that, you
should see something like the image below:
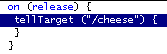
Click
in the code line that says "tellTarget
("") {" You should see an input box that asks for
the "Target". Type in: /cheese (That's the name I have
given the movie "movieclip" from Step 1 using the Movie
Instance Editor. For more information on that, go to the
Naming Movies tutorial")
Sorry for sidetracking; I wanted to make sure that you
understood why you were typing in what you were typing.
Once you have typed that, your action box should look
similar to the image below:
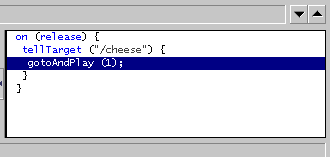
Now that you have
"Targeted" the movie you'd like to add your functions to,
it's time to simply add the Good Old "Go To" Action. Click
or Drag the "Go To" action to the main code editor. The
the default values that you should see are accurate, so
you don't have to make any modifications. Once you have
done that, the entering of code is complete. The final
code should look like that of the image below:
Now, if you preview the
animation and click on the "Animate" button, the cheese
should start rolling around in the background. That wasn't
that complicated now was it? The Tell Target command is a
more efficient way of controlling how an animation behaves.
You may have read one of my previous tutorials on adding a
movie action inside a button state. While that would work
similarly for a single movie, you cannot edit where in the
movie to start OR how to play the animation when the mouse
rolls of the button. That's why the Tell Target command,
while complicated to comprehend at first, will help save a
lot of time and take you one step closer to creating your
Perfect Animation. For more information on the Tell Target
command and why it functions the way it does, please visit
my More Tell Target Page.
I hope the information helped.
If you have any questions or comments, please don't hesitate to post them on the
kirupa.com Forums. Just post your question and I, or our friendly
forum helpers, will help answer it.
The following is a list of related tutorial and help resources that you may find
useful: